- Get link
- X
- Other Apps
10 Quick and Healthy Desserts You Can Make in Under 15 Minutes
Satisfy your sweet tooth without the guilt! Here are 10 quick and healthy dessert recipes that come together in under 15 minutes. Perfect for those moments when you crave something tasty but don’t have the time for elaborate baking. Let’s whip up some delicious treats that are as easy to make as they are enjoyable to eat!
Decadent Chocolate Avocado Mousse In Minutes

If you’re craving something rich and creamy but want to keep it healthy, this chocolate avocado mousse is a perfect choice. It’s quick to whip up and uses simple ingredients you probably already have at home. The image shows beautifully presented mousse topped with fresh berries and mint, making it not only delicious but also visually appealing.
This dessert is a fantastic way to enjoy chocolate without the guilt. The avocado gives it a smooth texture while adding healthy fats. Plus, the cocoa powder brings in that chocolatey goodness we all love. You can serve it in individual cups for a fancy touch or share it in a bowl.
Let’s get to the recipe so you can enjoy this delightful treat in no time!
Ingredients
- 2 ripe avocados
- 1/2 cup unsweetened cocoa powder
- 1/4 cup maple syrup or honey
- 1/4 cup almond milk (or any milk of choice)
- 1 teaspoon vanilla extract
- Pinch of salt
- Fresh berries for topping (raspberries, blueberries, etc.)
- Mint leaves for garnish
Instructions
- Prepare the Avocados: Cut the avocados in half, remove the pit, and scoop the flesh into a blender or food processor.
- Add Ingredients: To the blender, add cocoa powder, maple syrup (or honey), almond milk, vanilla extract, and a pinch of salt.
- Blend Until Smooth: Blend all the ingredients until you achieve a creamy and smooth consistency. You may need to scrape down the sides a couple of times.
- Taste and Adjust: Taste the mousse and adjust sweetness if needed by adding more maple syrup or honey.
- Serve: Spoon the mousse into serving cups. Top with fresh berries and mint leaves for a pop of color and freshness.
- Chill (Optional): You can serve it immediately or chill it in the fridge for about 30 minutes for a cooler treat.
Refreshing Berry Yogurt Parfait

Berry yogurt parfaits are a delightful treat that’s both healthy and quick to make. This colorful dessert showcases layers of creamy yogurt, fresh berries, and crunchy granola. The vibrant colors of strawberries and blueberries make it visually appealing, while the combination of flavors is simply delicious.
To prepare this parfait, start by choosing your favorite berries. Strawberries, blueberries, and raspberries work wonderfully together. Layer them with yogurt and granola in a glass for a beautiful presentation. This dessert is perfect for breakfast or a sweet snack.
Not only is this parfait tasty, but it’s also packed with nutrients. Yogurt provides protein and probiotics, while berries are rich in antioxidants. Granola adds a satisfying crunch, making each bite enjoyable.
Now, let’s get to the recipe so you can whip up this refreshing berry yogurt parfait!
Ingredients
- 2 cups Greek yogurt
- 1 cup strawberries, sliced
- 1 cup blueberries
- 1 cup granola
- 2 tablespoons honey (optional)
Instructions
- In a glass or bowl, start with a layer of Greek yogurt at the bottom.
- Add a layer of sliced strawberries, followed by a layer of blueberries.
- Sprinkle a layer of granola on top of the berries.
- Repeat the layers until the glass is full, finishing with a layer of yogurt and a few berries on top.
- If desired, drizzle honey over the top for added sweetness.
- Serve immediately and enjoy your refreshing berry yogurt parfait!
Quick And Easy Chocolate-Covered Bananas
Chocolate-covered bananas are a delightful treat that combines the sweetness of ripe bananas with rich chocolate. They are not only delicious but also super easy to make. You can whip them up in just a few minutes, making them perfect for a quick dessert or snack.
Start by slicing your bananas into bite-sized pieces. Then, melt some dark chocolate in a microwave or on the stove. Dip each banana slice into the melted chocolate, ensuring it’s fully coated. For an extra touch, sprinkle some crushed nuts or coconut flakes on top before the chocolate sets. You can even drizzle some white chocolate over them for a beautiful finish!
These treats are not only tasty but also provide a good source of potassium and energy. They’re perfect for kids and adults alike, making them a hit at parties or family gatherings. Plus, you can customize them with your favorite toppings!
Ingredients
- 2 ripe bananas
- 1 cup dark chocolate chips
- 1 tablespoon coconut oil (optional)
- Crushed nuts or coconut flakes for topping
- White chocolate for drizzling (optional)
Instructions
- Slice the bananas into bite-sized pieces and place them on a baking sheet lined with parchment paper.
- Melt the dark chocolate chips and coconut oil together in a microwave-safe bowl, heating in 30-second intervals until smooth.
- Dip each banana slice into the melted chocolate, ensuring it’s fully coated.
- Place the chocolate-covered bananas back on the baking sheet and sprinkle with crushed nuts or coconut flakes.
- If desired, melt some white chocolate and drizzle it over the top for decoration.
- Freeze for about 10 minutes or until the chocolate is set. Enjoy your quick and easy chocolate-covered bananas!
GET 21 QUICK & EASY LOW-CALORIE MEAL PLANS
Simple No-Bake Strawberry Cheesecake Cups
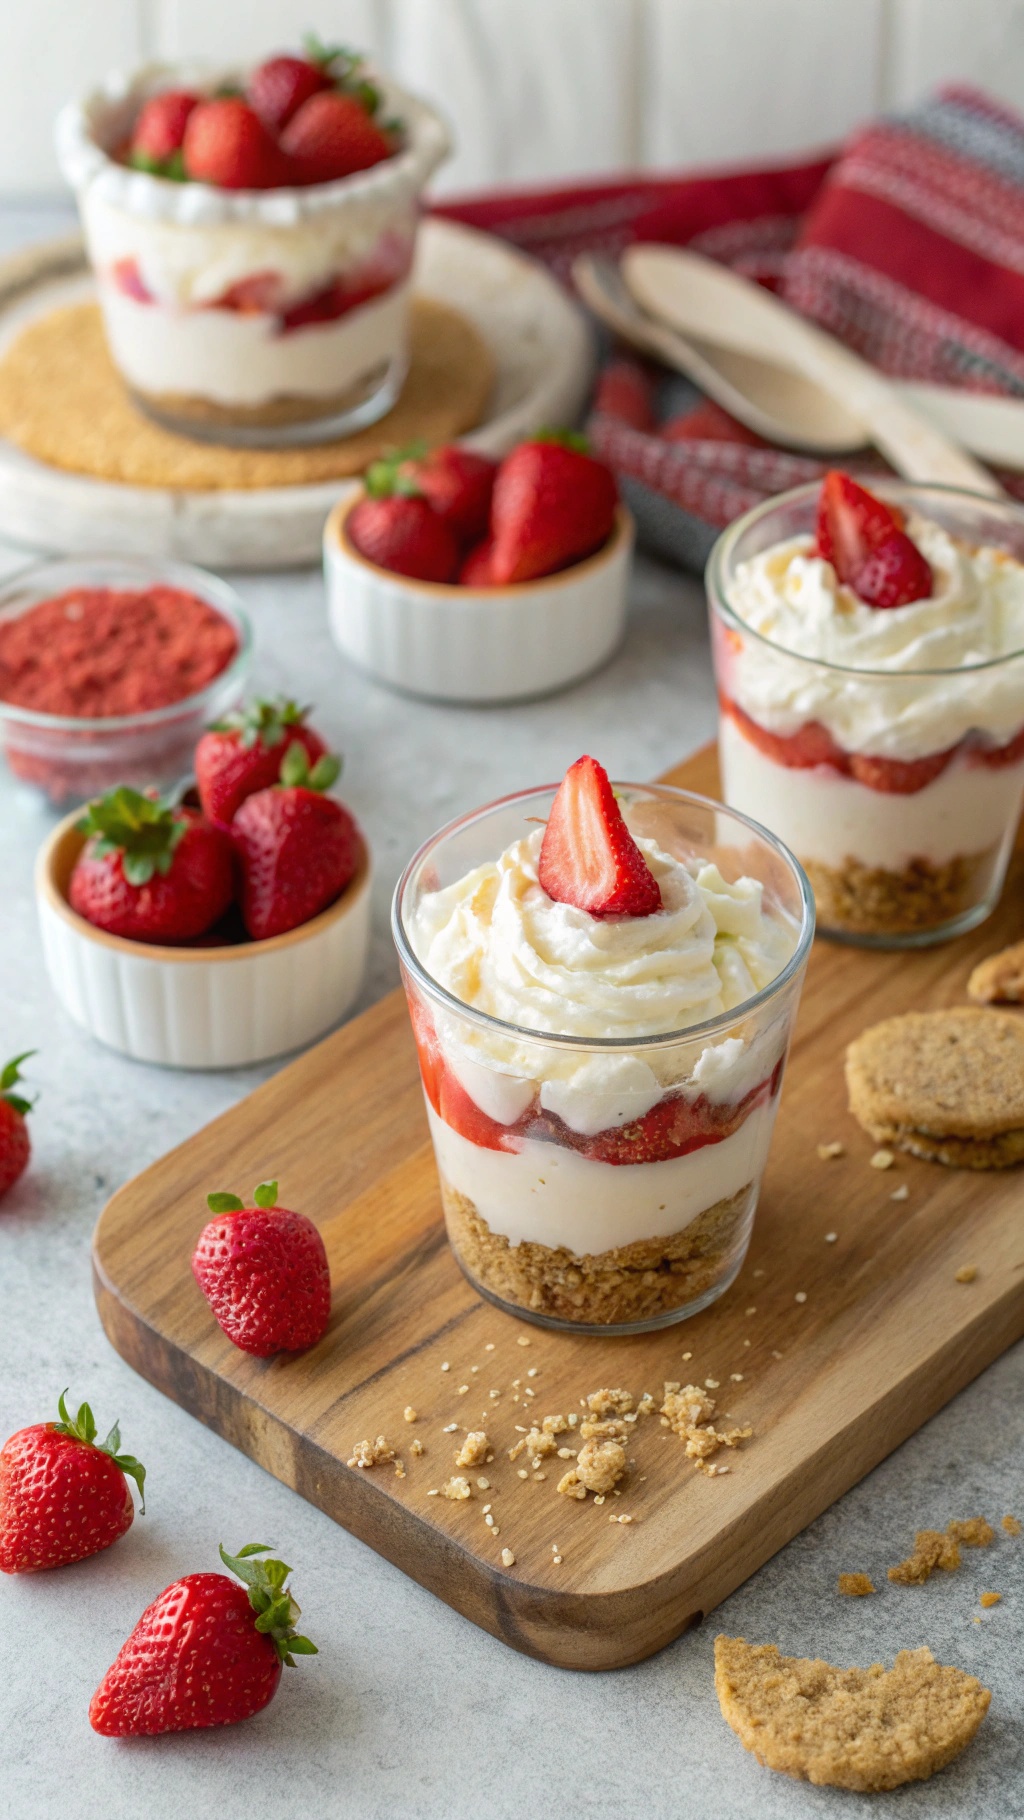
No-bake desserts are a lifesaver when you want something sweet without spending too much time in the kitchen. These Simple No-Bake Strawberry Cheesecake Cups are perfect for satisfying your sweet tooth in under 15 minutes. They’re light, creamy, and bursting with fresh strawberry flavor!
The image shows delightful layers of cheesecake filling, fresh strawberries, and a crunchy graham cracker base. Each cup is topped with whipped cream and a juicy strawberry, making them as pretty as they are tasty. You can whip these up for a quick dessert after dinner or even for a picnic treat!
Let’s get into how to make these delicious cups!
Ingredients
- 1 cup graham cracker crumbs
- 4 tablespoons unsalted butter, melted
- 8 oz cream cheese, softened
- 1/4 cup powdered sugar
- 1 teaspoon vanilla extract
- 1 cup whipped cream
- 2 cups fresh strawberries, sliced
Instructions
- Prepare the Base: In a bowl, mix the graham cracker crumbs with melted butter until well combined. Spoon the mixture into the bottom of serving cups, pressing down gently to form a crust.
- Make the Cheesecake Filling: In another bowl, beat the softened cream cheese with powdered sugar and vanilla extract until smooth. Gently fold in the whipped cream until fully combined.
- Layer the Cups: Spoon a layer of the cheesecake filling over the graham cracker crust. Add a layer of sliced strawberries on top, then repeat the layers until the cups are filled.
- Top and Serve: Finish with a dollop of whipped cream and a fresh strawberry on top. Chill for a few minutes if desired, then enjoy!
Fruity Banana Oatmeal Cookies Ready In A Flash

These fruity banana oatmeal cookies are a quick and healthy treat that anyone can whip up in no time. With just a few simple ingredients, you can enjoy a delicious snack that satisfies your sweet tooth without the guilt. The image showcases golden-brown cookies resting on a cooling rack, with fresh bananas and oats in the background, hinting at the wholesome goodness packed inside each bite.
Bananas add natural sweetness and moisture, while oats provide a hearty texture. These cookies are not only easy to make, but they are also perfect for breakfast or a midday snack. Plus, they can be customized with your favorite mix-ins like chocolate chips or nuts!
Ingredients
- 2 ripe bananas, mashed
- 1 cup rolled oats
- 1/4 cup peanut butter or almond butter
- 1/4 cup honey or maple syrup
- 1/2 teaspoon vanilla extract
- 1/2 teaspoon baking powder
- 1/4 teaspoon salt
- Optional: chocolate chips or nuts
Instructions
- Preheat your oven to 350°F (175°C) and line a baking sheet with parchment paper.
- In a mixing bowl, combine the mashed bananas, oats, peanut butter, honey, vanilla extract, baking powder, and salt. Stir until well mixed.
- If you’re adding chocolate chips or nuts, fold them into the mixture now.
- Using a spoon, drop dollops of the cookie mixture onto the prepared baking sheet, spacing them about 2 inches apart.
- Bake for 10-12 minutes or until the edges are lightly golden.
- Let the cookies cool on the baking sheet for a few minutes before transferring them to a wire rack to cool completely.
Enjoy these tasty cookies warm or store them in an airtight container for later. They’re perfect for a quick snack or a healthy dessert!
Tasty Apple Nachos With A Twist

Apple nachos are a fun and healthy dessert that everyone can enjoy. This version adds a twist to the classic recipe by incorporating peanut butter, chocolate chips, and granola. It’s quick to prepare and perfect for satisfying a sweet tooth without the guilt.
Start by slicing fresh apples into thin rounds. You can use a mix of red and green apples for a colorful presentation. Arrange the apple slices on a plate, creating a beautiful fan shape. Drizzle creamy peanut butter over the top for a rich flavor. Then, sprinkle mini chocolate chips and crunchy granola for added texture and sweetness.
This dessert is not only delicious but also packed with nutrients. Apples provide fiber and vitamins, while peanut butter adds protein. It’s a great option for a quick snack or a light dessert after dinner.
Ingredients
- 2 medium apples (any variety)
- 1/4 cup peanut butter
- 1/4 cup mini chocolate chips
- 1/4 cup granola
- 1 tablespoon honey (optional)
Instructions
- Wash and slice the apples into thin rounds.
- Arrange the apple slices on a plate in a circular pattern.
- Drizzle peanut butter over the apple slices.
- Sprinkle mini chocolate chips and granola on top.
- If desired, drizzle honey for extra sweetness.
- Serve immediately and enjoy your tasty apple nachos!
GET 8-WEEKS OF WORKOUTS TO LOSE INCHES
Fruit And Yogurt Smoothie Bowl In A Jiffy
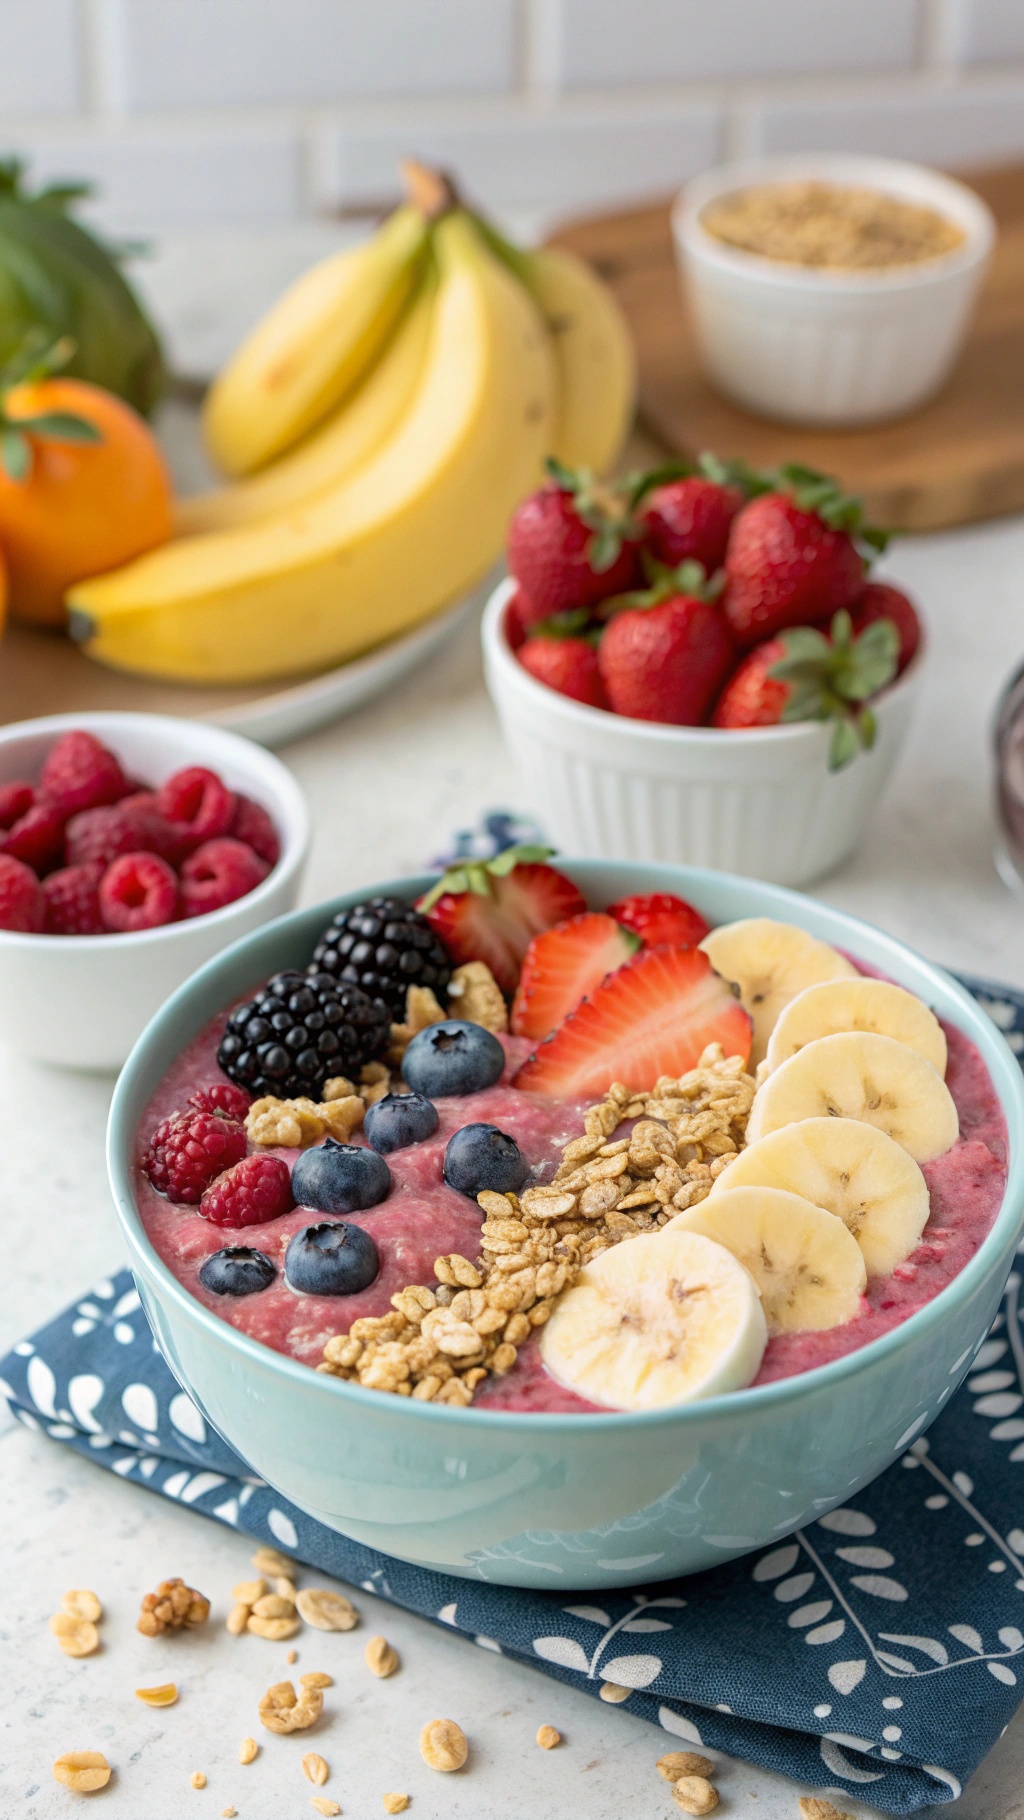
Looking for a quick and healthy dessert? A fruit and yogurt smoothie bowl is a fantastic choice! This colorful bowl is not only visually appealing but also packed with nutrients. You can whip it up in under 15 minutes, making it perfect for a busy day.
The base is typically made from yogurt blended with your favorite fruits. In the image, you can see a vibrant mix of strawberries, blueberries, blackberries, and bananas. These fruits add natural sweetness and a variety of flavors. Topping it off with granola gives it a nice crunch, while the yogurt provides creaminess.
This smoothie bowl is versatile. You can use any fruits you have on hand. If you prefer a different yogurt, feel free to switch it up! This dessert is great for breakfast, a snack, or a light treat after dinner.
Ingredients
- 1 cup plain yogurt (Greek or regular)
- 1 banana
- 1/2 cup strawberries
- 1/2 cup blueberries
- 1/2 cup blackberries
- 1/2 cup granola
- 1 tablespoon honey (optional)
Instructions
- Blend the yogurt and banana in a blender until smooth.
- Pour the mixture into a bowl.
- Top with sliced strawberries, blueberries, blackberries, and granola.
- Drizzle honey on top if you like it sweeter.
- Enjoy immediately!
Instant Peanut Butter Banana Smoothie
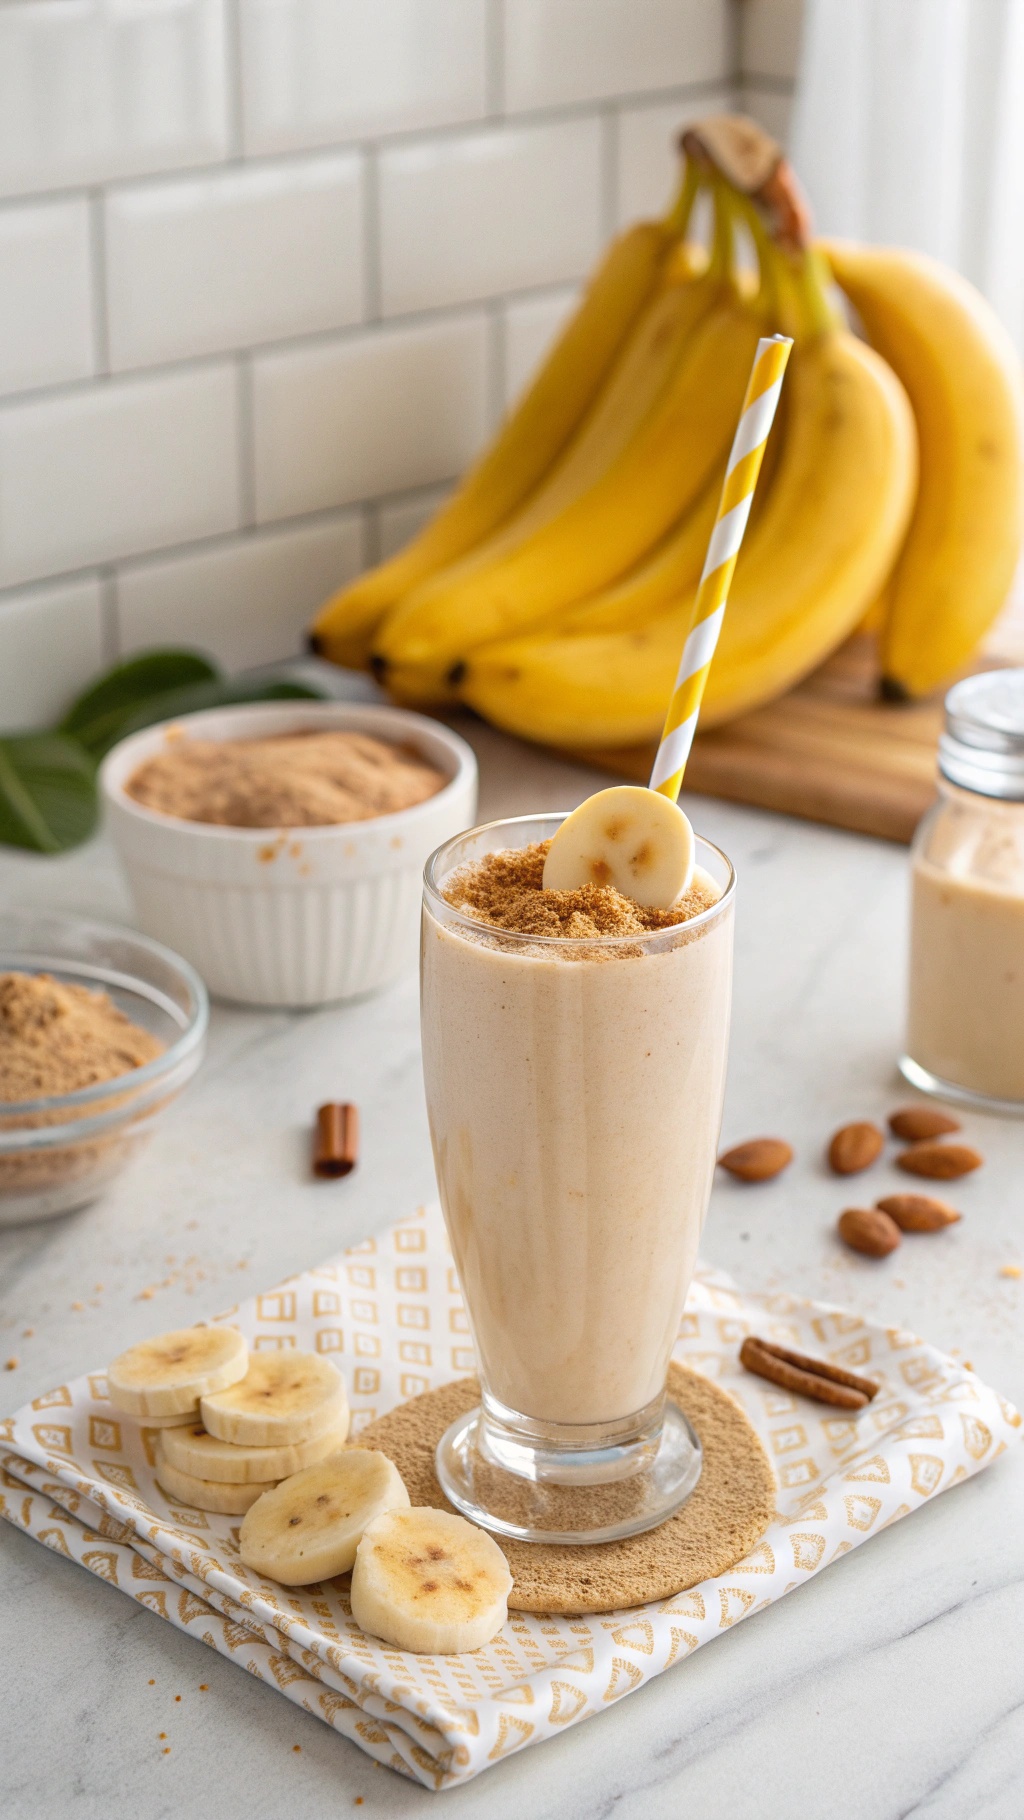
This Instant Peanut Butter Banana Smoothie is a quick and tasty treat that you can whip up in no time. The combination of creamy peanut butter and ripe bananas creates a rich flavor that’s hard to resist. Plus, it’s packed with nutrients, making it a great choice for a healthy dessert or snack.
The image shows a tall glass filled with a smooth, light-colored smoothie topped with a sprinkle of crushed nuts and a banana slice. In the background, you can see fresh bananas and bowls of ingredients, hinting at the deliciousness to come. The vibrant colors and inviting presentation make this smoothie look as good as it tastes!
To make this smoothie, you’ll need just a few simple ingredients. It’s perfect for busy days when you want something sweet without spending a lot of time in the kitchen. Let’s get started!
Ingredients
- 1 ripe banana
- 1 tablespoon peanut butter
- 1 cup milk (dairy or non-dairy)
- 1/2 cup Greek yogurt
- 1 tablespoon honey (optional)
- Ice cubes (optional)
Instructions
- Peel the banana and break it into chunks.
- In a blender, combine the banana, peanut butter, milk, Greek yogurt, and honey if you’re using it.
- Add ice cubes for a chilled smoothie, if desired.
- Blend until smooth and creamy.
- Pour into a glass and top with a sprinkle of crushed nuts or a banana slice for garnish.
- Enjoy your delicious and healthy smoothie!
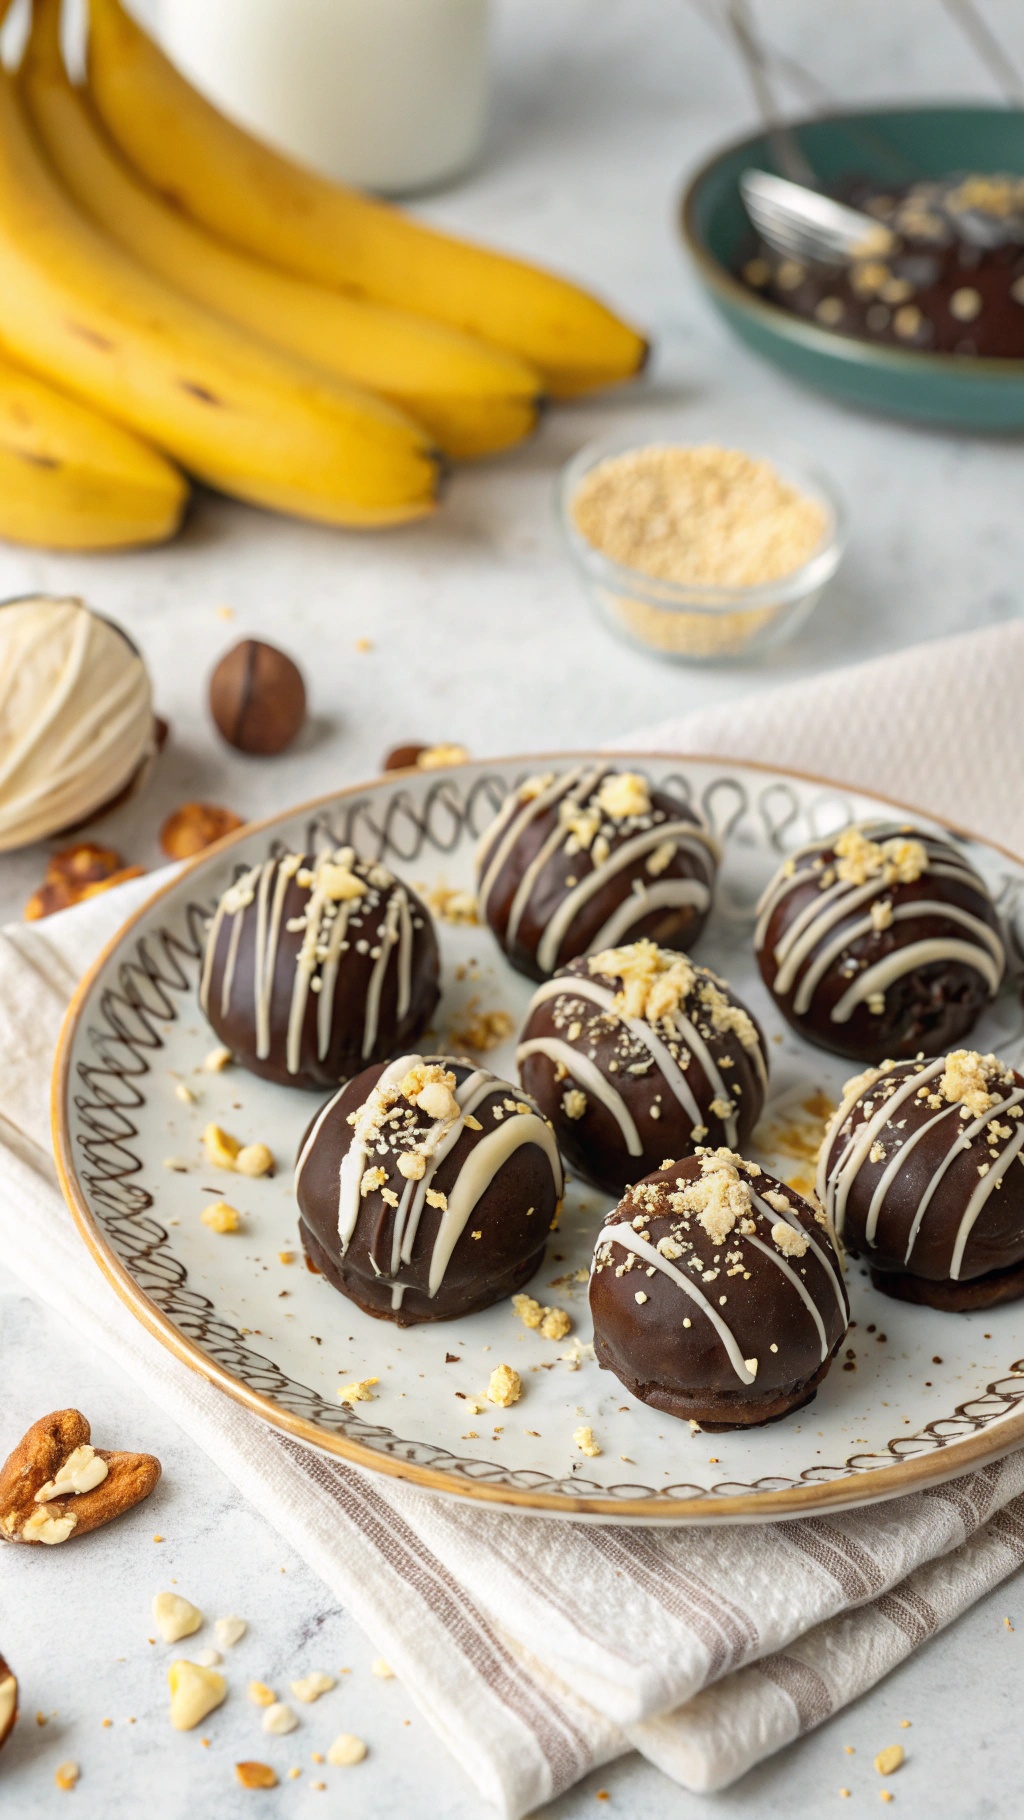
Effortless Nutty Date Truffles
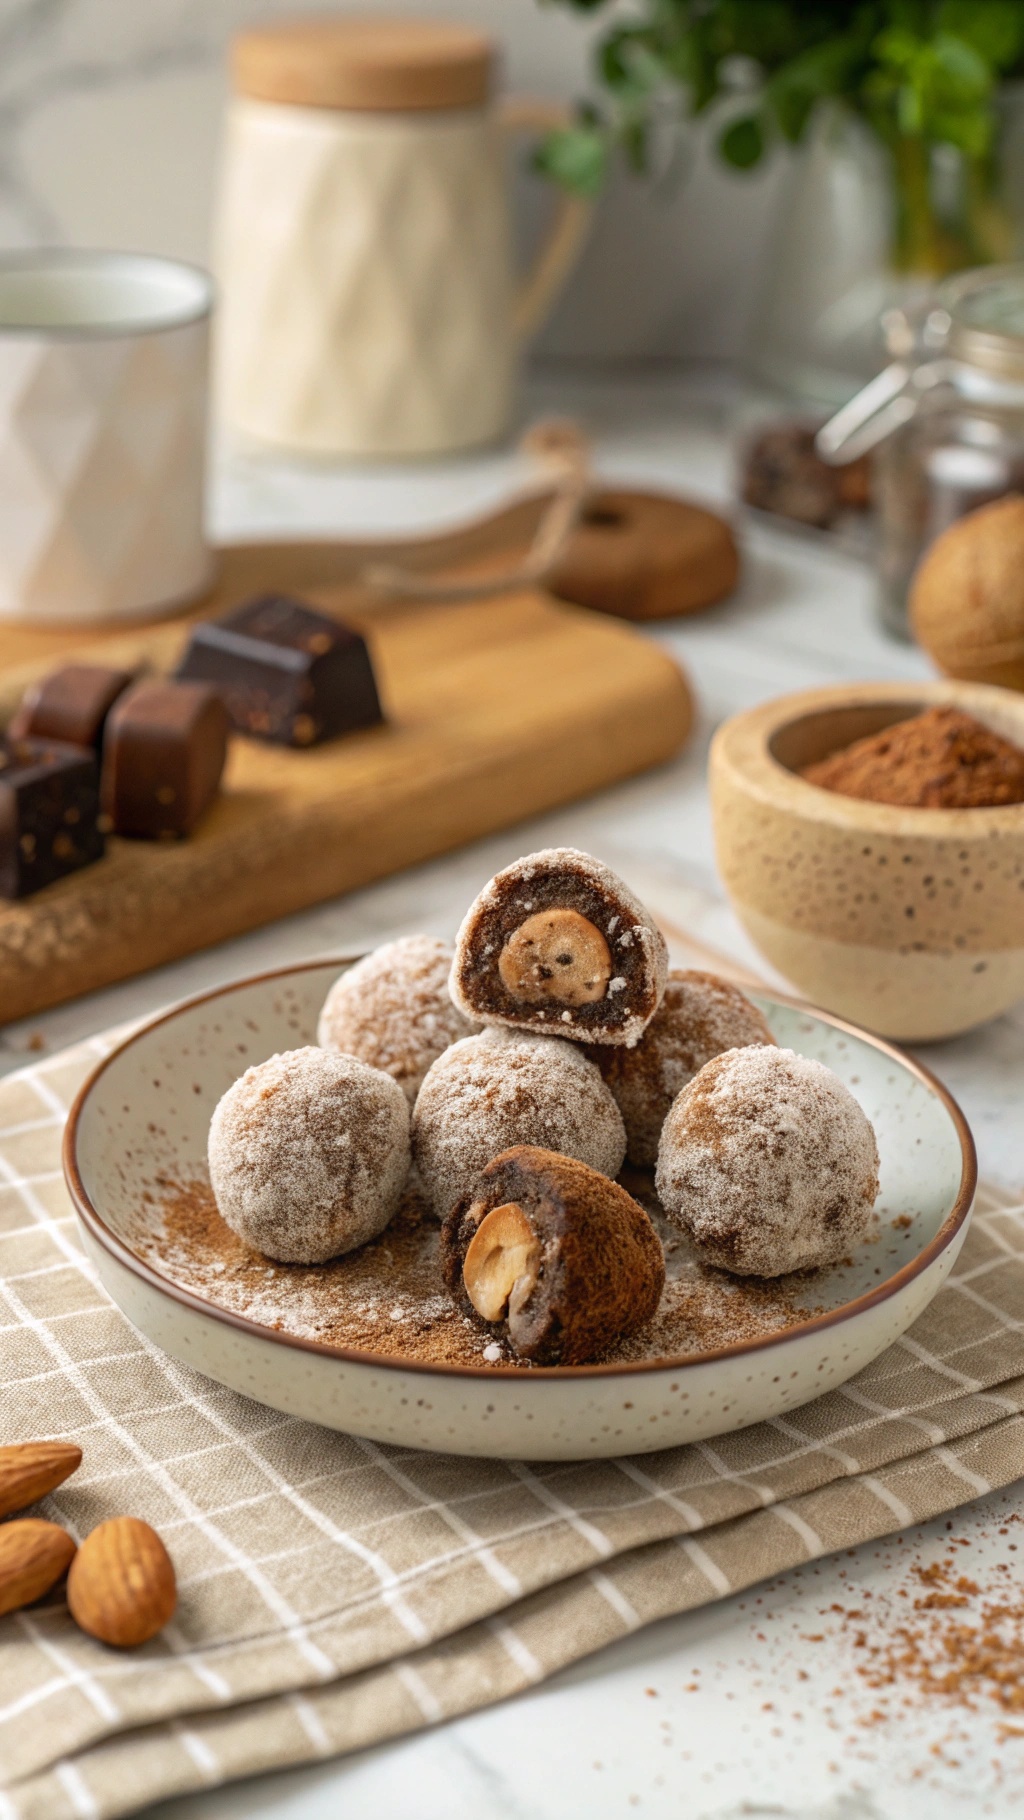
Nutty date truffles are a quick and healthy dessert option that satisfies your sweet tooth without the guilt. These little bites are packed with natural sweetness from dates and a delightful crunch from nuts. They are perfect for a snack or a post-meal treat.
In the image, you can see a beautiful plate of these truffles, dusted with a light coating of cocoa powder. The truffles are round and inviting, with one cut in half to reveal a whole nut inside. The background features a cozy kitchen setting, complete with a cup and some chocolate pieces, creating a warm and inviting atmosphere.
Making these truffles is super easy. You just blend the ingredients, roll them into balls, and they’re ready to enjoy. You can customize them with your favorite nuts or add a sprinkle of sea salt for an extra kick.
Ingredients
- 1 cup pitted dates
- 1 cup mixed nuts (such as almonds, walnuts, or pecans)
- 1 tablespoon cocoa powder (optional)
- 1/2 teaspoon vanilla extract
- Pinch of salt
- Desiccated coconut or chopped nuts for rolling (optional)
Instructions
- Prepare the Ingredients: If your dates are not soft, soak them in warm water for about 10 minutes, then drain.
- Blend the Mixture: In a food processor, combine the pitted dates, mixed nuts, cocoa powder, vanilla extract, and salt. Blend until the mixture is sticky and well combined.
- Form the Truffles: With damp hands, take small portions of the mixture and roll them into balls, about 1 inch in diameter.
- Coat the Truffles: If desired, roll the truffles in desiccated coconut or chopped nuts for added texture.
- Chill and Serve: Place the truffles in the refrigerator for about 30 minutes to firm up before serving. Enjoy as a healthy snack or dessert!
Lightning-Fast Chocolate Chip Mug Brownie
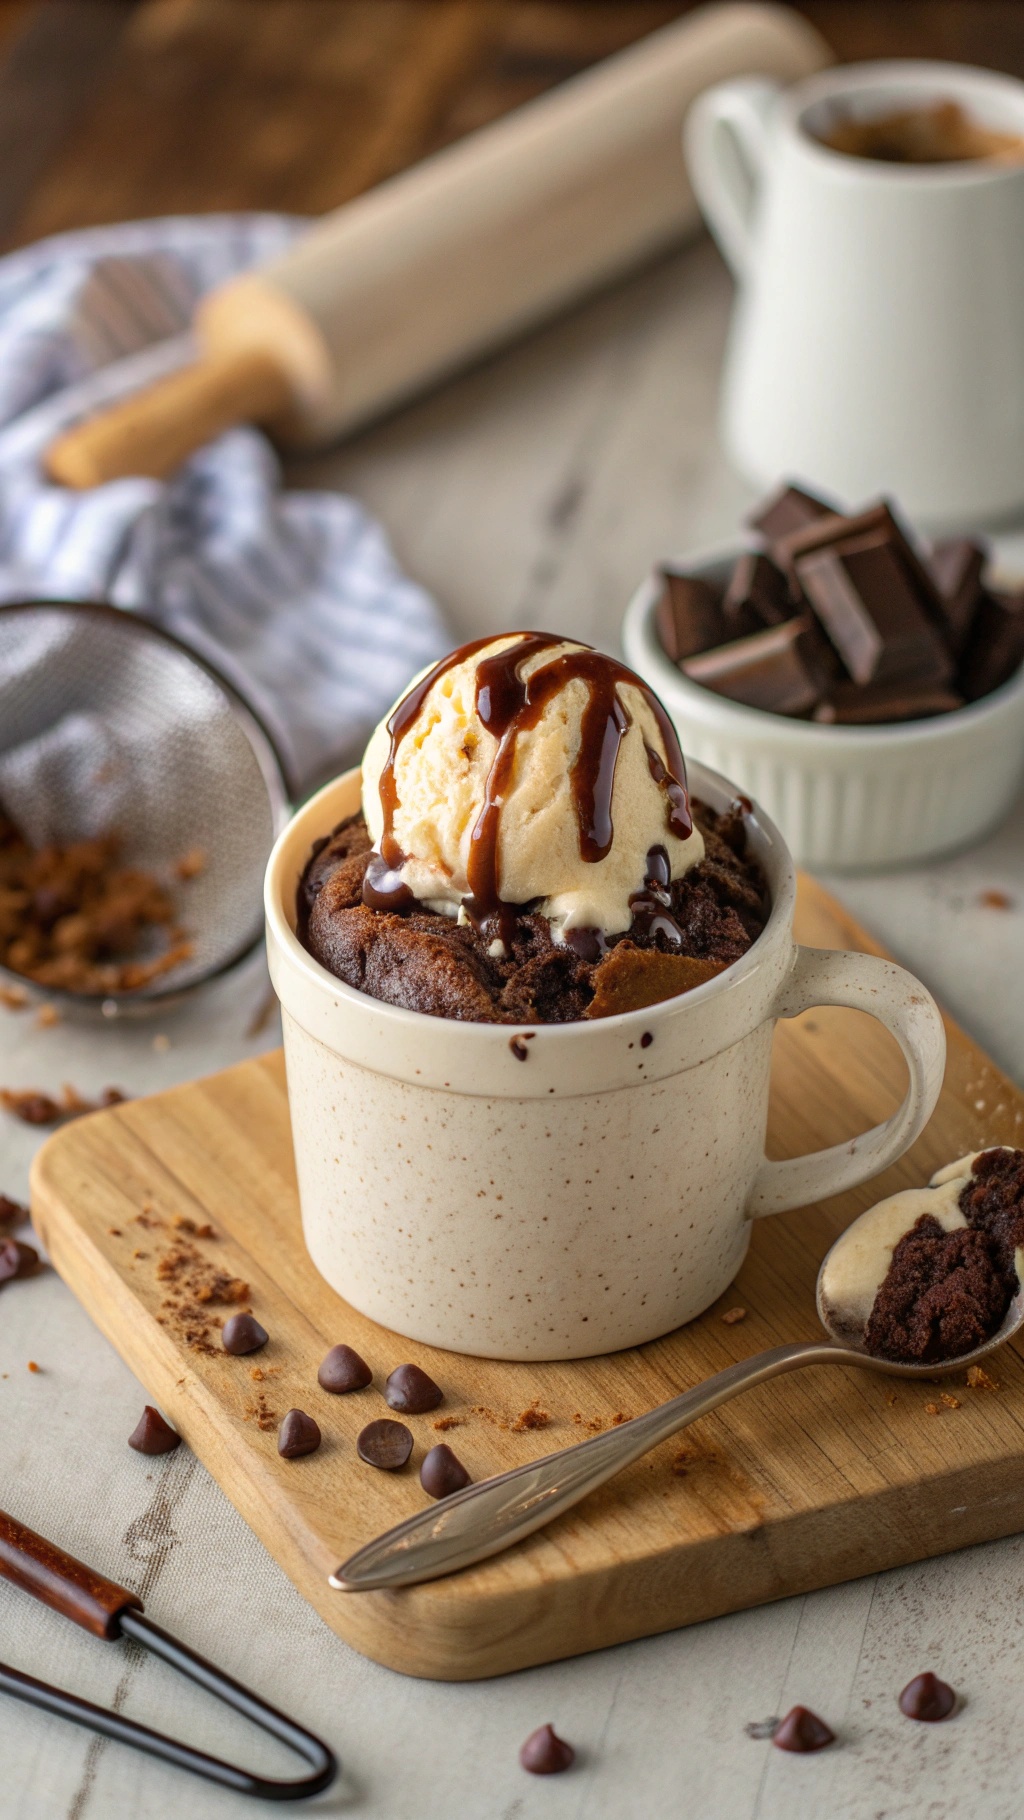
Craving something sweet but short on time? This Lightning-Fast Chocolate Chip Mug Brownie is your answer! It’s rich, gooey, and ready in just 15 minutes. Perfect for those late-night snack attacks or when you want a quick dessert fix.
In the image, you see a delightful mug filled with a warm brownie, topped with a scoop of vanilla ice cream and drizzled with chocolate sauce. The brownie is soft and inviting, with chocolate chips peeking through. Surrounding the mug are chocolate chips and a spoon, hinting at the deliciousness waiting to be enjoyed.
This recipe is simple and requires minimal ingredients. You can whip it up in your microwave, making it a fantastic option for anyone looking for a quick treat. Let’s get to the ingredients and steps!
Ingredients
- 4 tablespoons all-purpose flour
- 2 tablespoons cocoa powder
- 4 tablespoons sugar
- 1/8 teaspoon salt
- 3 tablespoons water or milk
- 2 tablespoons vegetable oil or melted butter
- 2 tablespoons chocolate chips
- 1/4 teaspoon vanilla extract (optional)
Instructions
- Combine Dry Ingredients: In a microwave-safe mug, mix together the flour, cocoa powder, sugar, and salt until well combined.
- Add Wet Ingredients: Stir in the water or milk, vegetable oil or melted butter, and vanilla extract if using. Mix until smooth.
- Add Chocolate Chips: Fold in the chocolate chips until evenly distributed.
- Microwave: Cook in the microwave on high for about 40-60 seconds, or until the brownie has risen and is set but still soft in the center. Be careful not to overcook.
- Cool and Serve: Allow the brownie to cool for a minute before enjoying it straight from the mug. Optionally, top with ice cream or whipped cream.
Struggling to Stay on Track with Your Eating?
You’re not alone. One of the biggest obstacles I see people
face is not knowing what to eat. Between busy schedules, endless diet
advice online, and trying to cook healthy meals that actually taste good—it’s
easy to feel stuck or overwhelmed.
That’s why I created my 21 Quick & Easy Custom
Low-Calorie Meal Plans Program. These plans are built specifically for
you—your goals, your lifestyle, and your food preferences. You won’t find
any cookie-cutter diets here. Just real, satisfying meals that help you stay
full, energized, and on track without the stress.
✅ No more guessing.
✅
No more skipping meals or eating “diet food” you hate.
✅
Just a clear, doable plan that fits your life.
👉 Ready to eat better,
feel better, and finally make progress? [Click here to get your custom meal plans today.]
Not Seeing the Inches Drop No Matter What You Do?
If you’re working out but still not seeing the results in
the mirror, I hear you. So many people come to me after months of doing cardio
or random workouts—and still struggling to lose inches or tone up. The truth
is, your body needs more than just movement. It needs a proven strategy.
My 8-Week Workout Program to Lose Inches is designed
to do just that—burn fat, tighten up, and give you visible results.
These workouts are fun, effective, and designed for real people with real
lives. Whether you’re getting back into fitness or ready to take it to the next
level, this program gives you a clear path to success.
✅ Just 8 weeks to build strength,
confidence, and a fitter shape.
✅
No endless cardio.
✅
No gym required (unless you want it).
👉 If you're ready to
drop inches and feel amazing in your own skin, [click here to start the 8-Week Workout Program].
Comments
Post a Comment