- Get link
- X
- Other Apps
11 Budget-Friendly No Bake Desserts Under $5
Budget-friendly and tasty, these no-bake desserts prove that you don't need to spend a lot to satisfy your sweet tooth. With simple ingredients and easy instructions, you can whip up delicious treats for under $5. Perfect for any occasion, these recipes are here to show you that making dessert can be both fun and affordable!
Indulgent Chocolate Peanut Butter Bars To Satisfy Your Sweet Tooth
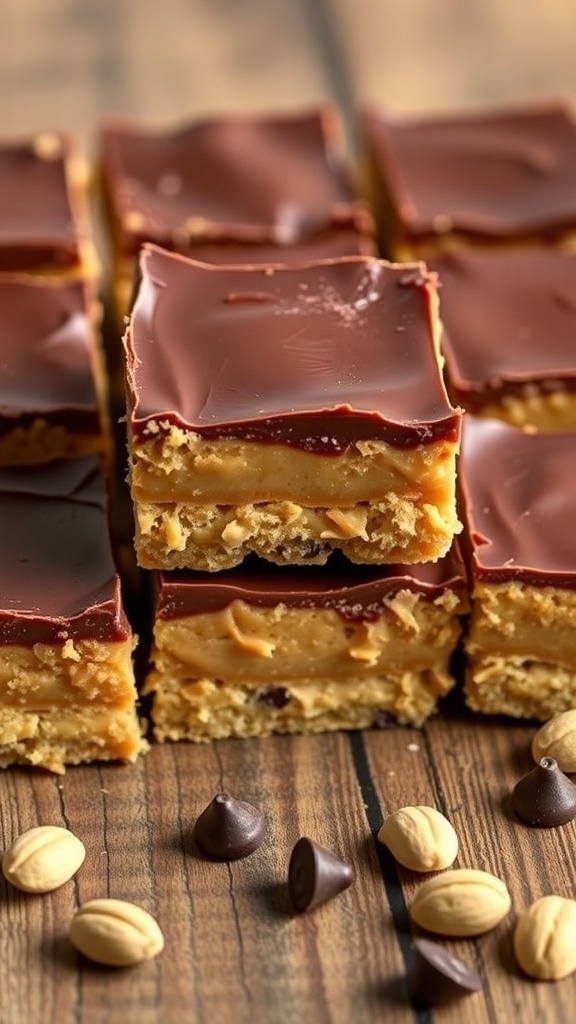
These Chocolate Peanut Butter Bars are a dream come true for anyone with a sweet tooth. The layers of creamy peanut butter and rich chocolate create a perfect balance of flavors. Plus, they’re super easy to make and don’t require any baking, making them a fantastic option for a quick treat.
The image captures these bars beautifully, showcasing their glossy chocolate topping and the smooth peanut butter filling. They’re cut into neat squares, making them perfect for sharing or enjoying all by yourself. The scattered chocolate and peanut pieces around the bars add a fun touch, hinting at the deliciousness that awaits.
With just a few simple ingredients, you can whip up these bars for under $5. They’re great for parties, movie nights, or just a sweet snack during the day. Let’s get into how you can make these delightful treats!
Ingredients
- 1 cup graham cracker crumbs
- 1 cup creamy peanut butter
- 1/2 cup powdered sugar
- 1/4 cup unsalted butter, melted
- 1 cup semi-sweet chocolate chips
- 2 tablespoons coconut oil or butter (for melting chocolate)
Instructions
- Prepare the Base: In a mixing bowl, combine graham cracker crumbs, peanut butter, powdered sugar, and melted butter. Mix until well combined.
- Press into Pan: Line an 8x8 inch baking dish with parchment paper. Press the peanut butter mixture evenly into the bottom of the dish.
- Melt the Chocolate: In a microwave-safe bowl, combine chocolate chips and coconut oil. Microwave in 30-second intervals, stirring in between, until fully melted and smooth.
- Spread the Chocolate: Pour the melted chocolate over the peanut butter layer and spread evenly with a spatula.
- Chill: Refrigerate the bars for at least 2 hours or until set. Once firm, lift the bars out of the pan using the parchment paper and cut into squares.
- Serve: Enjoy the bars chilled or at room temperature. Store any leftovers in an airtight container in the refrigerator.
Refreshing No-Bake Strawberry Cheesecake Cups For Warm Days
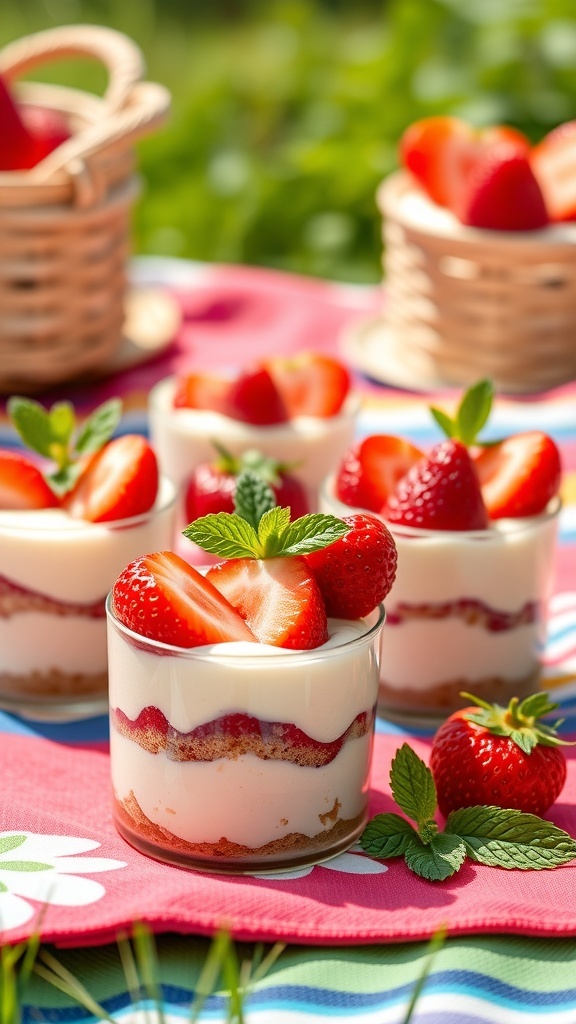
When the sun is shining and the temperatures rise, nothing beats a cool, refreshing dessert. These no-bake strawberry cheesecake cups are perfect for warm days. They are light, creamy, and bursting with fresh strawberry flavor. Plus, they are easy to make and budget-friendly, coming in at under $5!
These delightful cups feature layers of creamy cheesecake filling, crunchy graham cracker crumbs, and sweet strawberries. The vibrant colors and textures make them not only tasty but also visually appealing. Serve them at picnics, barbecues, or just as a treat for yourself on a hot day.
Gather your ingredients and get ready to whip up these delicious cups. They require minimal effort and no baking, which means you can enjoy more time outdoors!
Ingredients
- 1 cup graham cracker crumbs
- 2 tablespoons granulated sugar
- 4 tablespoons unsalted butter, melted
- 8 ounces cream cheese, softened
- 1/2 cup powdered sugar
- 1 teaspoon vanilla extract
- 1 cup heavy whipping cream
- 1 cup fresh strawberries, sliced
Instructions
- Prepare the Crust: In a bowl, mix graham cracker crumbs, granulated sugar, and melted butter until combined. Divide the mixture into serving cups, pressing it down to form a crust.
- Make the Cheesecake Filling: In another bowl, beat the softened cream cheese, powdered sugar, and vanilla extract until smooth. In a separate bowl, whip the heavy cream until stiff peaks form. Gently fold the whipped cream into the cream cheese mixture until well combined.
- Layer the Cups: Spoon a layer of the cheesecake filling over the crust in each cup. Add a layer of sliced strawberries on top. Repeat the layers until the cups are filled.
- Chill and Serve: Refrigerate the cups for at least 2 hours to set. Before serving, top with additional strawberries for a fresh touch.
Creamy And Dreamy No-Bake Oreo Dessert For Chocolate Lovers
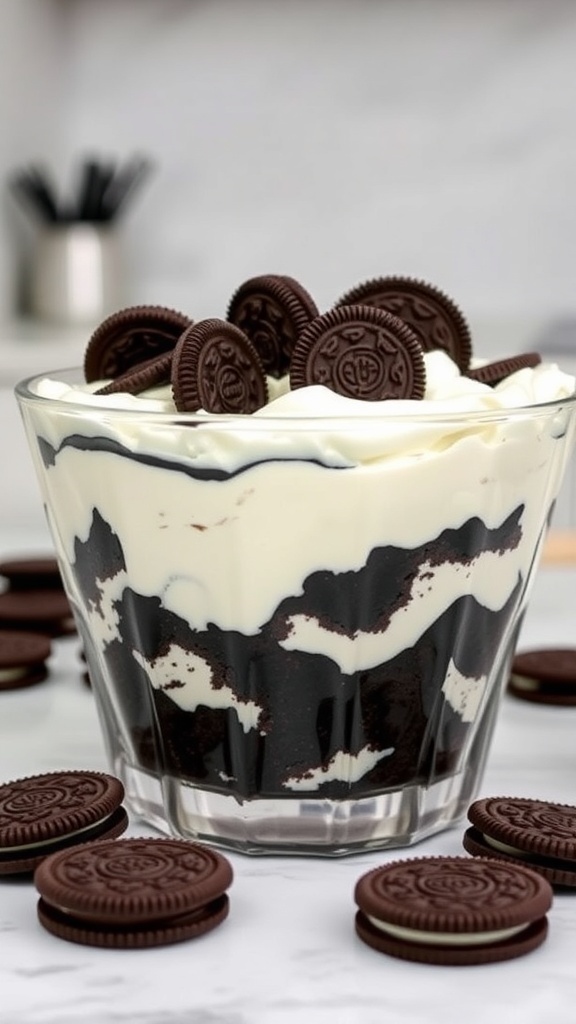
If you’re a chocolate lover, this creamy and dreamy no-bake Oreo dessert is sure to hit the spot. Picture layers of crushed Oreos mingling with a rich, velvety cream filling. It’s a treat that’s not only easy to make but also budget-friendly, costing less than $5!
This dessert is perfect for any occasion, whether it’s a family gathering or a cozy night in. The combination of crunchy Oreo pieces and smooth cream creates a delightful texture that everyone will enjoy. Plus, it requires no baking, making it a hassle-free option for those busy days.
Gather your ingredients and get ready to whip up this delicious dessert that will impress your friends and family. It’s a simple recipe that doesn’t skimp on flavor!
Ingredients
- 1 package of Oreo cookies (about 14.3 oz)
- 1 cup heavy whipping cream
- 1/2 cup powdered sugar
- 1 teaspoon vanilla extract
- 8 oz cream cheese, softened
- 1/2 cup milk
Instructions
- Crush the Oreos: Start by crushing the Oreo cookies into fine crumbs. You can do this by placing them in a zip-top bag and using a rolling pin or pulsing them in a food processor.
- Make the Cream Mixture: In a mixing bowl, beat the heavy whipping cream, powdered sugar, and vanilla extract until stiff peaks form. In another bowl, blend the softened cream cheese and milk until smooth. Gently fold the whipped cream into the cream cheese mixture.
- Layer the Dessert: In a glass dish or individual cups, layer the crushed Oreos and the cream mixture. Start with a layer of Oreos, then add a layer of cream, and repeat until you reach the top.
- Chill: Cover the dessert and refrigerate for at least 2 hours to allow it to set.
- Serve: Once chilled, garnish with additional Oreo cookies on top before serving. Enjoy your creamy and dreamy no-bake Oreo dessert!
Light And Luscious No-Bake Lemon Mousse For A Zesty Treat
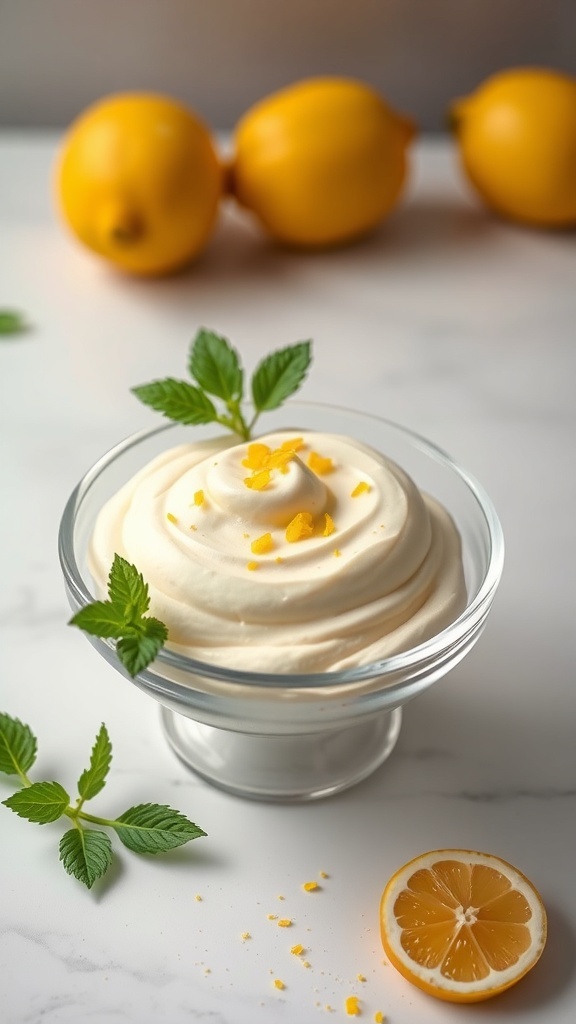
This no-bake lemon mousse is a refreshing dessert that’s perfect for any occasion. With its creamy texture and zesty flavor, it’s sure to brighten your day. The image shows a delightful bowl of lemon mousse, topped with a sprinkle of lemon zest and fresh mint leaves. Behind the mousse, you can see vibrant lemons, hinting at the key ingredient that makes this dessert so special.
Making this treat is simple and budget-friendly, costing under $5. It’s a great way to enjoy a light dessert without spending too much time in the kitchen. The combination of tangy lemon and sweet cream creates a balance that everyone will love.
Ingredients
- 1 cup heavy cream
- 1/2 cup powdered sugar
- 1/2 cup lemon juice (freshly squeezed)
- 1 tablespoon lemon zest
- 1 teaspoon vanilla extract
- 1 packet of unflavored gelatin (optional, for extra firmness)
Instructions
- Whip the Cream: In a large bowl, beat the heavy cream and powdered sugar together until soft peaks form.
- Mix Lemon Ingredients: In another bowl, combine lemon juice, lemon zest, and vanilla extract. If using gelatin, dissolve it in a little warm water and add it to the lemon mixture.
- Combine: Gently fold the lemon mixture into the whipped cream until fully combined.
- Chill: Spoon the mousse into serving dishes and refrigerate for at least 2 hours to set.
- Serve: Garnish with extra lemon zest and mint leaves before serving.
Decadent No-Bake Nutella Cheesecake For Chocolate Hazelnut Fans
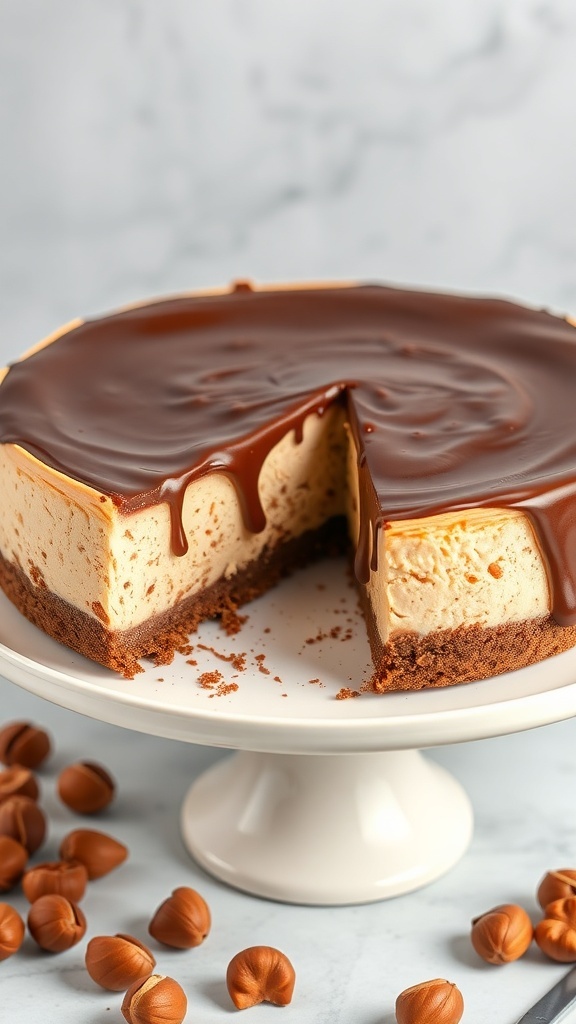
If you love chocolate and hazelnut, this no-bake Nutella cheesecake is a dream come true. It’s creamy, rich, and super easy to make. The image shows a luscious cheesecake topped with a glossy chocolate ganache, sitting on a classic cake stand. The crust is made from chocolate cookies, giving it an extra layer of flavor. Surrounding the cake are scattered hazelnuts, hinting at the delicious ingredients inside.
This dessert is perfect for any occasion, whether it’s a birthday party or a cozy night in. Plus, it’s budget-friendly, costing under $5 to make. Who can resist a treat that’s both easy on the wallet and a delight to the taste buds?
Let’s get started on making this delightful cheesecake!
Ingredients
- 1 ½ cups chocolate cookie crumbs
- ½ cup unsalted butter, melted
- 1 cup cream cheese, softened
- 1 cup Nutella
- 1 cup whipped cream
- ½ cup powdered sugar
- 1 cup chocolate chips (for ganache)
- ½ cup heavy cream (for ganache)
Instructions
- Prepare the Crust: In a bowl, mix chocolate cookie crumbs with melted butter. Press the mixture into the bottom of a springform pan to form a crust.
- Make the Filling: In another bowl, beat the cream cheese until smooth. Add Nutella and powdered sugar, mixing until well combined. Gently fold in the whipped cream.
- Combine: Pour the filling over the crust and smooth the top. Refrigerate for at least 4 hours or until set.
- Prepare the Ganache: In a small saucepan, heat the heavy cream until it just starts to simmer. Remove from heat and add chocolate chips. Stir until smooth.
- Top the Cheesecake: Pour the ganache over the chilled cheesecake, spreading it evenly. Let it set for about 30 minutes before serving.
Elegant No-Bake Chocolate Mousse For A Special Occasion
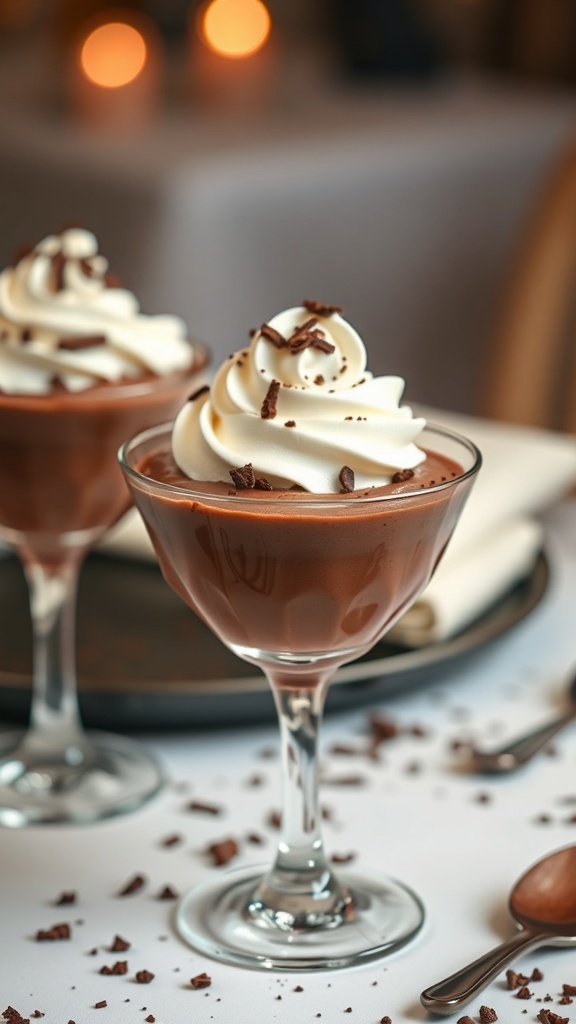
No-bake chocolate mousse is a fantastic treat that feels fancy without breaking the bank. This dessert is rich and creamy, perfect for impressing guests at any gathering. The image shows beautifully presented chocolate mousse topped with whipped cream and chocolate shavings, making it look even more inviting.
Making this dessert is simple and requires minimal ingredients. You can whip it up in no time, and it’s sure to be a crowd-pleaser. Plus, it’s budget-friendly, costing under $5 to prepare. Let’s get into the details so you can create this delightful dessert!
Ingredients
- 1 cup heavy cream
- 1/2 cup semi-sweet chocolate chips
- 1/4 cup powdered sugar
- 1 teaspoon vanilla extract
- 1/2 cup milk
- 1 tablespoon gelatin (optional, for extra firmness)
Instructions
- Melt the Chocolate: In a microwave-safe bowl, melt the chocolate chips in 30-second intervals, stirring until smooth. Set aside to cool slightly.
- Whip the Cream: In a mixing bowl, whip the heavy cream with powdered sugar and vanilla extract until soft peaks form.
- Combine: Gently fold the melted chocolate into the whipped cream until fully combined. If using gelatin, dissolve it in warm milk and mix it in at this stage.
- Chill: Spoon the mousse into serving glasses and refrigerate for at least 2 hours to set.
- Serve: Top with extra whipped cream and chocolate shavings before serving. Enjoy your elegant no-bake chocolate mousse!
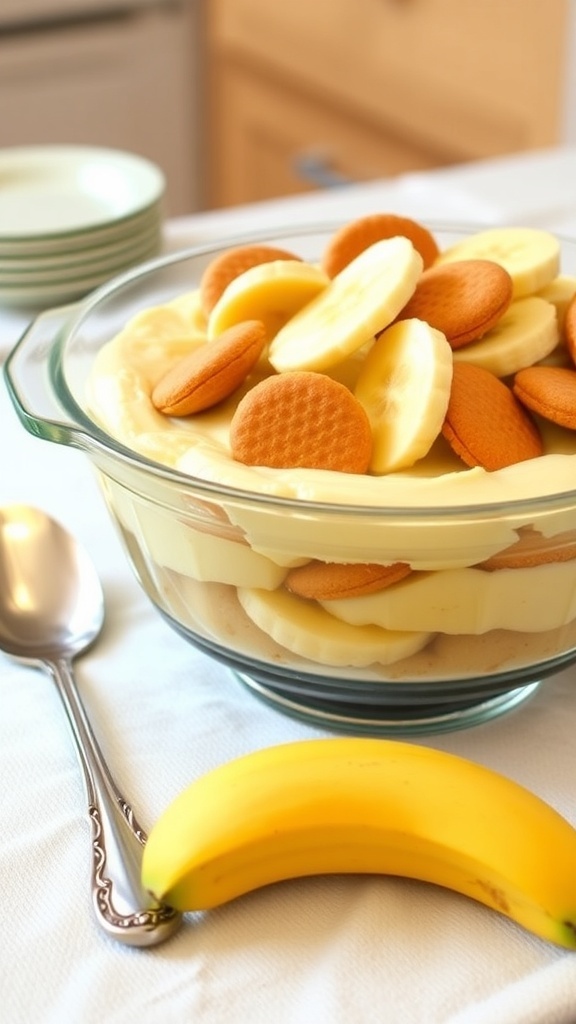
Classic No-Bake Banana Pudding For Comforting Flavors
No-bake banana pudding is a classic dessert that brings comfort and joy. This treat is layered with creamy pudding, fresh bananas, and crunchy vanilla wafers. It’s perfect for any occasion and incredibly easy to whip up.
The image shows a beautiful glass bowl filled with layers of banana pudding. You can see slices of ripe bananas and vanilla wafers peeking through the creamy pudding. The presentation is inviting and makes you want to dig in right away!
This dessert is not only delicious but also budget-friendly, costing under $5 to make. It’s a great way to use up ripe bananas and satisfy your sweet tooth without breaking the bank.
Ingredients
- 2 ripe bananas, sliced
- 1 box (3.4 oz) instant vanilla pudding mix
- 2 cups cold milk
- 1 cup whipped topping
- 1 box (11 oz) vanilla wafers
Instructions
- In a mixing bowl, combine the instant pudding mix and cold milk. Whisk for about 2 minutes until it thickens.
- Fold in the whipped topping until well combined.
- In a serving dish, layer the vanilla wafers, followed by a layer of pudding mixture, and then a layer of banana slices.
- Repeat the layers until all ingredients are used, finishing with pudding on top.
- Chill in the refrigerator for at least 2 hours before serving to let the flavors meld.
Fruity No-Bake Blueberry Cheesecake For Freshness

This no-bake blueberry cheesecake is a delightful treat that’s both easy to make and budget-friendly. The vibrant blueberries on top not only look stunning but also add a burst of freshness to each bite. The creamy cheesecake filling pairs perfectly with the sweet blueberry topping, making it a hit for any occasion.
To create this delicious dessert, you’ll need some simple ingredients like cream cheese, sugar, and graham cracker crumbs. The best part? You don’t need to turn on the oven! Just mix, chill, and enjoy.
Ingredients
- 1 ½ cups graham cracker crumbs
- ½ cup unsalted butter, melted
- 2 cups cream cheese, softened
- 1 cup powdered sugar
- 1 teaspoon vanilla extract
- 1 cup heavy whipping cream
- 2 cups fresh blueberries
- ½ cup blueberry sauce (store-bought or homemade)
Instructions
- Prepare the Crust: In a bowl, mix the graham cracker crumbs and melted butter until combined. Press the mixture into the bottom of a 9-inch springform pan to form an even layer.
- Make the Filling: In a large bowl, beat the cream cheese until smooth. Gradually add the powdered sugar and vanilla extract, mixing until well combined. In another bowl, whip the heavy cream until stiff peaks form, then gently fold it into the cream cheese mixture.
- Combine: Pour the cheesecake filling over the prepared crust, smoothing the top with a spatula. Cover and refrigerate for at least 4 hours, or until set.
- Add the Topping: Once the cheesecake is set, spread the blueberry sauce over the top and garnish with fresh blueberries.
- Serve: Carefully remove the sides of the springform pan. Slice and serve chilled. Enjoy your fruity no-bake blueberry cheesecake!
Chocolatey No-Bake Mint Chocolate Bars For A Cool Treat
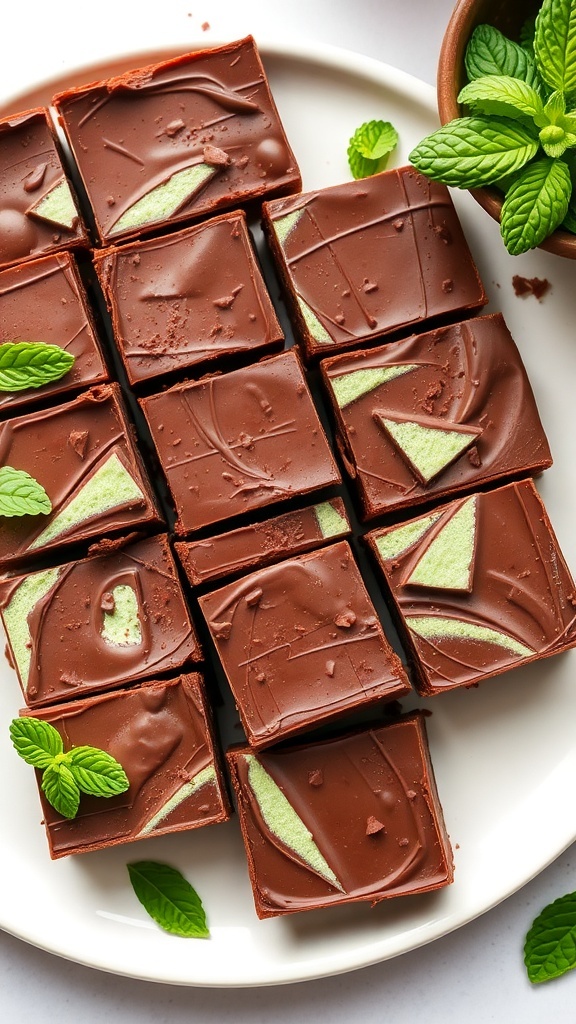
These Chocolatey No-Bake Mint Chocolate Bars are a delightful way to satisfy your sweet tooth without breaking the bank. With a beautiful layer of rich chocolate on top and a refreshing mint center, they are perfect for any occasion. The vibrant green mint layer peeks through the chocolate, making them visually appealing and inviting.
Making these bars is a breeze. You don’t need to turn on the oven, which is a huge plus, especially during hot days. Just gather your ingredients, mix them up, and let the fridge do the work. They’re not just easy to make; they’re also budget-friendly, costing under $5 for the whole batch!
These bars are great for sharing at parties or enjoying as a sweet treat after dinner. The combination of chocolate and mint is always a crowd-pleaser. Plus, they look stunning on any dessert table, adding a pop of color and a touch of elegance.
Ingredients
- 1 cup chocolate chips
- 1/2 cup unsweetened cocoa powder
- 1/2 cup sweetened condensed milk
- 1/4 cup butter, melted
- 1/2 teaspoon peppermint extract
- 1/4 cup powdered sugar
- Green food coloring (optional)
Instructions
- Prepare the Base: In a mixing bowl, combine melted butter, cocoa powder, and sweetened condensed milk. Stir until smooth.
- Press into Pan: Line an 8x8 inch pan with parchment paper. Pour the chocolate mixture into the pan and press it down evenly.
- Make the Mint Layer: In another bowl, mix powdered sugar, peppermint extract, and a few drops of green food coloring if desired. Stir until smooth and spread it over the chocolate base.
- Add the Top Layer: Melt the chocolate chips and pour them over the mint layer, spreading it evenly.
- Chill: Refrigerate for at least 2 hours until set. Once firm, cut into squares and enjoy!
Velvety No-Bake Tiramisu For An Italian Classic
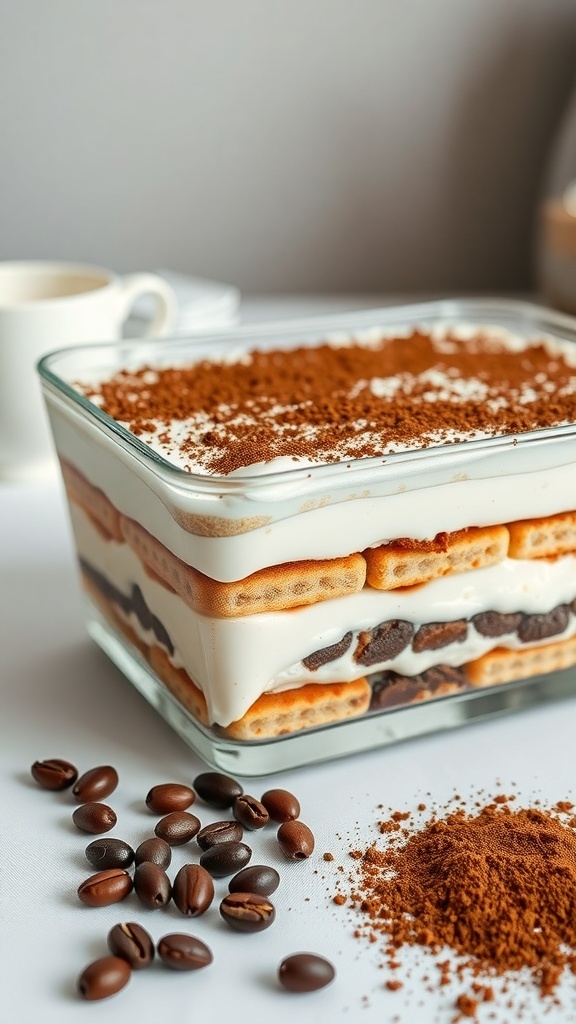
No-bake tiramisu is a delightful treat that captures the essence of Italian dessert culture. This version is easy to make and perfect for those who want a sweet indulgence without the fuss of baking. The layers of coffee-soaked ladyfingers combined with a creamy mascarpone mixture create a rich and satisfying dessert.
The image showcases a beautifully layered tiramisu, topped with a dusting of cocoa powder. The contrast between the creamy filling and the crunchy ladyfingers is simply irresistible. Surrounding the dish are coffee beans and cocoa powder, hinting at the key flavors that make this dessert so special.
This recipe is budget-friendly, costing under $5, making it accessible for anyone looking to impress guests or treat themselves. Let’s get into how to make this delicious no-bake tiramisu!
Ingredients
- 2 cups strong brewed coffee, cooled
- 1/2 cup coffee liqueur (optional)
- 24 ladyfingers (savoiardi)
- 1 cup mascarpone cheese
- 1 cup heavy cream
- 1/2 cup powdered sugar
- 1 teaspoon vanilla extract
- Cocoa powder for dusting
- Dark chocolate shavings for garnish (optional)
Instructions
- Prepare Coffee Mixture: In a shallow dish, combine the cooled brewed coffee and coffee liqueur, if using.
- Whip Cream: In a mixing bowl, whip the heavy cream until soft peaks form. Gradually add powdered sugar and vanilla extract, continuing to whip until stiff peaks form.
- Combine Mascarpone: In another bowl, gently fold the mascarpone cheese into the whipped cream until smooth and well combined.
- Layer the Tiramisu: Quickly dip each ladyfinger into the coffee mixture, ensuring they are soaked but not soggy. Arrange a layer of soaked ladyfingers in the bottom of a serving dish. Spread half of the mascarpone mixture over the ladyfingers. Repeat with another layer of soaked ladyfingers and the remaining mascarpone mixture.
- Chill: Cover and refrigerate the tiramisu for at least 4 hours, or overnight for best results.
- Serve: Before serving, dust the top with cocoa powder and garnish with dark chocolate shavings, if desired.
Gourmet No-Bake Fruit Tart For A Fresh Finish
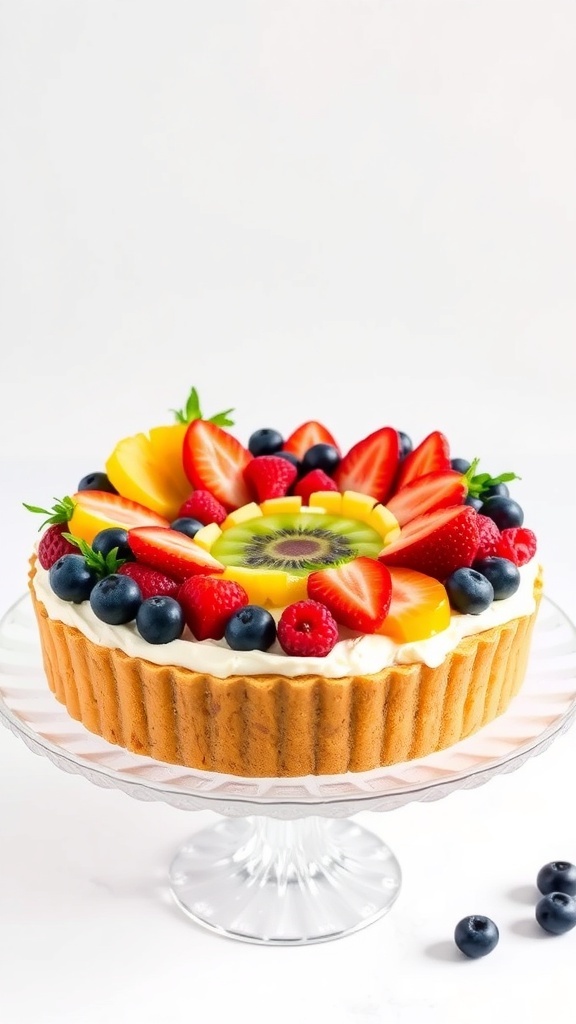
This gourmet no-bake fruit tart is a stunning way to end any meal. With a buttery crust and a creamy filling, it’s topped with a colorful array of fresh fruits. The vibrant colors of strawberries, blueberries, kiwi, and mango make it not just delicious but also a feast for the eyes.
Making this tart is simple and budget-friendly. You don’t need to turn on the oven, which is perfect for warm days. The combination of flavors and textures will impress your friends and family without breaking the bank.
Let’s get into the details of how to create this delightful dessert!
Ingredients
- 1 ½ cups graham cracker crumbs
- ½ cup unsalted butter, melted
- 1 cup cream cheese, softened
- ½ cup powdered sugar
- 1 teaspoon vanilla extract
- 1 cup heavy whipping cream
- 1 cup mixed fresh fruits (strawberries, blueberries, kiwi, mango)
Instructions
- Prepare the Crust: In a bowl, mix graham cracker crumbs and melted butter until combined. Press the mixture into the bottom and sides of a tart pan. Chill in the refrigerator for about 30 minutes.
- Make the Filling: In another bowl, beat the cream cheese until smooth. Add powdered sugar and vanilla extract, mixing until well combined. In a separate bowl, whip the heavy cream until stiff peaks form. Gently fold the whipped cream into the cream cheese mixture.
- Assemble the Tart: Spread the cream cheese filling evenly over the chilled crust. Arrange the fresh fruits on top in a decorative pattern.
- Chill and Serve: Refrigerate the tart for at least 2 hours before serving. Slice and enjoy your fresh, no-bake fruit tart!
Comments
Post a Comment