- Get link
- X
- Other Apps
12 Delicious Fruit Desserts to Satisfy Your Sugar Cravings
Snacking can often lead to those pesky sugar cravings, but it doesn’t have to! These fruit-based desserts offer a sweet and satisfying fix that keeps you feeling good without the overload of refined sugars. Get ready to enjoy delicious options that are as guilt-free as they are tasty!
Indulge In A Refreshing Classic Peach Cobbler
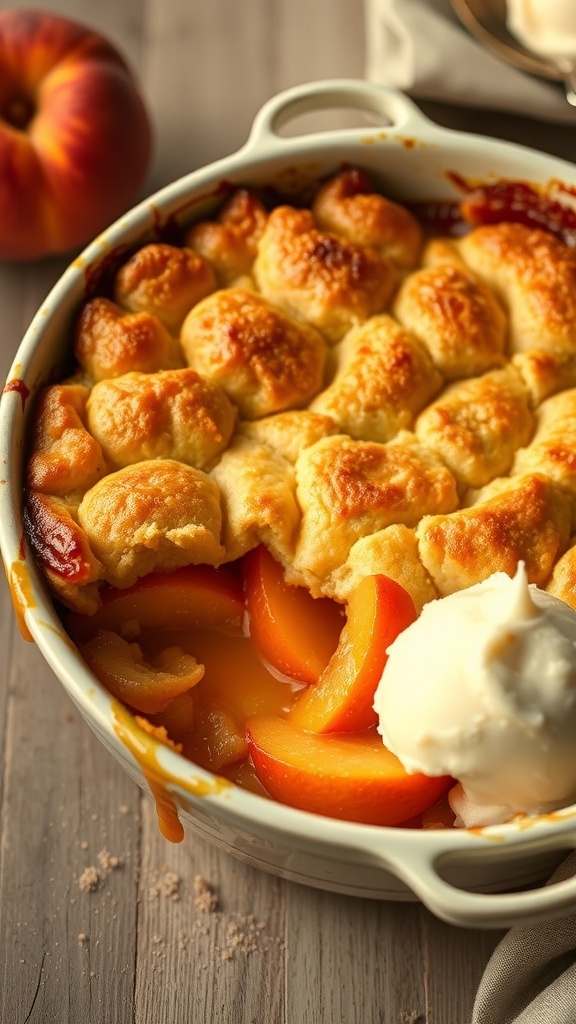
Peach cobbler is a timeless dessert that brings comfort and joy. The image shows a warm bowl of peach cobbler, topped with a scoop of vanilla ice cream and garnished with fresh mint leaves. The golden crust contrasts beautifully with the juicy, sweet peaches underneath. It's the perfect treat for anyone craving something sweet without the guilt of overly sugary snacks.
This dish is not just about taste; it’s about the experience. The aroma of baked peaches fills the air, inviting you to dig in. Each spoonful offers a delightful mix of textures, from the soft fruit to the crispy topping. Pairing it with ice cream adds a creamy element that elevates the whole dessert.
Making peach cobbler at home is simple and rewarding. You can enjoy it warm right out of the oven or chilled, depending on your preference. It's a fantastic way to satisfy your sweet tooth while keeping it fruity and fresh.
Ingredients
- 4 cups fresh peaches, sliced
- 1 cup granulated sugar
- 1 teaspoon cinnamon
- 1 tablespoon lemon juice
- 1 cup all-purpose flour
- 1 tablespoon baking powder
- 1/2 teaspoon salt
- 1 cup milk
- 1/2 cup unsalted butter, melted
Instructions
- Preheat your oven to 350°F (175°C).
- In a bowl, mix the sliced peaches with 1/2 cup of sugar, cinnamon, and lemon juice. Let it sit for about 10 minutes.
- In another bowl, combine flour, baking powder, salt, and the remaining sugar. Stir in the milk and melted butter until just combined.
- Pour the peach mixture into a greased baking dish. Spoon the batter over the peaches evenly.
- Bake for 30-35 minutes until the top is golden brown and a toothpick comes out clean.
- Serve warm with a scoop of vanilla ice cream on top.
Delight In A Decadent Chocolate-Covered Strawberry Tart
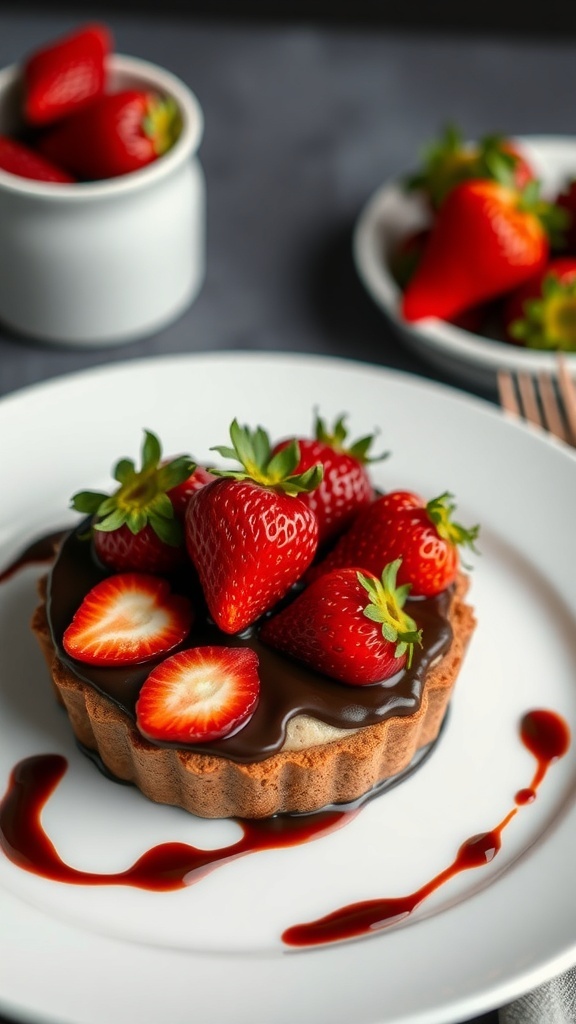
If you’re craving something sweet, a chocolate-covered strawberry tart is the perfect treat. This dessert combines rich chocolate with fresh strawberries, creating a delightful balance of flavors. The tart crust is buttery and flaky, providing a great base for the creamy chocolate filling.
Picture a beautifully arranged tart topped with vibrant strawberries. The glossy chocolate glaze glistens under the light, making it hard to resist. This dessert not only looks stunning but also satisfies those sugar cravings without going overboard.
Making this tart is simple and fun. You can whip it up for a special occasion or just to enjoy at home. It’s a great way to indulge while still keeping things fresh and fruity!
Ingredients
- 1 pre-made tart shell
- 1 cup dark chocolate chips
- 1/2 cup heavy cream
- 1 teaspoon vanilla extract
- 2 cups fresh strawberries, hulled and sliced
- Chocolate syrup for drizzling (optional)
Instructions
- Prepare the Filling: In a small saucepan, heat the heavy cream over medium heat until it just begins to simmer. Remove from heat and add the chocolate chips and vanilla extract. Stir until smooth and fully combined.
- Assemble the Tart: Pour the chocolate filling into the pre-made tart shell, spreading it evenly. Let it cool at room temperature for about 30 minutes, then refrigerate for at least 1 hour until set.
- Add the Toppings: Once the tart is set, arrange the sliced strawberries on top. You can drizzle chocolate syrup over the strawberries for an extra touch.
- Serve: Slice the tart and enjoy! It’s perfect for sharing or savoring all on your own.
Enjoy The Zesty Flavor Of Lemon Blueberry Bars
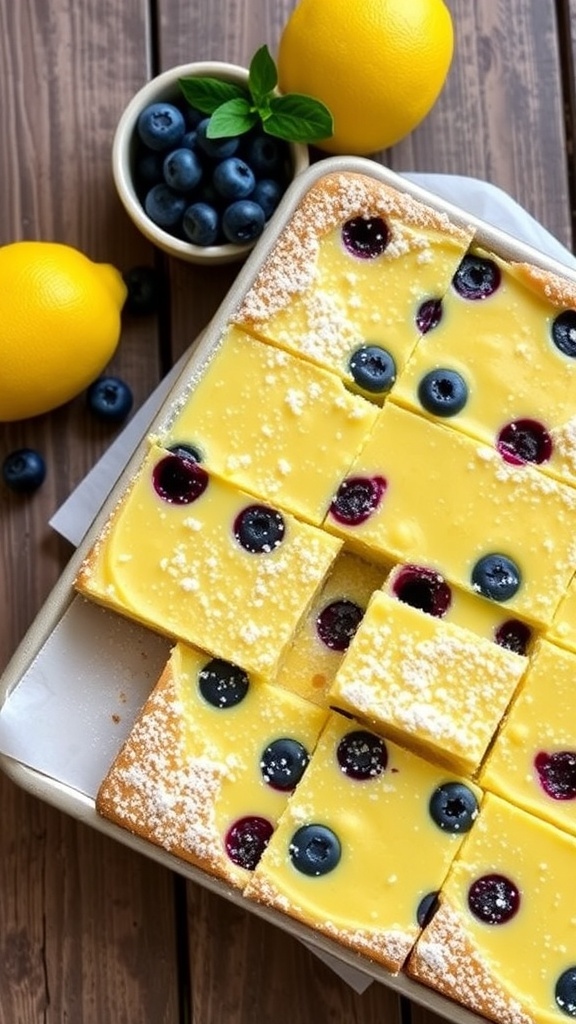
Lemon blueberry bars are a delightful treat that perfectly balance tart and sweet. The bright yellow filling, dotted with juicy blueberries, is both refreshing and satisfying. These bars are not just a feast for the eyes; they also pack a punch of flavor that can help curb those pesky sugar cravings.
The combination of zesty lemon and plump blueberries creates a vibrant dessert that feels light yet indulgent. They are perfect for a snack or a light dessert after a meal. Plus, they are easy to make and can be enjoyed by everyone.
To make these delicious lemon blueberry bars, you’ll need a few simple ingredients. Gather up some fresh lemons, blueberries, sugar, and eggs. The process is straightforward, making it a great recipe for both novice and experienced bakers.
Ingredients
- 1 cup all-purpose flour
- 1/2 cup granulated sugar
- 1/4 cup unsalted butter, melted
- 2 large eggs
- 1/2 cup fresh lemon juice
- 1 tablespoon lemon zest
- 1/2 teaspoon baking powder
- 1 cup fresh blueberries
- Powdered sugar for dusting
Instructions
- Preheat the oven to 350°F (175°C). Grease an 8x8-inch baking dish.
- In a bowl, mix flour, sugar, and melted butter until combined. Press this mixture into the bottom of the prepared baking dish to form a crust.
- In another bowl, whisk together the eggs, lemon juice, lemon zest, and baking powder. Pour this mixture over the crust.
- Sprinkle the fresh blueberries evenly on top of the lemon filling.
- Bake for 25-30 minutes or until the filling is set and the edges are lightly golden.
- Allow to cool completely before cutting into squares. Dust with powdered sugar before serving.
Treat Yourself To No-Bake Raspberry Cheesecake Cups

If you're craving something sweet but want to keep it light, these no-bake raspberry cheesecake cups are a perfect choice. They look gorgeous and taste even better! Each cup features layers of creamy cheesecake filling, tangy raspberry sauce, and crunchy graham cracker crumbs. It's a delightful treat that satisfies your sweet tooth without the guilt.
These cups are super easy to make, requiring no baking at all. Just layer the ingredients in a glass, and you’re good to go! The vibrant red raspberries on top add a pop of color and freshness, making them not only delicious but also visually appealing.
Perfect for parties or a cozy night in, these cheesecake cups are sure to impress. Plus, they can be made ahead of time, so you can enjoy them whenever the craving strikes!
Ingredients
- 1 cup graham cracker crumbs
- 4 tablespoons unsalted butter, melted
- 1 cup cream cheese, softened
- 1/2 cup powdered sugar
- 1 teaspoon vanilla extract
- 1 cup heavy cream
- 1 cup fresh raspberries
- 1/4 cup raspberry jam
Instructions
- Prepare the Crust: In a bowl, mix graham cracker crumbs with melted butter until combined. Divide the mixture into the bottom of serving cups, pressing down gently.
- Make the Cheesecake Filling: In another bowl, beat the cream cheese until smooth. Gradually add powdered sugar and vanilla extract, mixing well. In a separate bowl, whip the heavy cream until stiff peaks form, then fold it into the cream cheese mixture.
- Layer the Cups: Spoon a layer of the cheesecake filling over the crust in each cup. Add a layer of raspberry jam and a few fresh raspberries. Repeat the layers until the cups are filled.
- Chill: Refrigerate the cups for at least 2 hours to set. This will make them easier to serve and enhance the flavors.
- Serve: Top with additional raspberries before serving. Enjoy your delicious no-bake raspberry cheesecake cups!
Bite Into A Heavenly Banana Cream Pie
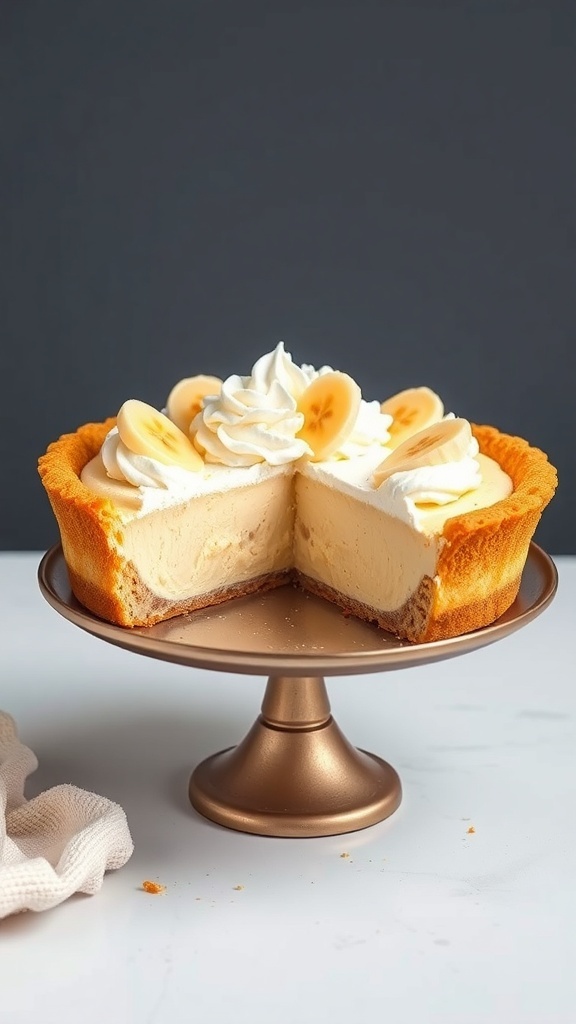
Banana cream pie is a classic dessert that hits the sweet spot every time. The image showcases a beautifully crafted pie with a golden crust, creamy filling, and topped with fluffy whipped cream and fresh banana slices. It's a treat that not only looks inviting but also promises a delightful taste experience.
This dessert is perfect for satisfying those sugar cravings without going overboard. The combination of ripe bananas and creamy filling creates a flavor that’s both comforting and refreshing. Plus, it’s easy to whip up at home!
Ready to make your own? Here’s how:
Ingredients
- 1 pre-made pie crust
- 3 ripe bananas
- 2 cups milk
- 1/2 cup granulated sugar
- 1/3 cup cornstarch
- 1/4 teaspoon salt
- 3 large egg yolks
- 2 tablespoons unsalted butter
- 1 teaspoon vanilla extract
- 1 cup heavy cream
- 2 tablespoons powdered sugar
Instructions
- Prepare the Crust: Bake the pre-made pie crust according to package instructions until golden brown. Let it cool completely.
- Make the Filling: In a saucepan, whisk together milk, sugar, cornstarch, and salt. Cook over medium heat, stirring constantly until it thickens. Remove from heat and stir in egg yolks, butter, and vanilla until smooth.
- Layer the Bananas: Slice two bananas and layer them on the bottom of the cooled pie crust. Pour the filling over the bananas.
- Chill: Cover the pie with plastic wrap and refrigerate for at least 4 hours, or until set.
- Whip the Cream: In a mixing bowl, beat heavy cream and powdered sugar until soft peaks form. Spread the whipped cream over the chilled pie.
- Garnish: Slice the remaining banana and arrange on top of the whipped cream for a beautiful finish.
Enjoy your heavenly banana cream pie, a sweet treat that’s sure to please!
Satisfy Your Sweet Tooth With Pineapple Upside-Down Cake
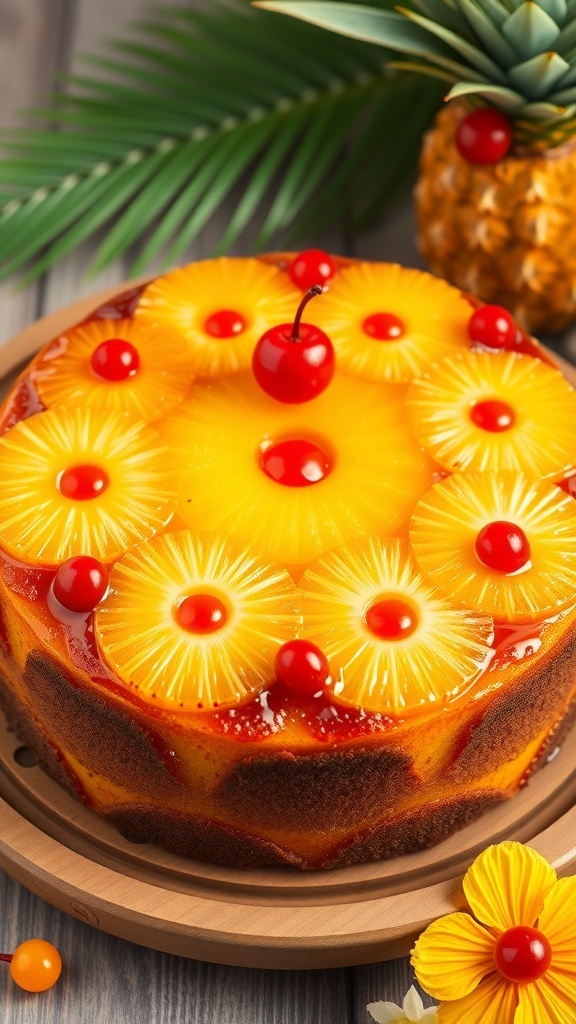
Pineapple upside-down cake is a classic dessert that never fails to impress. The vibrant colors and inviting aroma make it a perfect treat for any occasion. The combination of sweet, caramelized pineapple and cherries on top of a moist cake is simply irresistible.
This cake is not just about looks; it’s about flavor too. The juicy pineapple adds a refreshing twist, while the buttery cake base provides a delightful contrast. Each bite is a burst of sweetness that can easily satisfy your sugar cravings.
Making this cake is easier than you might think. Start by preparing the pineapple and cherries, then create a simple batter. Pour it over the fruit, bake, and flip it over for that stunning presentation. It’s a fun and rewarding process that will have everyone asking for seconds!
Ingredients
- 1/4 cup unsalted butter
- 1 cup brown sugar
- 1 can (20 oz) pineapple slices, drained
- Maraschino cherries
- 1 1/2 cups all-purpose flour
- 1 cup granulated sugar
- 1/2 cup milk
- 2 large eggs
- 1/4 cup vegetable oil
- 2 teaspoons baking powder
- 1 teaspoon vanilla extract
- 1/2 teaspoon salt
Instructions
- Preheat the oven to 350°F (175°C). Melt the butter in a 9-inch round cake pan. Sprinkle brown sugar evenly over the melted butter.
- Arrange pineapple slices on top of the brown sugar. Place a cherry in the center of each pineapple slice and around the edges.
- In a bowl, mix flour, granulated sugar, baking powder, and salt. In another bowl, whisk together milk, eggs, oil, and vanilla.
- Combine the wet and dry ingredients, mixing until smooth. Pour the batter over the pineapple and cherries.
- Bake for 35-40 minutes, or until a toothpick inserted in the center comes out clean. Let it cool for a few minutes before flipping it onto a serving plate.
Bite Into The Sweetness Of Apple Crisp
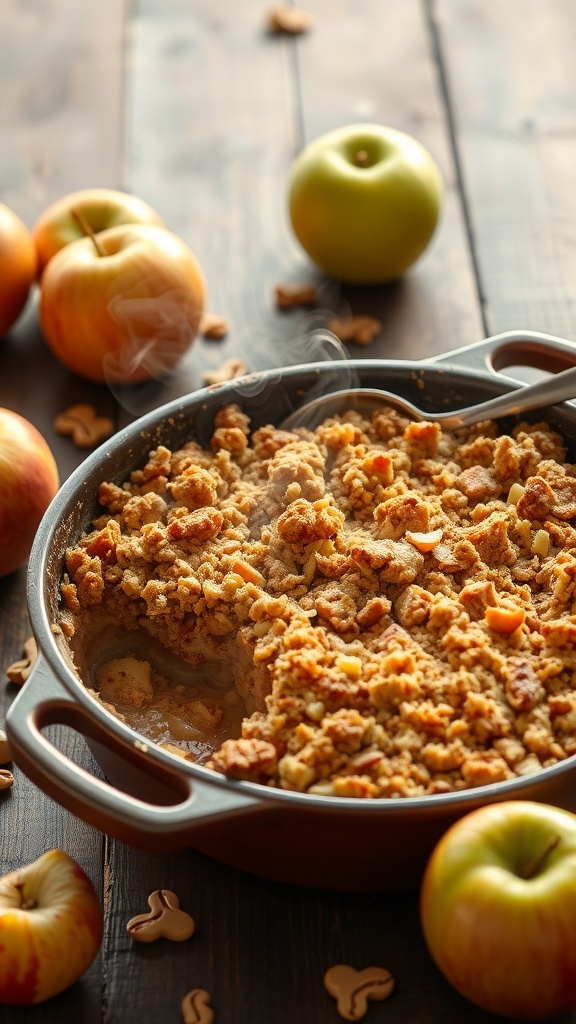
Apple crisp is a warm and comforting dessert that hits the spot when cravings strike. The image showcases a delicious apple crisp, bubbling with sweet, tender apples and topped with a crunchy, golden-brown crumble. The apples are likely mixed with cinnamon and sugar, creating a delightful aroma that fills the kitchen. Around the dish, you can see fresh apples, hinting at the main ingredient and adding a pop of color.
This dessert is perfect for any occasion, whether it’s a family gathering or a cozy night in. It’s simple to make and brings a smile to everyone’s face. Serve it warm with a scoop of vanilla ice cream for an extra treat!
Ingredients
- 6 cups sliced apples (Granny Smith or Honeycrisp work great)
- 1 cup granulated sugar
- 1 teaspoon ground cinnamon
- 1 tablespoon lemon juice
- 1 cup rolled oats
- 1 cup all-purpose flour
- 1 cup packed brown sugar
- 1/2 cup unsalted butter, melted
Instructions
- Preheat your oven to 350°F (175°C).
- In a large bowl, mix sliced apples with granulated sugar, cinnamon, and lemon juice. Spread this mixture evenly in a greased baking dish.
- In another bowl, combine oats, flour, brown sugar, and melted butter. Stir until crumbly.
- Sprinkle the oat mixture over the apples, covering them completely.
- Bake for 30-35 minutes until the top is golden and the apples are bubbly.
- Let it cool slightly before serving. Enjoy warm, ideally with a scoop of ice cream!
Delight Your Senses With Key Lime Pie
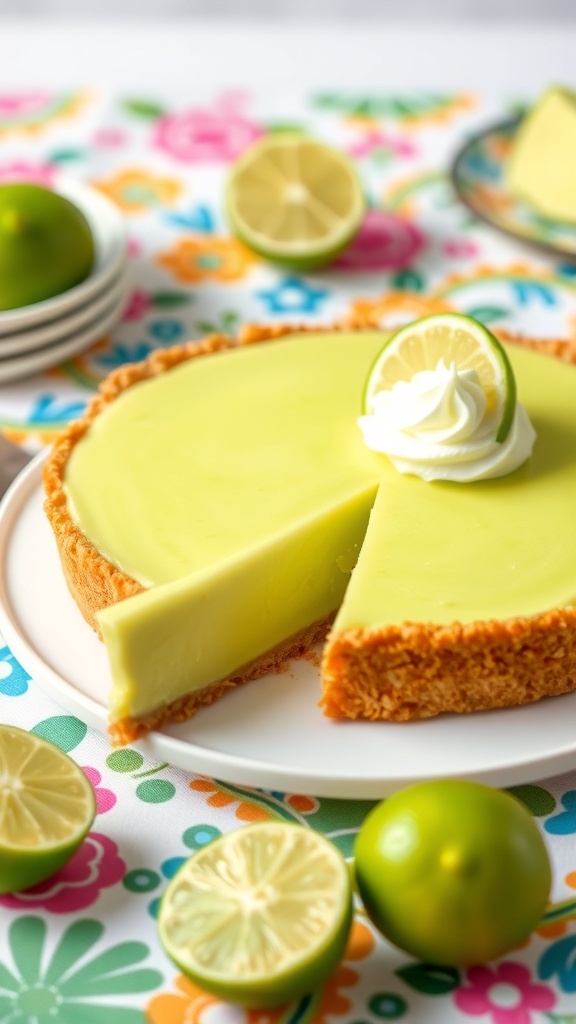
Key lime pie is a classic dessert that brings a burst of flavor to your table. The vibrant yellow filling, made from fresh key lime juice, is both tangy and sweet. Topped with a dollop of whipped cream, it’s a treat that’s hard to resist.
The image captures this delightful pie perfectly, showcasing its glossy surface and golden crust. Surrounding the pie are fresh limes and lemons, hinting at the zesty flavors waiting to be enjoyed. The colorful background adds a cheerful touch, making it a perfect centerpiece for any gathering.
This dessert is not just about taste; it’s also about the experience. Each bite transports you to sunny shores, making it a great choice for those who can’t stop snacking. It’s light enough to satisfy your cravings without feeling heavy.
Ingredients
- 1 ½ cups graham cracker crumbs
- ½ cup unsalted butter, melted
- ⅓ cup granulated sugar
- 4 large egg yolks
- 1 can (14 oz) sweetened condensed milk
- ½ cup fresh key lime juice
- 1 teaspoon lime zest
- Whipped cream for topping
Instructions
- Preheat your oven to 350°F (175°C).
- In a bowl, mix graham cracker crumbs, melted butter, and sugar until combined. Press this mixture into the bottom and up the sides of a pie dish.
- Bake the crust for about 10 minutes until lightly golden. Remove and let it cool.
- In another bowl, whisk together the egg yolks, sweetened condensed milk, key lime juice, and lime zest until smooth.
- Pour the filling into the cooled crust and bake for 15 minutes. Let it cool at room temperature, then refrigerate for at least 3 hours.
- Before serving, top with whipped cream and garnish with lime slices if desired.
Indulge In The Creaminess Of Chocolate Pudding
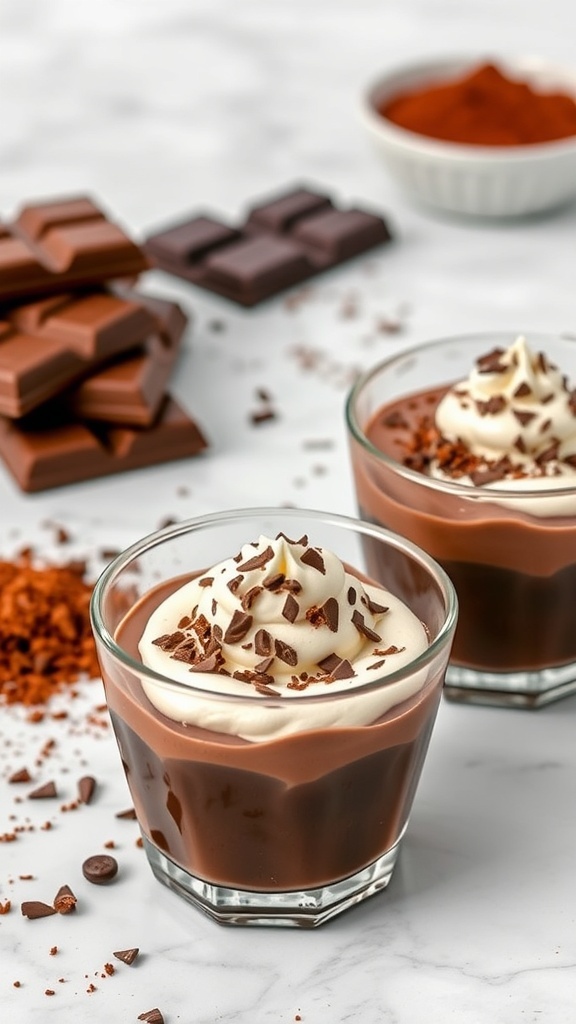
Chocolate pudding is a classic dessert that never fails to satisfy. Its rich, creamy texture is perfect for those moments when you crave something sweet. The image shows two elegant glasses filled with luscious chocolate pudding, topped with a dollop of whipped cream and sprinkled with chocolate shavings. The dark chocolate pieces in the background hint at the delicious ingredients that make this dessert so irresistible.
Making chocolate pudding at home is simple and rewarding. You can enjoy it on its own or pair it with fresh fruit for a delightful twist. This dessert is not just about taste; it also offers a comforting experience that can lift your spirits.
Ingredients
- 2 cups whole milk
- 1/2 cup granulated sugar
- 1/3 cup unsweetened cocoa powder
- 1/4 cup cornstarch
- 1/4 teaspoon salt
- 1 teaspoon vanilla extract
- 2 tablespoons unsalted butter
Instructions
- In a medium saucepan, whisk together the sugar, cocoa powder, cornstarch, and salt.
- Gradually add the milk while whisking to combine. Cook over medium heat, stirring constantly until the mixture thickens and starts to bubble.
- Remove from heat and stir in the vanilla extract and butter until smooth.
- Pour the pudding into serving dishes and let it cool slightly before refrigerating for at least 2 hours.
- Serve chilled, topped with whipped cream and chocolate shavings if desired.
Savor The Layers In Tiramisu Cups
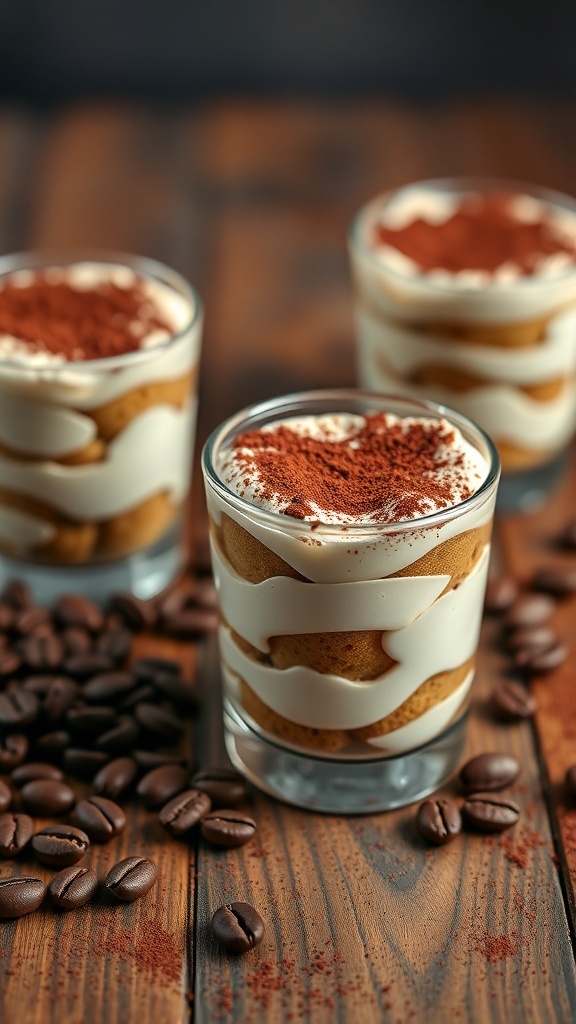
Tiramisu cups are a delightful treat that combines rich flavors and creamy textures. These individual servings are perfect for satisfying your sweet tooth without going overboard. Each cup features layers of coffee-soaked ladyfingers and a luscious mascarpone mixture, topped with a sprinkle of cocoa powder. The presentation in clear cups lets you see those beautiful layers, making them as pleasing to the eyes as they are to the palate.
Making tiramisu cups is simple and fun. You can easily customize them to suit your taste. Whether you prefer a stronger coffee flavor or a sweeter touch, you can adjust the ingredients accordingly. Plus, they’re a great way to impress guests at any gathering!
Ingredients
- 1 cup strong brewed coffee, cooled
- 2 tablespoons coffee liqueur (optional)
- 1 cup mascarpone cheese
- 1 cup heavy cream
- 1/2 cup powdered sugar
- 1 teaspoon vanilla extract
- 12-15 ladyfingers
- Cocoa powder for dusting
Instructions
- Mix the Coffee: In a shallow dish, combine the brewed coffee and coffee liqueur. Set aside.
- Prepare the Cream: In a mixing bowl, beat the heavy cream until soft peaks form. Gradually add powdered sugar and vanilla extract, then fold in the mascarpone cheese until smooth.
- Layer the Cups: Quickly dip each ladyfinger into the coffee mixture and layer them at the bottom of each cup. Add a layer of the mascarpone mixture on top.
- Repeat: Continue layering until you reach the top of the cups, finishing with the mascarpone mixture.
- Chill: Cover the cups and refrigerate for at least 4 hours, or overnight for best results.
- Serve: Before serving, dust the tops with cocoa powder for a finishing touch.
Taste The Freshness Of Melon Sorbet
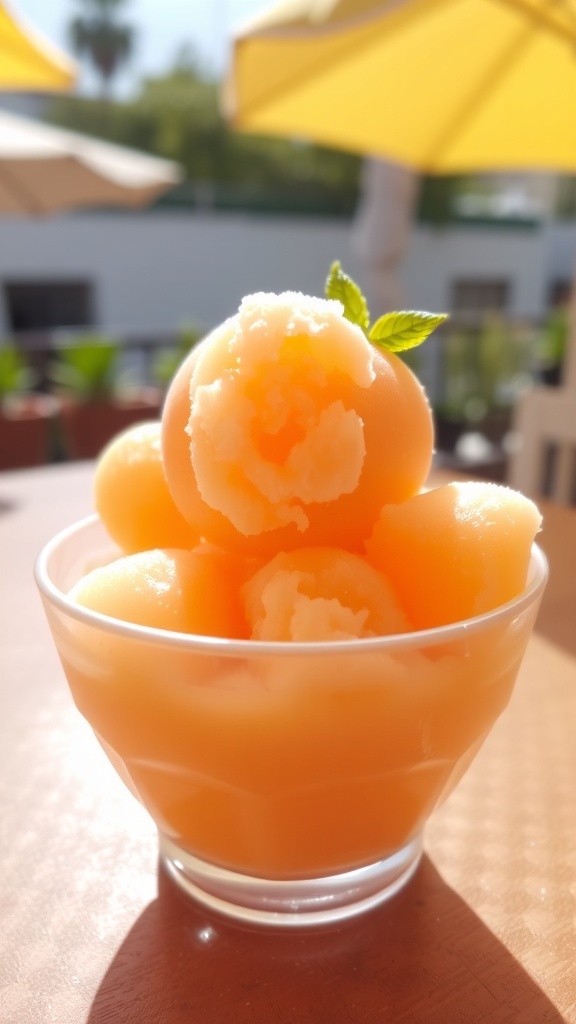
Melon sorbet is a refreshing treat that captures the essence of summer. The vibrant colors of the melon and the smooth texture of the sorbet make it a feast for the eyes and the taste buds. Imagine scooping into a bowl filled with creamy, frozen melon goodness, garnished with fresh mint leaves. It’s the perfect way to satisfy your sweet tooth without all the added sugars found in traditional desserts.
This sorbet is not just about taste; it’s also about enjoying the natural sweetness of fruit. Melons are hydrating and packed with vitamins, making this dessert a guilt-free indulgence. The bright orange and green hues of the melon slices surrounding the sorbet add a playful touch, inviting you to dig in.
Making melon sorbet at home is simple and requires just a few ingredients. You can customize it to your liking, adding a splash of lime juice for a zesty kick or a hint of honey for extra sweetness. This dessert is sure to crush any sugar cravings you might have!
Ingredients
- 4 cups ripe melon, cubed (cantaloupe or honeydew work great)
- 1/2 cup granulated sugar
- 1 tablespoon lime juice
- 1/4 cup water
- Fresh mint leaves for garnish
Instructions
- Prepare the Melon: Start by cutting the melon into cubes. Make sure to remove the seeds and skin.
- Blend the Mixture: In a blender, combine the melon cubes, sugar, lime juice, and water. Blend until smooth.
- Chill the Mixture: Pour the blended mixture into a bowl and refrigerate for about 1 hour until it’s cold.
- Freeze the Sorbet: Pour the chilled mixture into an ice cream maker and churn according to the manufacturer’s instructions. If you don’t have an ice cream maker, pour it into a shallow dish and freeze, stirring every 30 minutes until it’s fully frozen.
- Serve: Once the sorbet is ready, scoop it into bowls and garnish with fresh mint leaves. Enjoy!
Enjoy The Crunch Of Fruit And Nut Energy Bars
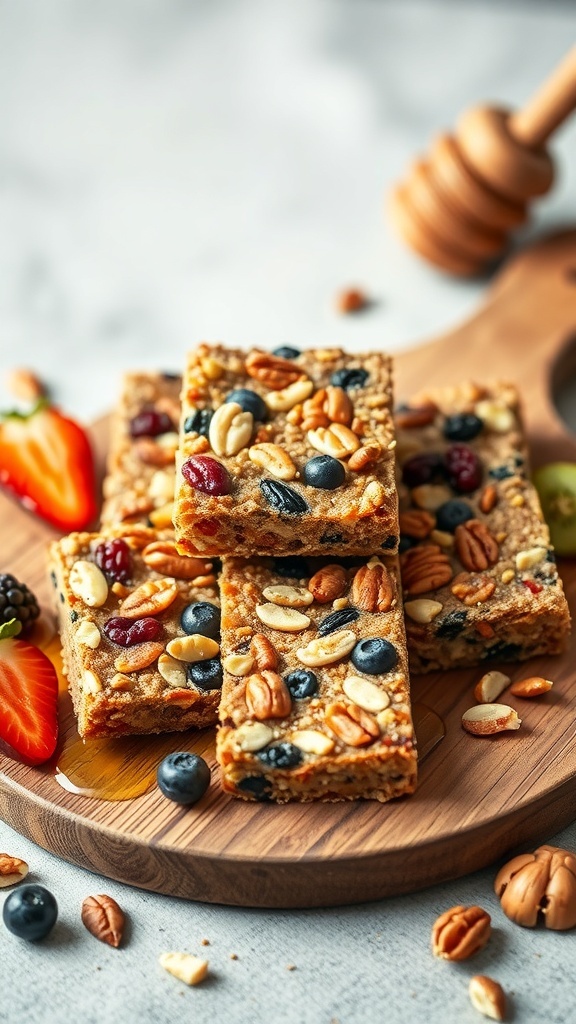
Fruit and nut energy bars are a fantastic way to satisfy your snack cravings while keeping things healthy. These bars are packed with a mix of crunchy nuts and chewy dried fruits, making them perfect for a quick energy boost. The combination of flavors and textures is simply delightful!
Imagine biting into a bar filled with blueberries, strawberries, and a variety of nuts like pecans and almonds. The sweetness from the fruit pairs perfectly with the nuttiness, creating a snack that feels indulgent yet nutritious. Plus, they’re easy to make at home!
These energy bars are not just tasty; they’re also versatile. You can customize them with your favorite nuts and fruits. Whether you prefer a nutty crunch or a fruity burst, the options are endless. They’re great for on-the-go snacking, post-workout fuel, or even a healthy dessert.
Ingredients
- 1 cup rolled oats
- 1/2 cup mixed nuts (almonds, pecans, peanuts)
- 1/2 cup dried fruit (blueberries, cranberries, or strawberries)
- 1/4 cup honey or maple syrup
- 1/4 cup nut butter (peanut or almond)
- 1/2 teaspoon vanilla extract
- 1/4 teaspoon salt
Instructions
- Preheat your oven to 350°F (175°C) and line a baking dish with parchment paper.
- In a large bowl, mix the rolled oats, nuts, and dried fruit.
- In a small saucepan, combine honey, nut butter, vanilla extract, and salt. Heat over low until melted and smooth.
- Pour the melted mixture over the dry ingredients and stir until everything is well coated.
- Press the mixture firmly into the prepared baking dish, spreading it evenly.
- Bake for 20-25 minutes until golden brown. Let it cool completely before cutting into bars.
- Store in an airtight container for up to a week.
Comments
Post a Comment