- Get link
- X
- Other Apps
13 Budget-Friendly Baking Recipes That Taste Gourmet
Budget-friendly baking can be both delicious and gourmet without breaking the bank. This collection of recipes proves that you don’t need fancy ingredients to create mouthwatering treats that impress. From scrumptious cakes to delightful pastries, each recipe maximizes flavor while keeping costs down, making it easy to indulge your sweet tooth without financial stress.
Fruity Delight: Easy Peach Cobbler For Everyone
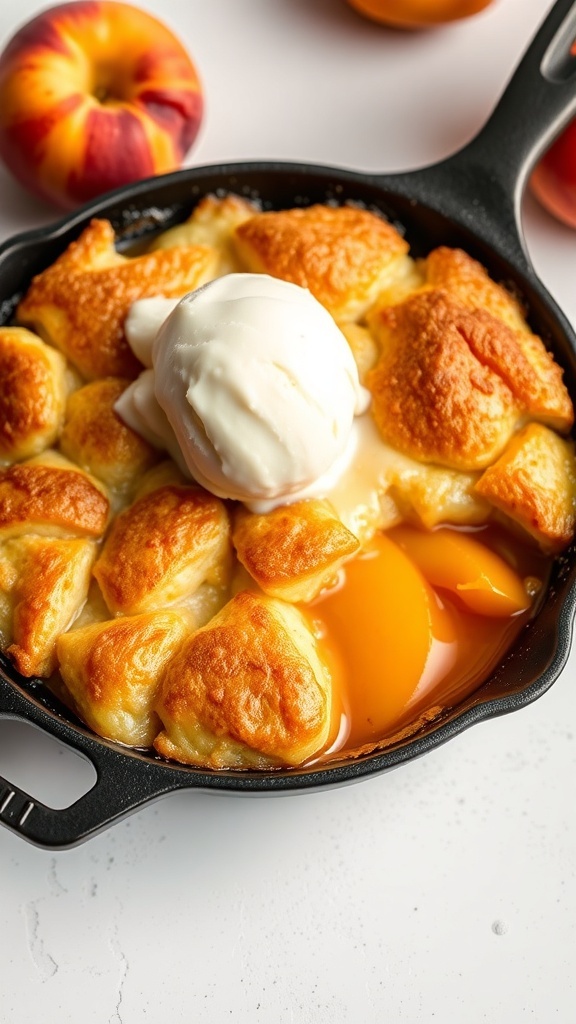
Peach cobbler is a classic dessert that brings warmth and comfort to any gathering. This easy recipe is perfect for those who want to enjoy a fruity treat without breaking the bank. The image showcases a golden-brown cobbler, with fluffy biscuit-like topping nestled over sweet, juicy peaches. Topped with a scoop of vanilla ice cream, it’s a delightful sight that promises a burst of flavor in every bite.
Making peach cobbler at home is simple and requires just a few ingredients. You can easily whip it up for family dinners or casual get-togethers. The combination of fresh peaches and a buttery crust creates a mouthwatering experience that feels gourmet, yet is budget-friendly.
Let’s get started on this delicious recipe!
Ingredients
- 4 cups fresh peaches, sliced
- 1 cup granulated sugar, divided
- 1 teaspoon cinnamon
- 1 tablespoon lemon juice
- 1 cup all-purpose flour
- 1 tablespoon baking powder
- 1/2 teaspoon salt
- 1 cup milk
- 1/2 cup unsalted butter, melted
Instructions
- Preheat the oven to 350°F (175°C).
- In a bowl, mix sliced peaches with 1/2 cup sugar, cinnamon, and lemon juice. Pour this mixture into a greased baking dish.
- In another bowl, combine flour, remaining sugar, baking powder, and salt. Stir in milk and melted butter until just combined.
- Pour the batter over the peaches in the baking dish. Do not stir.
- Bake for 40-45 minutes, or until the top is golden brown and a toothpick comes out clean.
- Let it cool slightly before serving. Enjoy warm with a scoop of vanilla ice cream!
A Twist On Tradition: Simple Banana Bread With Nuts
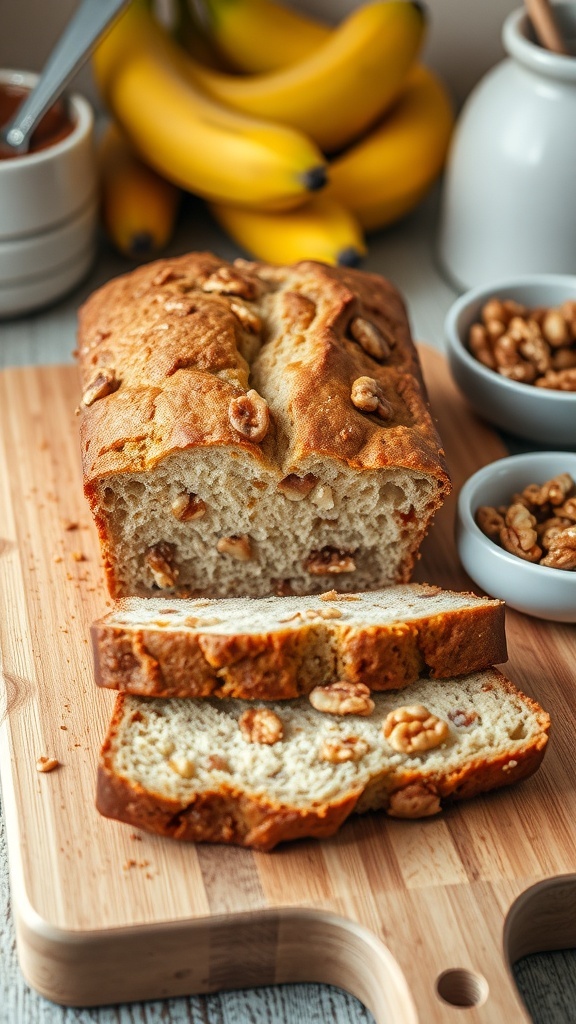
Banana bread is a classic that never goes out of style. This simple recipe adds a delightful twist with the addition of nuts, making it even more satisfying. The image showcases a beautifully baked loaf, golden brown on the outside and soft on the inside. You can see the crunchy walnuts peeking through the slices, adding texture and flavor.
Using ripe bananas is key to achieving that sweet, moist bread. The nuts not only enhance the taste but also provide a nice crunch that complements the soft banana base. This recipe is perfect for breakfast, a snack, or even dessert. Plus, it’s budget-friendly, making it a great choice for anyone looking to bake gourmet treats without breaking the bank.
Let’s get into the ingredients and steps to whip up this delicious banana bread!
Ingredients
- 3 ripe bananas, mashed
- 1/3 cup melted butter
- 1 teaspoon baking soda
- Pinch of salt
- 3/4 cup sugar
- 1 large egg, beaten
- 1 teaspoon vanilla extract
- 1 1/2 cups all-purpose flour
- 1/2 cup chopped walnuts
Instructions
- Preheat your oven to 350°F (175°C) and grease a 4x8 inch loaf pan.
- In a mixing bowl, mash the ripe bananas with a fork until smooth. Stir in the melted butter.
- Add the baking soda and salt. Mix in the sugar, beaten egg, and vanilla extract.
- Finally, stir in the flour until just combined. Fold in the chopped walnuts.
- Pour the batter into the prepared loaf pan and smooth the top.
- Bake for 60-65 minutes, or until a toothpick inserted into the center comes out clean.
- Let it cool in the pan for about 10 minutes before transferring it to a wire rack to cool completely.
Lemon Zest: Refreshing Lemon Bars On A Budget
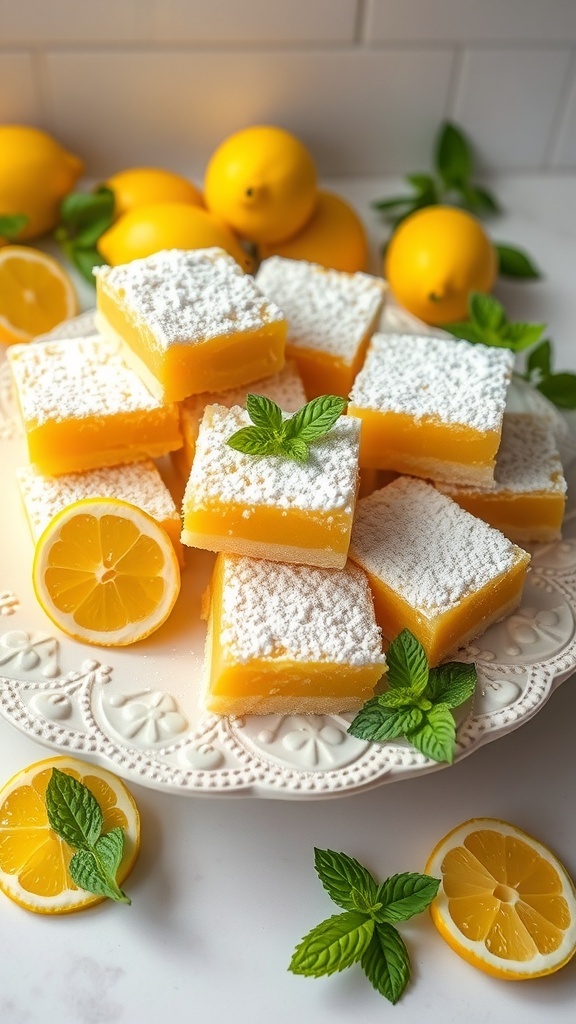
Lemon bars are a delightful treat that brings a burst of sunshine to any dessert table. These bars are not only refreshing but also budget-friendly, making them perfect for any occasion. The image showcases a beautiful platter of lemon bars, dusted with powdered sugar and garnished with fresh mint leaves. The vibrant yellow color of the lemon filling contrasts beautifully with the white sugar, making them look as gourmet as they taste.
Making lemon bars at home is simple and requires just a few ingredients. You’ll need fresh lemons for that zesty flavor, sugar for sweetness, and eggs to bind it all together. The buttery crust adds a lovely texture that complements the tangy filling.
These lemon bars are perfect for sharing with friends or enjoying as a sweet treat after dinner. They are easy to make and can be prepared in advance, allowing you to enjoy more time with your loved ones. Let’s get started on this delicious recipe!
Ingredients
- 1 cup all-purpose flour
- 1/4 cup powdered sugar
- 1/2 cup unsalted butter, softened
- 2 large eggs
- 1 cup granulated sugar
- 1/4 cup fresh lemon juice
- 1 tablespoon lemon zest
- 1/2 teaspoon baking powder
- 1/4 teaspoon salt
- Powdered sugar for dusting
Instructions
- Preheat the oven to 350°F (175°C). Grease an 8x8 inch baking dish.
- Make the crust: In a bowl, mix flour and powdered sugar. Cut in the softened butter until crumbly. Press the mixture into the bottom of the prepared dish.
- Bake the crust for 15 minutes until lightly golden.
- Prepare the filling: In a separate bowl, whisk together eggs, granulated sugar, lemon juice, lemon zest, baking powder, and salt until smooth.
- Pour the filling over the baked crust and return to the oven. Bake for an additional 20-25 minutes until set.
- Let the bars cool completely before cutting into squares. Dust with powdered sugar before serving.
Classic Comfort: Homemade Apple Pie Without Breaking The Bank

Homemade apple pie is a classic dessert that brings warmth and comfort to any table. The image shows a beautifully baked apple pie sitting by a window, surrounded by fresh apples and cinnamon sticks. This scene captures the essence of cozy baking, where simple ingredients come together to create something truly delightful.
Making apple pie doesn’t have to be expensive or complicated. With just a few budget-friendly ingredients, you can whip up a pie that tastes gourmet. The key is to use fresh apples and a flaky crust, both of which can be found at reasonable prices. Plus, the aroma of baking apple pie fills your home with a sense of nostalgia and happiness.
Let’s get to the good stuff! Here’s a simple recipe for a delicious homemade apple pie that won’t break the bank.
Ingredients
- 6 cups sliced apples (about 6 medium apples)
- 3/4 cup granulated sugar
- 2 tablespoons all-purpose flour
- 1 teaspoon ground cinnamon
- 1/4 teaspoon ground nutmeg
- 1 tablespoon lemon juice
- 1 tablespoon butter, cut into small pieces
- 1 package refrigerated pie crusts (or homemade if you prefer)
Instructions
- Preheat your oven to 425°F (220°C).
- In a large bowl, combine sliced apples, sugar, flour, cinnamon, nutmeg, and lemon juice. Toss until the apples are well coated.
- Roll out one pie crust and place it in a 9-inch pie pan. Fill with the apple mixture and dot with butter.
- Cover with the second pie crust, sealing the edges. Cut slits in the top crust to allow steam to escape.
- Bake for 15 minutes in the preheated oven. Reduce the temperature to 350°F (175°C) and continue baking for 30-35 minutes, or until the apples are tender and the crust is golden brown.
- Let the pie cool for at least 2 hours before slicing. Serve warm or at room temperature, and enjoy!
Delicate And Divine: Affordable Vanilla Cupcakes With Buttercream

These vanilla cupcakes are a delightful treat that won't break the bank. Topped with smooth buttercream, they look as good as they taste. The image showcases a beautiful tower of cupcakes, each adorned with a swirl of frosting and colorful sprinkles. Perfect for any celebration, these cupcakes bring a gourmet touch to your dessert table.
Making these cupcakes is simple and fun. You don’t need fancy ingredients to create something special. Just gather some basic pantry staples, and you’re ready to bake. The light, fluffy texture of the cupcakes pairs perfectly with the rich buttercream, making every bite a joy.
Whether you’re hosting a party or just treating yourself, these cupcakes are sure to impress. They’re not only budget-friendly but also a great way to practice your baking skills. Let’s get started on this delicious recipe!
Ingredients
- 1 1/2 cups all-purpose flour
- 1 cup granulated sugar
- 1/2 cup unsalted butter, softened
- 2 large eggs
- 1/2 cup milk
- 2 teaspoons baking powder
- 1 teaspoon vanilla extract
- 1/4 teaspoon salt
- 1 cup unsalted butter, softened (for frosting)
- 4 cups powdered sugar
- 2 teaspoons vanilla extract (for frosting)
- 2-4 tablespoons milk (for frosting)
- Sprinkles for decoration
Instructions
- Preheat the oven to 350°F (175°C) and line a cupcake pan with liners.
- In a large bowl, cream together the softened butter and sugar until light and fluffy. Add the eggs one at a time, mixing well after each addition.
- Stir in the milk and vanilla extract until combined.
- In another bowl, whisk together the flour, baking powder, and salt. Gradually add this dry mixture to the wet ingredients, mixing until just combined.
- Fill each cupcake liner about two-thirds full with batter. Bake for 18-20 minutes or until a toothpick inserted in the center comes out clean.
- Let the cupcakes cool completely on a wire rack.
- For the frosting, beat the softened butter until creamy. Gradually add the powdered sugar, mixing well. Add the vanilla extract and enough milk to achieve a smooth consistency.
- Once the cupcakes are cool, frost them generously with the buttercream and top with sprinkles.
Crispy And Sweet: Classic Rice Krispie Treats For Everyone
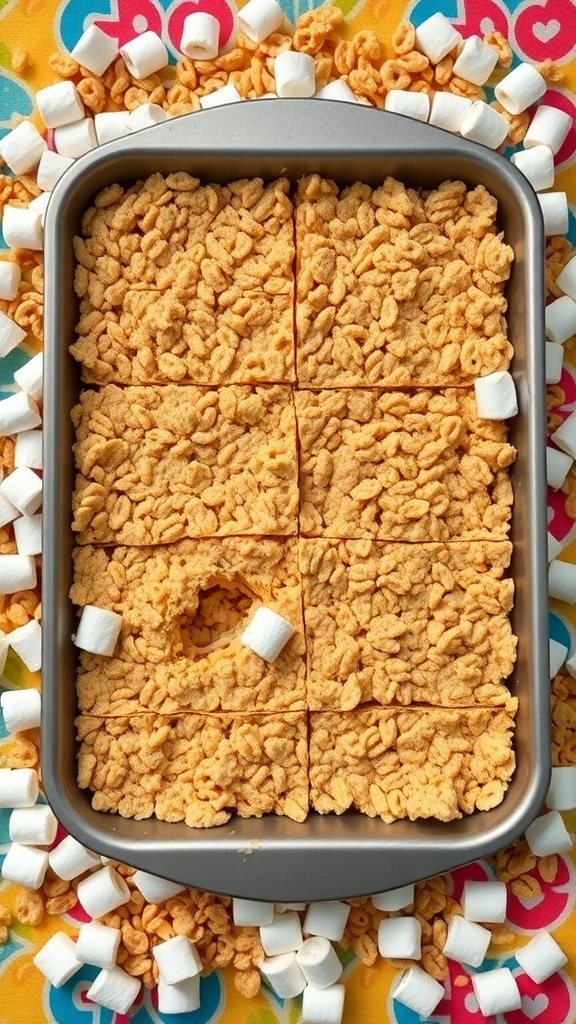
Rice Krispie treats are a timeless favorite. They are simple to make and always bring a smile. The image shows a pan filled with perfectly cut squares of these treats, surrounded by marshmallows and Rice Krispies. The golden color and crispy texture make them look inviting and delicious.
This recipe is budget-friendly and requires just a few ingredients. You can whip these up in no time, making them perfect for parties, snacks, or just a sweet treat at home.
Ingredients
- 6 cups Rice Krispies cereal
- 4 cups mini marshmallows
- 3 tablespoons unsalted butter
- 1/2 teaspoon vanilla extract (optional)
Instructions
- Prepare the Pan: Grease a 9x13 inch baking dish with butter or cooking spray.
- Melt the Butter: In a large saucepan over low heat, melt the butter. Once melted, add the mini marshmallows and stir until completely melted and smooth. If using, mix in the vanilla extract.
- Add the Cereal: Remove the saucepan from heat and add the Rice Krispies cereal. Stir until the cereal is well coated with the marshmallow mixture.
- Transfer to the Pan: Pour the mixture into the prepared baking dish. Use a spatula or your hands (greased) to press it down evenly.
- Cool and Cut: Let the treats cool for about 30 minutes. Once set, cut into squares and enjoy!
Decadent Yet Simple: Rich Brownies Made Easy
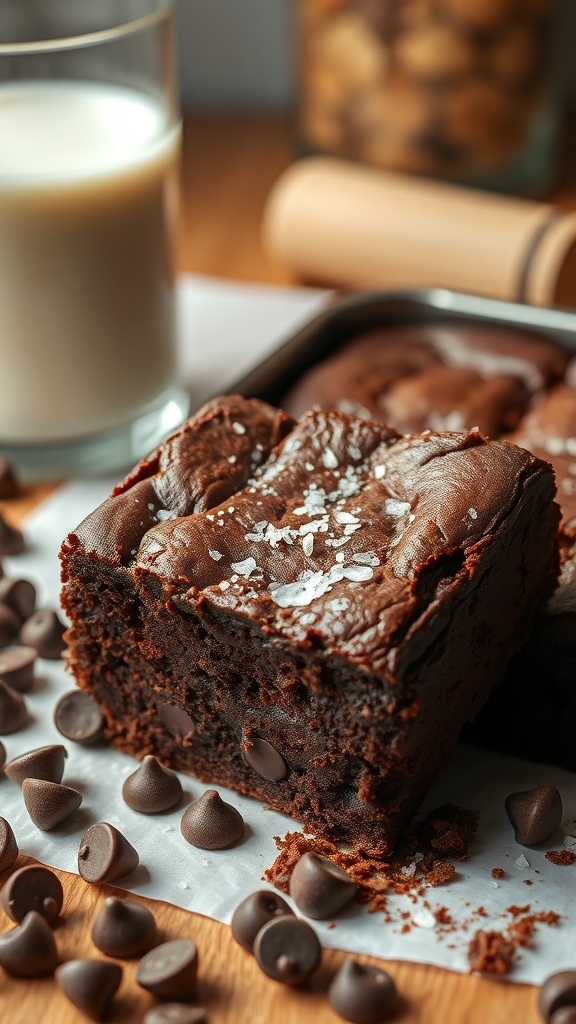
Brownies are a classic treat that never disappoints. They are rich, fudgy, and perfect for satisfying any sweet tooth. The image shows a delicious brownie topped with a sprinkle of sea salt, surrounded by chocolate chips. This simple yet appealing presentation makes it clear that you don’t need fancy ingredients to create something that looks and tastes gourmet.
Making brownies at home can be both fun and economical. With just a few basic ingredients, you can whip up a batch that rivals any bakery. The key is to use quality chocolate and not skimp on the butter. This will give your brownies that deep, rich flavor everyone loves.
Whether you’re baking for a special occasion or just to enjoy at home, these brownies are sure to impress. Pair them with a glass of cold milk for a classic combination that brings back childhood memories. Let’s get to the recipe!
Ingredients
- 1/2 cup (1 stick) unsalted butter
- 1 cup granulated sugar
- 2 large eggs
- 1 teaspoon vanilla extract
- 1/3 cup unsweetened cocoa powder
- 1/2 cup all-purpose flour
- 1/4 teaspoon salt
- 1/4 teaspoon baking powder
- 1/2 cup chocolate chips or nuts (optional)
Instructions
- Preheat the Oven: Preheat your oven to 350°F (175°C) and grease a 9x9-inch baking pan or line it with parchment paper.
- Melt the Butter: In a medium saucepan, melt the butter over low heat. Remove from heat and stir in the sugar, eggs, and vanilla until well combined.
- Mix Dry Ingredients: In a separate bowl, whisk together the cocoa powder, flour, salt, and baking powder.
- Combine Mixtures: Gradually add the dry ingredients to the wet mixture, stirring until just combined. If desired, fold in chocolate chips or nuts.
- Bake: Pour the batter into the prepared baking pan and spread it evenly. Bake for 20-25 minutes, or until a toothpick inserted in the center comes out with a few moist crumbs.
- Cool and Serve: Allow the brownies to cool in the pan before cutting them into squares. Serve as is or with a scoop of ice cream.
Savory Sweets: Budget-Friendly Cornbread Muffins
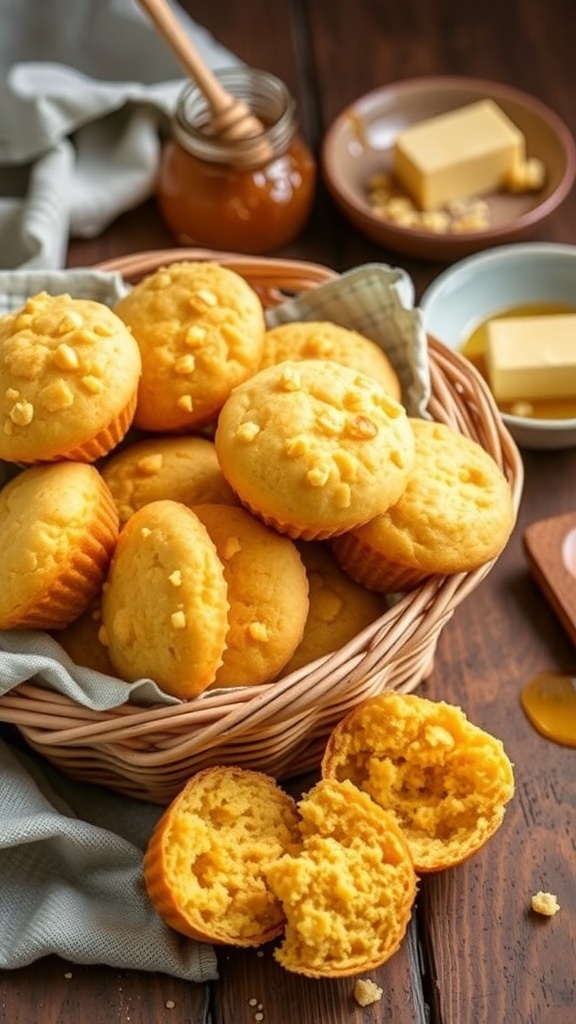
Cornbread muffins are a delightful treat that can easily fit into your budget. They are soft, fluffy, and perfect for any meal. The image shows a warm basket filled with golden cornbread muffins, some topped with bits of corn for added texture. Nearby, you can see butter and honey, which are great toppings to enhance the flavor.
Making cornbread muffins at home is simple and requires just a few ingredients. You can whip these up quickly, making them a fantastic option for breakfast or a side dish. Plus, they taste gourmet without breaking the bank!
Ingredients
- 1 cup cornmeal
- 1 cup all-purpose flour
- 1/4 cup granulated sugar
- 1 tablespoon baking powder
- 1/2 teaspoon salt
- 1 cup milk
- 1/4 cup vegetable oil
- 1 large egg
- 1 cup corn kernels (optional)
Instructions
- Preheat the oven to 400°F (200°C) and grease a muffin tin.
- In a large bowl, mix together cornmeal, flour, sugar, baking powder, and salt.
- In another bowl, whisk together milk, vegetable oil, and egg until well combined.
- Pour the wet ingredients into the dry ingredients and stir until just combined. If using, fold in the corn kernels.
- Divide the batter evenly among the muffin cups, filling each about 2/3 full.
- Bake for 15-20 minutes, or until the muffins are golden and a toothpick inserted comes out clean.
- Let them cool slightly before serving. Enjoy with butter and honey!
Delightful And Easy: No-Bake Chocolate Oatmeal Cookies

No-bake chocolate oatmeal cookies are a delightful treat that combines the rich flavor of chocolate with the wholesome goodness of oats. These cookies are perfect for satisfying your sweet tooth without the need for an oven. Just mix, chill, and enjoy!
The image showcases a plate of these cookies, beautifully arranged with a glossy chocolate finish. They look so inviting, especially paired with a glass of milk. The combination of textures, from the chewy oats to the smooth chocolate, makes them irresistible.
Making these cookies is a breeze. You only need a few simple ingredients, and they come together in no time. This recipe is not only budget-friendly but also a great way to whip up a gourmet treat at home.
Ingredients
- 2 cups rolled oats
- 1/2 cup unsweetened cocoa powder
- 1 cup granulated sugar
- 1/2 cup unsalted butter
- 1/2 cup milk
- 1 teaspoon vanilla extract
- 1/2 cup chocolate chips (for topping)
Instructions
- Prepare the Mixture: In a medium saucepan, combine the butter, sugar, cocoa powder, and milk. Bring to a boil over medium heat, stirring constantly. Once it reaches a boil, let it cook for 1-2 minutes.
- Add Oats: Remove the saucepan from heat and stir in the rolled oats and vanilla extract until well combined.
- Shape the Cookies: Drop spoonfuls of the mixture onto a parchment-lined baking sheet. Flatten them slightly with the back of a spoon.
- Top with Chocolate: While the cookies are still warm, sprinkle chocolate chips on top and let them melt slightly before spreading them for a smooth finish.
- Chill: Place the baking sheet in the refrigerator for about 30 minutes to allow the cookies to set.
Enjoy these no-bake chocolate oatmeal cookies as a quick snack or a sweet treat after dinner. They’re sure to impress!
Fruity And Fun: Wholesome Mixed Berry Muffins
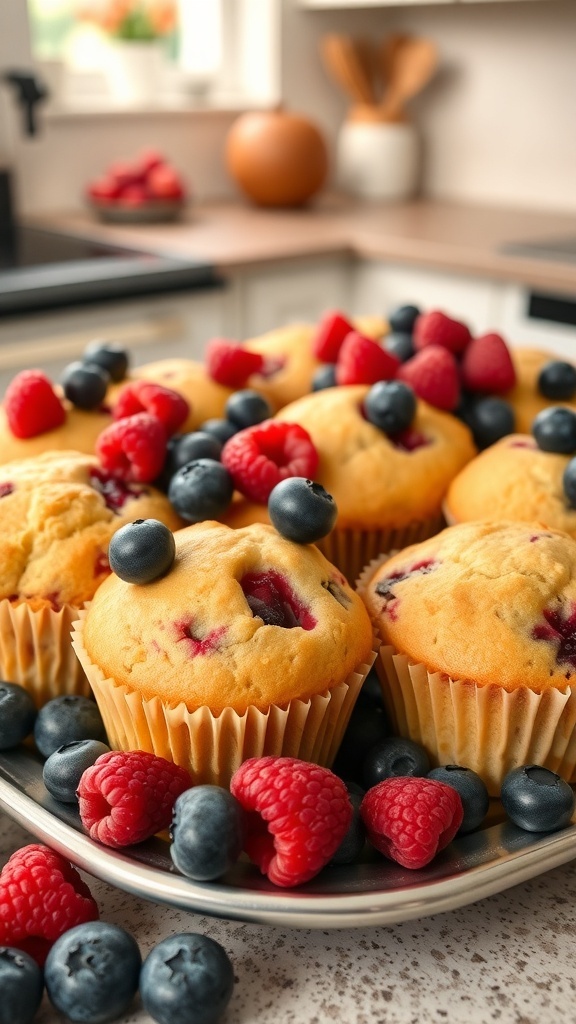
These mixed berry muffins are a delightful treat that brings a burst of flavor to your day. Packed with juicy blueberries and raspberries, they are not only tasty but also a healthy option for breakfast or a snack. The bright colors of the berries make these muffins visually appealing, perfect for sharing with friends or family.
Making these muffins is simple and budget-friendly. You don’t need fancy ingredients to create something that feels gourmet. Just gather your pantry staples and fresh berries, and you’re ready to bake!
These muffins are fluffy and moist, with a hint of sweetness that complements the tartness of the berries. They are great for meal prep, too! Bake a batch and enjoy them throughout the week.
Ingredients
- 1 ½ cups all-purpose flour
- ½ cup granulated sugar
- 2 teaspoons baking powder
- ½ teaspoon salt
- 1/3 cup vegetable oil
- 1 large egg
- 1 teaspoon vanilla extract
- ½ cup milk
- 1 cup mixed berries (blueberries and raspberries)
Instructions
- Preheat your oven to 375°F (190°C) and line a muffin tin with paper liners.
- In a large bowl, whisk together the flour, sugar, baking powder, and salt.
- In another bowl, combine the oil, egg, vanilla extract, and milk. Mix well.
- Pour the wet ingredients into the dry ingredients and stir until just combined. Be careful not to overmix.
- Gently fold in the mixed berries.
- Divide the batter evenly among the muffin cups, filling each about 2/3 full.
- Bake for 18-20 minutes, or until a toothpick inserted into the center comes out clean.
- Let the muffins cool in the pan for a few minutes before transferring them to a wire rack to cool completely.
Cozy Comfort: Simple Pumpkin Bread For The Fall
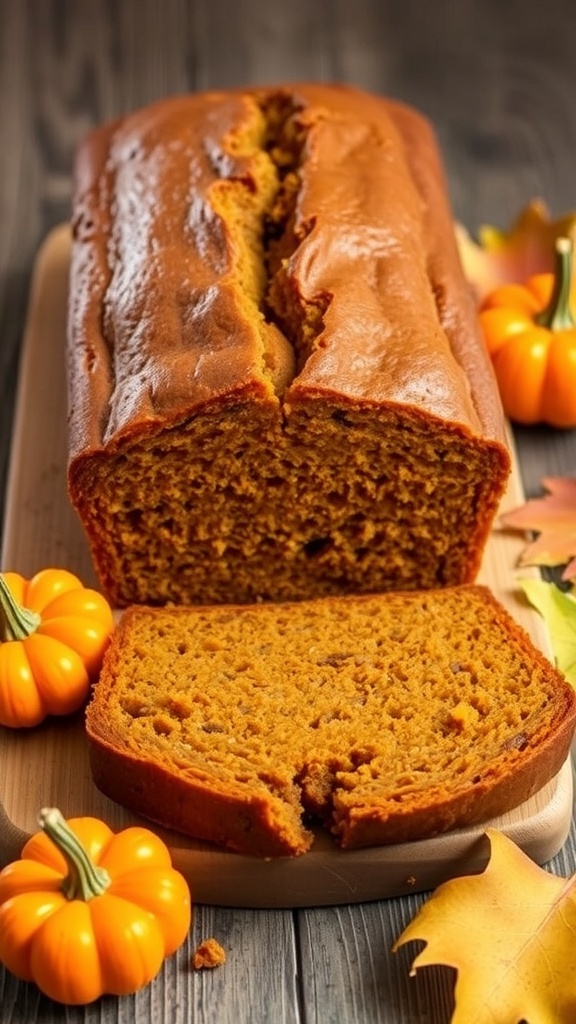
Fall is the perfect time to enjoy warm, comforting treats. Pumpkin bread is a classic choice that fills your kitchen with a delightful aroma. The image shows a beautifully baked loaf of pumpkin bread, golden brown and perfectly sliced. Surrounding it are cute little pumpkins and autumn leaves, adding to the cozy feel of the season.
This pumpkin bread is not only easy to make but also budget-friendly. With simple ingredients, you can whip up a delicious loaf that tastes gourmet. It’s perfect for breakfast, snacks, or even dessert. Plus, it makes a great gift for friends and family!
Let’s get to the recipe so you can enjoy this fall favorite!
Ingredients
- 1 3/4 cups all-purpose flour
- 1 teaspoon baking soda
- 1/2 teaspoon baking powder
- 1/2 teaspoon salt
- 1 teaspoon ground cinnamon
- 1/2 teaspoon ground nutmeg
- 1/4 teaspoon ground ginger
- 1/2 cup granulated sugar
- 1/2 cup brown sugar, packed
- 1/2 cup vegetable oil
- 2 large eggs
- 1 cup canned pumpkin puree
- 1/4 cup water
Instructions
- Preheat your oven to 350°F (175°C). Grease a 9x5-inch loaf pan.
- In a bowl, whisk together the flour, baking soda, baking powder, salt, cinnamon, nutmeg, and ginger.
- In another bowl, mix the granulated sugar, brown sugar, and oil until well combined. Add the eggs, pumpkin puree, and water, mixing until smooth.
- Gradually add the dry ingredients to the wet mixture, stirring until just combined.
- Pour the batter into the prepared loaf pan and smooth the top.
- Bake for 60-65 minutes, or until a toothpick inserted in the center comes out clean.
- Let the bread cool in the pan for 10 minutes, then transfer to a wire rack to cool completely.
Simple Pleasures: No-Fuss Sugar Cookies For Every Occasion

Sugar cookies are a classic treat that brings joy to any gathering. They are simple to make and can be decorated for any occasion, making them a favorite for holidays, birthdays, or just a cozy night in. The image shows a delightful assortment of sugar cookies, beautifully decorated in festive colors and shapes. From Christmas trees to snowflakes, these cookies are not just tasty; they are also a feast for the eyes.
Making sugar cookies doesn’t have to be complicated. With just a few ingredients, you can whip up a batch that tastes gourmet without breaking the bank. The key is to have fun with the decorating. Use icing, sprinkles, or even edible glitter to make each cookie unique. These treats are perfect for sharing with friends and family or even for a sweet personal snack.
Now, let’s get into the recipe so you can start baking your own batch of these delightful cookies!
Ingredients
- 2 3/4 cups all-purpose flour
- 1 teaspoon baking soda
- 1/2 teaspoon baking powder
- 1 cup unsalted butter, softened
- 1 1/2 cups white sugar
- 1 egg
- 1 teaspoon vanilla extract
- 1/2 teaspoon almond extract
- 3 to 4 cups confectioners' sugar
- 2 tablespoons milk
- Food coloring (optional)
- Sprinkles (optional)
Instructions
- Preheat your oven to 375°F (190°C).
- In a small bowl, stir together flour, baking soda, and baking powder. Set aside.
- In a large bowl, cream together the butter and sugar until smooth. Beat in the egg, vanilla extract, and almond extract.
- Gradually blend in the dry ingredients. Roll rounded teaspoonfuls of dough into balls, and place them onto ungreased cookie sheets. Flatten each ball slightly with the bottom of a glass.
- Bake 8 to 10 minutes in the preheated oven, or until golden. Let cool on wire racks.
- For decorating, mix confectioners' sugar with milk to make a smooth icing. Add food coloring if desired. Decorate the cooled cookies and sprinkle with your favorite toppings.
Delightfully Easy: Homemade Cinnamon Rolls With Icing

Homemade cinnamon rolls are a delightful treat that can easily fit into your budget. These rolls are soft, fluffy, and topped with a creamy icing that makes them taste gourmet. The image shows freshly baked cinnamon rolls, golden brown and drizzled with a luscious icing, sitting on a cooling rack. The warm colors and inviting presentation make them hard to resist.
Making cinnamon rolls at home is simpler than you might think. With just a few ingredients, you can create a delicious breakfast or dessert that will impress your family and friends. The process involves mixing, kneading, and rolling, but the results are well worth the effort.
Let’s get started with the recipe so you can enjoy these sweet rolls in no time!
Ingredients
- 4 cups all-purpose flour
- 1/4 cup granulated sugar
- 2 1/4 teaspoons active dry yeast
- 1 teaspoon salt
- 1/4 cup unsalted butter, melted
- 1 cup milk, warmed
- 2 large eggs
- 1/2 cup brown sugar, packed
- 2 tablespoons ground cinnamon
- 1/4 teaspoon ground nutmeg
- 1/4 cup unsalted butter, softened
- 1 cup cream cheese, softened
- 2 cups powdered sugar
- 1 teaspoon vanilla extract
Instructions
- Prepare the Dough: In a large bowl, combine warmed milk, sugar, and yeast. Let it sit for about 5 minutes until foamy. Stir in melted butter, eggs, and salt. Gradually add flour, mixing until a soft dough forms.
- Knead the Dough: Turn the dough onto a floured surface and knead for about 5-7 minutes until smooth and elastic. Place in a greased bowl, cover, and let rise in a warm place until doubled in size, about 1 hour.
- Make the Filling: In a small bowl, mix brown sugar, cinnamon, and nutmeg. Roll out the dough into a rectangle, spread softened butter over the surface, and sprinkle the cinnamon mixture evenly. Roll tightly and slice into individual rolls.
- Bake the Rolls: Place the rolls in a greased baking dish and let rise for another 30 minutes. Preheat the oven to 350°F (175°C). Bake for 25-30 minutes until golden brown.
- Prepare the Frosting: While the rolls are baking, beat together cream cheese, powdered sugar, and vanilla until smooth. Spread the frosting over warm rolls before serving.
Comments
Post a Comment