- Get link
- X
- Other Apps
13 Delicious Healthy No Bake Desserts for the Holidays
Healthy No Bake Desserts for Holidays are here to make your festive celebrations both sweet and guilt-free! These treats are quick to whip up, requiring minimal effort while still delivering delicious flavors and satisfying textures. Perfect for gatherings or cozy nights in, these recipes will keep you enjoying the season without compromising on your health goals.
Treat Yourself To A No-Bake Lemon Cheesecake
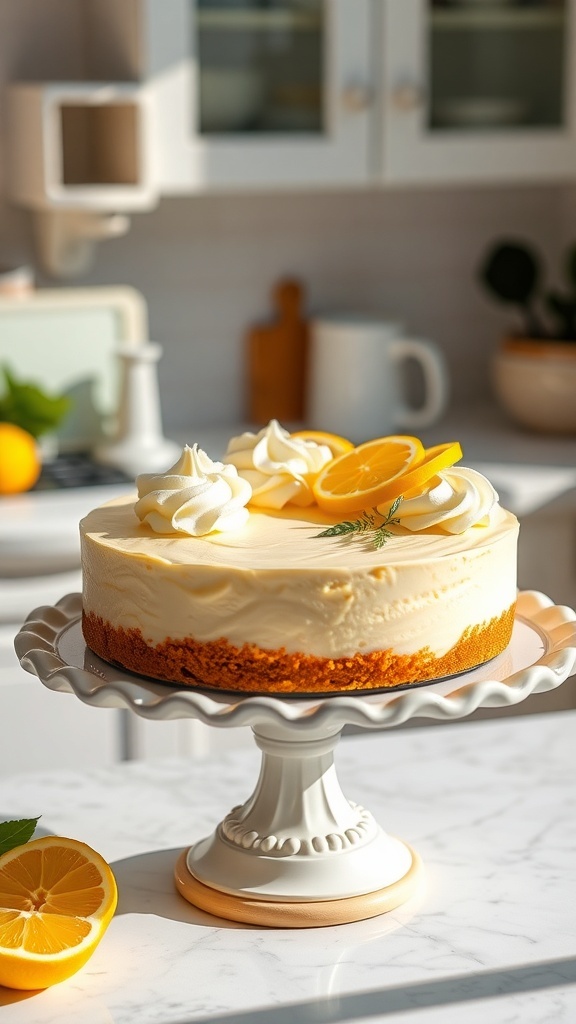
No-bake desserts are a fantastic way to enjoy sweet treats without the fuss of baking. This no-bake lemon cheesecake is a perfect example. It’s light, refreshing, and bursting with citrus flavor, making it an ideal dessert for any holiday gathering.
The cheesecake features a creamy filling made from cream cheese and fresh lemon juice, all resting on a crunchy graham cracker crust. Topped with whipped cream and lemon slices, it’s not just delicious but also visually appealing. Imagine serving this at your next holiday party; it’s sure to impress!
Making this cheesecake is simple and requires no oven time. Just mix your ingredients, pour them into a crust, and let it chill. It’s a great way to treat yourself and your loved ones without spending hours in the kitchen.
Ingredients
- 1 ½ cups graham cracker crumbs
- ½ cup unsalted butter, melted
- 2 cups cream cheese, softened
- 1 cup powdered sugar
- 1 cup heavy whipping cream
- ½ cup fresh lemon juice
- 1 tablespoon lemon zest
- 1 teaspoon vanilla extract
- Whipped cream and lemon slices for garnish
Instructions
- Prepare the Crust: In a bowl, mix graham cracker crumbs and melted butter until well combined. Press the mixture into the bottom of a springform pan to form an even layer.
- Make the Filling: In a large bowl, beat the cream cheese until smooth. Gradually add powdered sugar, mixing until combined. Then, add lemon juice, lemon zest, and vanilla extract, mixing until smooth.
- Whip the Cream: In another bowl, whip the heavy cream until stiff peaks form. Gently fold the whipped cream into the cream cheese mixture until fully combined.
- Assemble: Pour the filling over the prepared crust and spread it evenly. Cover and refrigerate for at least 4 hours, or until set.
- Serve: Once set, remove the cheesecake from the springform pan. Top with whipped cream and lemon slices before serving.
Savor The Flavor Of No-Bake Chocolate Coconut Bars
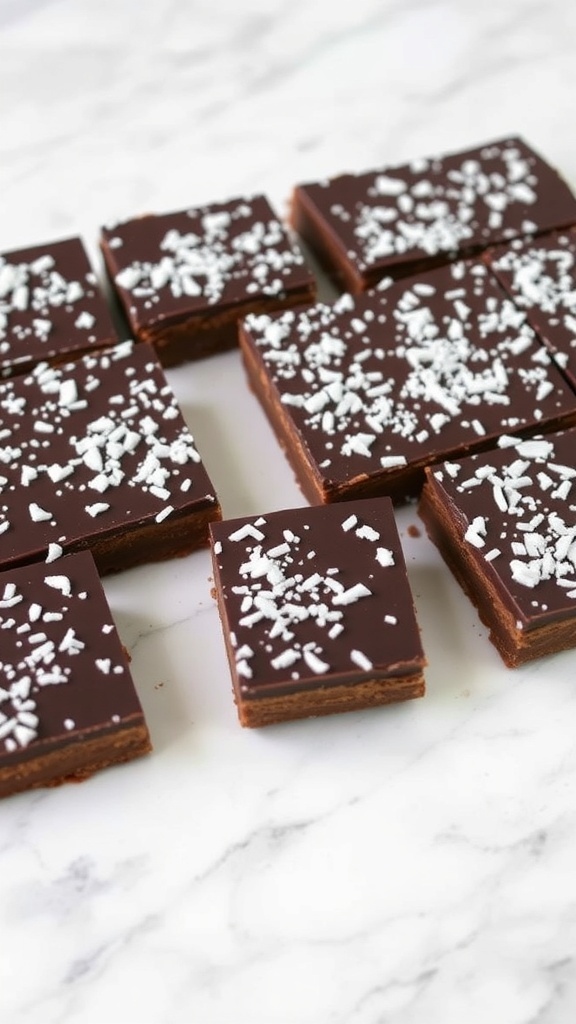
No-bake chocolate coconut bars are a delightful treat that brings together rich chocolate and the tropical taste of coconut. These bars are perfect for holiday gatherings or just a sweet snack at home. The image shows a tempting array of chocolate-covered bars, sprinkled with coconut flakes, making them not only delicious but also visually appealing.
These bars are easy to make and require no baking, which means you can whip them up quickly. They are made with simple ingredients that you probably already have in your pantry. The combination of chocolate and coconut creates a flavor that is hard to resist.
Whether you're hosting a holiday party or just craving something sweet, these no-bake chocolate coconut bars will surely impress. They are a healthier alternative to traditional desserts, allowing you to enjoy a treat without the guilt.
Ingredients
- 1 cup unsweetened shredded coconut
- 1 cup almond flour
- 1/2 cup maple syrup
- 1/2 cup coconut oil, melted
- 1/4 cup cocoa powder
- 1/2 teaspoon vanilla extract
- 1/4 teaspoon salt
- 1/2 cup dark chocolate chips
- 2 tablespoons coconut flakes for topping
Instructions
- Mix the Base: In a bowl, combine shredded coconut, almond flour, maple syrup, melted coconut oil, cocoa powder, vanilla extract, and salt. Stir until well mixed.
- Prepare the Pan: Line an 8x8 inch baking dish with parchment paper. Press the mixture evenly into the bottom of the dish.
- Melt the Chocolate: In a microwave-safe bowl, melt the dark chocolate chips in 30-second intervals, stirring in between until smooth.
- Top the Bars: Pour the melted chocolate over the coconut mixture and spread it evenly. Sprinkle coconut flakes on top.
- Chill: Refrigerate for at least 2 hours until set. Once firm, cut into squares and enjoy!
Relish In No-Bake Strawberry Shortcake Cups
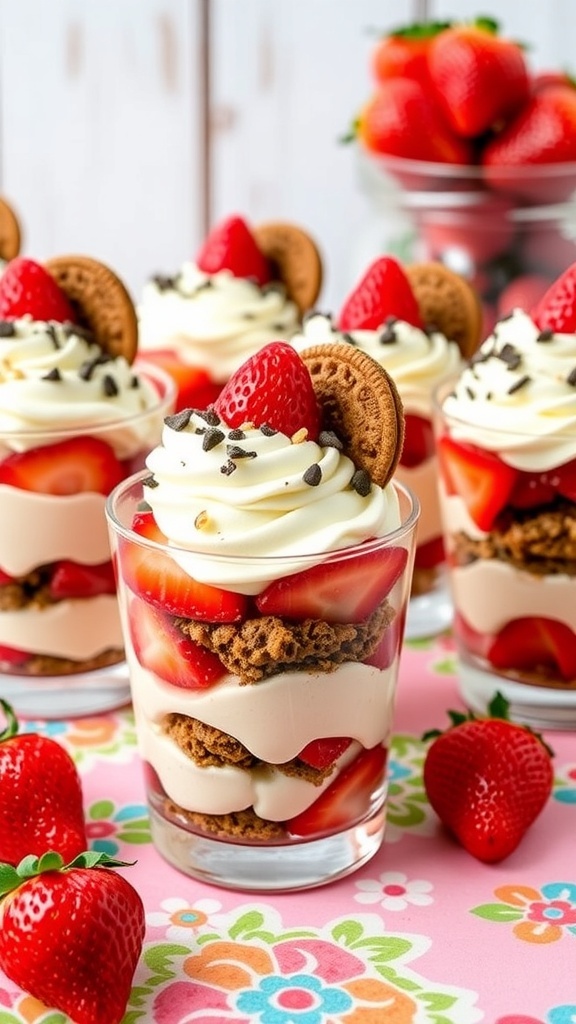
No-bake strawberry shortcake cups are a delightful treat that brings a burst of flavor to any holiday gathering. These individual servings are layered with fresh strawberries, creamy filling, and crunchy cookies, making them a hit with everyone. The vibrant colors and textures make these cups not just tasty but also visually appealing.
To make these cups, you’ll need simple ingredients that come together quickly. The fresh strawberries provide a sweet and juicy contrast to the rich cream, while the cookies add a satisfying crunch. Perfect for those who want a light dessert without the fuss of baking!
Ingredients
- 2 cups fresh strawberries, sliced
- 1 cup heavy cream
- 1/2 cup powdered sugar
- 1 teaspoon vanilla extract
- 1 cup crushed graham crackers or cookies
- Chocolate chips for garnish (optional)
Instructions
- Whip the Cream: In a mixing bowl, beat the heavy cream, powdered sugar, and vanilla extract until soft peaks form.
- Layer the Ingredients: In serving cups, start with a layer of crushed graham crackers or cookies, followed by a layer of sliced strawberries, and then a layer of whipped cream. Repeat the layers until the cups are filled.
- Garnish: Top each cup with a few chocolate chips and a whole strawberry for decoration.
- Chill: Refrigerate the cups for at least 30 minutes before serving to let the flavors meld.
Create Festive Chocolate Dipped Fruit Skewers
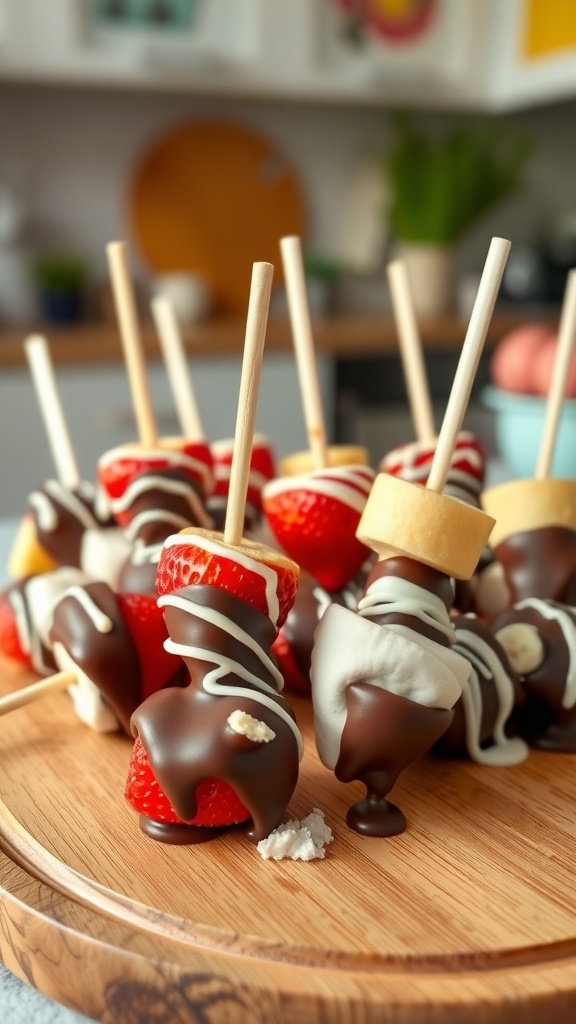
Chocolate dipped fruit skewers are a fun and healthy treat for any holiday gathering. They look festive and are easy to make, making them a hit with both kids and adults. You can use a variety of fruits, like strawberries, bananas, and marshmallows, all drizzled with chocolate for that sweet touch.
Start by preparing your fruits and skewers. Simply thread pieces of fruit onto wooden sticks, alternating between different types for a colorful display. Melt some dark chocolate and dip the skewers into it, letting the excess chocolate drip off. For an extra touch, drizzle some white chocolate on top for a beautiful finish.
These skewers not only taste great but also add a lovely pop of color to your holiday table. They’re perfect for parties or as a light dessert after a big meal. Plus, they’re a healthier option compared to traditional desserts, allowing everyone to enjoy a sweet treat without the guilt!
Ingredients
- 1 cup strawberries, hulled
- 1 banana, sliced
- 1 cup marshmallows
- 1 cup dark chocolate chips
- 1/2 cup white chocolate chips (optional)
- Wooden skewers
Instructions
- Prepare the Skewers: Thread strawberries, banana slices, and marshmallows onto wooden skewers, alternating for variety.
- Melt the Chocolate: In a microwave-safe bowl, melt the dark chocolate chips in 30-second intervals, stirring until smooth.
- Dip the Skewers: Dip each skewer into the melted dark chocolate, allowing excess chocolate to drip off.
- Drizzle White Chocolate: If using, melt the white chocolate chips in the same way and drizzle over the dipped skewers for decoration.
- Chill: Place the skewers on a parchment-lined tray and refrigerate until the chocolate hardens, about 15-20 minutes.
- Serve: Enjoy your festive chocolate dipped fruit skewers as a delightful holiday treat!
Indulge In A No-Bake Pumpkin Spice Tart
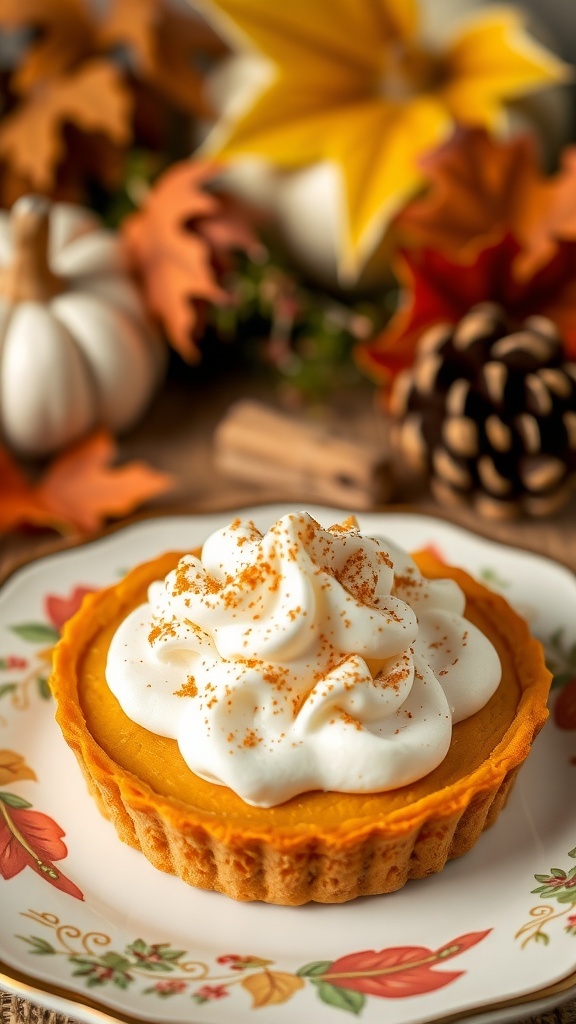
Fall is the perfect time to enjoy the warm flavors of pumpkin spice, and what better way to celebrate than with a no-bake pumpkin spice tart? This delightful dessert is not only easy to make but also a crowd-pleaser at any holiday gathering. The tart features a creamy pumpkin filling that’s rich in flavor, topped with a light whipped cream and a sprinkle of cinnamon.
The image captures the essence of autumn with its vibrant colors. The tart sits elegantly on a decorative plate, surrounded by seasonal decorations like colorful leaves and small pumpkins. This visual feast sets the stage for a delicious treat that embodies the spirit of the holidays.
Making this tart is a breeze. You’ll love how simple it is to whip up a dessert that looks and tastes impressive. Plus, it’s a healthier option that doesn’t compromise on taste. Gather your ingredients and let’s get started!
Ingredients
- 1 ½ cups graham cracker crumbs
- ½ cup unsalted butter, melted
- 2 cups pumpkin puree
- 1 cup Greek yogurt
- ½ cup maple syrup
- 1 teaspoon vanilla extract
- 1 teaspoon pumpkin pie spice
- ½ teaspoon cinnamon
- Whipped cream, for topping
- Extra cinnamon for garnish
Instructions
- Prepare the Crust: In a bowl, mix graham cracker crumbs with melted butter until well combined. Press the mixture into the bottom and sides of a tart pan. Chill in the refrigerator for about 30 minutes.
- Make the Filling: In a large bowl, combine pumpkin puree, Greek yogurt, maple syrup, vanilla extract, pumpkin pie spice, and cinnamon. Mix until smooth and creamy.
- Fill the Tart: Pour the pumpkin filling into the chilled crust, spreading it evenly. Smooth the top with a spatula.
- Chill: Place the tart back in the refrigerator for at least 2 hours to set.
- Serve: Once set, slice the tart and top each piece with whipped cream and a sprinkle of cinnamon before serving.
Enjoy The Crunch Of Chocolate Almond Clusters
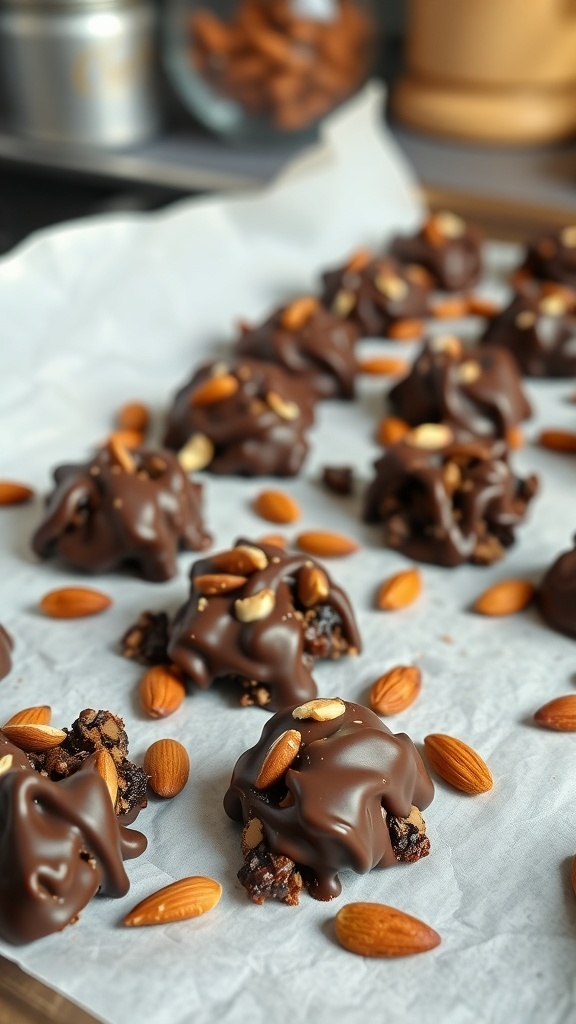
Chocolate almond clusters are a delightful treat that brings together the rich taste of chocolate and the satisfying crunch of almonds. These no-bake desserts are perfect for the holidays, making them a quick and easy option for festive gatherings. The clusters are not only delicious but also provide a nice balance of sweetness and nuttiness.
In the image, you can see clusters of chocolate coated with whole almonds sprinkled on top. The shiny chocolate coating glistens, inviting you to take a bite. Each cluster is unique, showcasing the homemade charm that makes these treats special. They are arranged neatly on parchment paper, making them easy to serve and share.
Making these clusters is a breeze. You only need a few ingredients, and the process is simple. They can be prepared ahead of time and stored, allowing you to enjoy them whenever you want. Plus, they make a great gift for friends and family during the holiday season.
Ingredients
- 1 cup dark chocolate chips
- 2 cups almonds, chopped or whole
- 1/2 cup dried fruit (like cranberries or raisins)
- 1 tablespoon coconut oil (optional)
- Pinch of sea salt
Instructions
- Melt the Chocolate: In a microwave-safe bowl, combine dark chocolate chips and coconut oil. Heat in 30-second intervals, stirring in between, until fully melted and smooth.
- Mix Ingredients: Add the almonds and dried fruit to the melted chocolate. Stir until everything is well coated.
- Form Clusters: Using a spoon, drop spoonfuls of the mixture onto a parchment-lined baking sheet. Shape them into clusters as you go.
- Sprinkle Salt: Lightly sprinkle a pinch of sea salt over the clusters for added flavor.
- Chill: Place the baking sheet in the refrigerator for about 30 minutes, or until the chocolate hardens.
- Serve: Once set, enjoy your chocolate almond clusters or package them as gifts!
Savor The Sweetness Of No-Bake Raspberry Cheesecake
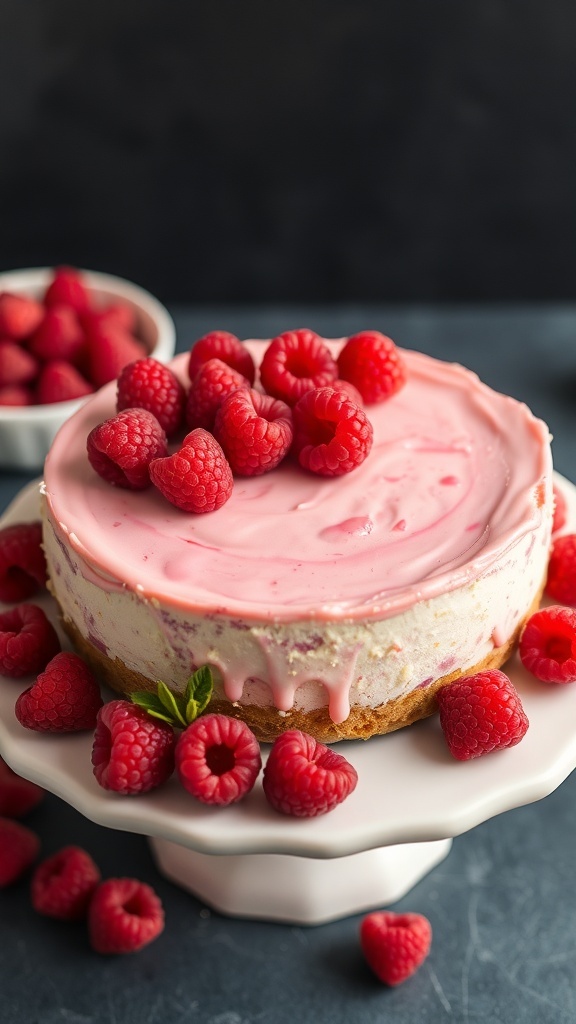
No-bake raspberry cheesecake is a delightful treat that brings a burst of flavor to any holiday gathering. This dessert is not only visually appealing with its vibrant pink hue and fresh raspberries on top, but it’s also easy to make. The creamy texture combined with the tangy sweetness of raspberries creates a perfect balance that everyone will love.
Imagine serving this cheesecake on a beautiful platter, surrounded by more fresh raspberries. It’s a showstopper that requires no baking, making it a stress-free option for busy holiday schedules. Plus, it’s a healthier alternative to traditional desserts, allowing you to enjoy the sweetness without the guilt.
Let’s get into the details of making this delicious no-bake raspberry cheesecake. You’ll need simple ingredients that come together quickly, leaving you with more time to enjoy the festivities!
Ingredients
- 1 ½ cups graham cracker crumbs
- ½ cup unsalted butter, melted
- 2 cups cream cheese, softened
- 1 cup powdered sugar
- 1 teaspoon vanilla extract
- 1 cup fresh raspberries, pureed
- 1 cup whipped cream
- Fresh raspberries for topping
Instructions
- Prepare the Crust: In a bowl, mix graham cracker crumbs and melted butter until combined. Press the mixture into the bottom of a springform pan to form a crust.
- Make the Filling: In a large bowl, beat the softened cream cheese until smooth. Gradually add powdered sugar and vanilla extract, mixing until well combined. Fold in the raspberry puree and whipped cream until smooth.
- Assemble the Cheesecake: Pour the filling over the crust in the springform pan. Smooth the top with a spatula. Refrigerate for at least 4 hours or until set.
- Serve: Once set, remove the cheesecake from the pan. Top with fresh raspberries and serve chilled.
Delight In No-Bake Oatmeal Chocolate Chip Cookies

These no-bake oatmeal chocolate chip cookies are a perfect treat for the holidays. They are easy to make and require no oven, making them a great option for busy days. The combination of oats and chocolate chips creates a delightful flavor that everyone will love.
Picture a colorful plate filled with golden-brown cookies, each studded with rich chocolate chips. The texture is chewy, and the taste is simply irresistible. These cookies not only satisfy your sweet tooth but also provide some wholesome ingredients, making them a healthier choice.
Gather your ingredients and get ready to whip up a batch that will impress your family and friends. These cookies are perfect for sharing or enjoying as a quick snack!
Ingredients
- 2 cups rolled oats
- 1/2 cup natural peanut butter
- 1/3 cup honey or maple syrup
- 1/2 cup chocolate chips
- 1/4 cup unsweetened cocoa powder
- 1 teaspoon vanilla extract
- 1/4 teaspoon salt
Instructions
- Mix Ingredients: In a large bowl, combine rolled oats, peanut butter, honey, cocoa powder, vanilla extract, and salt. Stir until well combined.
- Add Chocolate Chips: Gently fold in the chocolate chips until evenly distributed throughout the mixture.
- Form Cookies: Using your hands, form small balls or patties from the mixture and place them on a parchment-lined baking sheet.
- Chill: Refrigerate the cookies for at least 30 minutes to set.
- Enjoy: Once set, enjoy your delicious no-bake cookies! Store any leftovers in an airtight container in the fridge.
Indulge In Decadent No-Bake Chocolate Hazelnut Cake
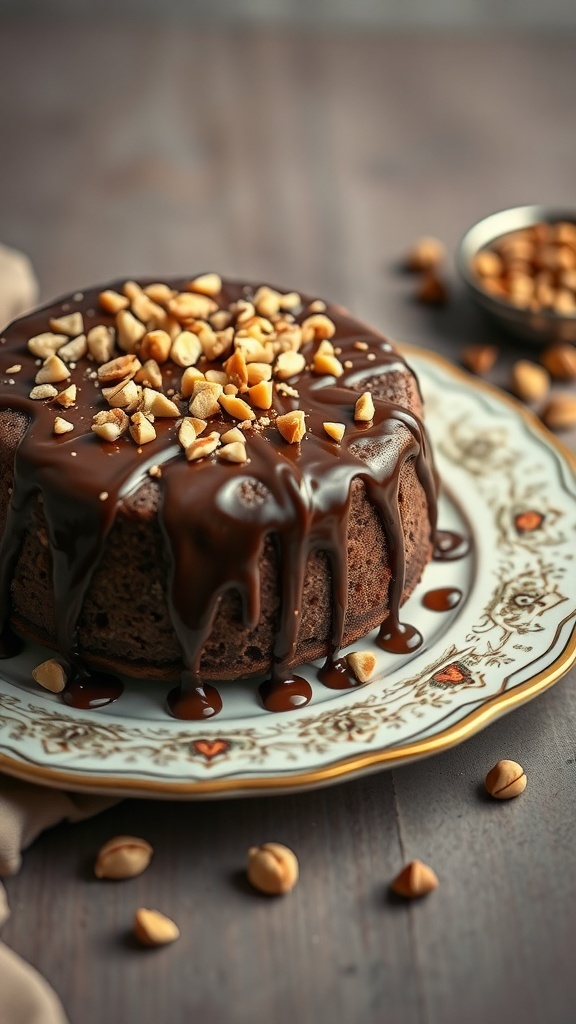
Picture a rich, chocolatey cake topped with a glossy chocolate ganache and sprinkled with crunchy hazelnuts. This no-bake chocolate hazelnut cake is perfect for holiday gatherings. It’s easy to make and doesn’t require an oven, making it a stress-free dessert option.
The cake features layers of chocolate goodness, with a creamy filling that melts in your mouth. The combination of chocolate and hazelnuts creates a delightful flavor that everyone will love. Plus, it looks stunning on any dessert table!
Gather your ingredients and get ready to impress your family and friends with this delicious treat. It’s a great way to satisfy your sweet tooth without the fuss of baking.
Ingredients
- 2 cups crushed chocolate cookies
- 1/2 cup unsalted butter, melted
- 1 cup hazelnut spread
- 1 cup cream cheese, softened
- 1 cup heavy cream
- 1/2 cup powdered sugar
- 1 teaspoon vanilla extract
- 1/2 cup chopped hazelnuts for topping
Instructions
- Prepare the Crust: In a bowl, mix the crushed chocolate cookies with melted butter. Press the mixture into the bottom of a springform pan to form a crust.
- Make the Filling: In a separate bowl, beat together the hazelnut spread, cream cheese, powdered sugar, and vanilla extract until smooth.
- Whip the Cream: In another bowl, whip the heavy cream until stiff peaks form. Gently fold the whipped cream into the hazelnut mixture until well combined.
- Assemble the Cake: Pour the filling over the crust in the springform pan. Smooth the top and refrigerate for at least 4 hours or until set.
- Serve: Once set, remove the cake from the pan. Drizzle with extra hazelnut spread and sprinkle with chopped hazelnuts before serving.
Create A Festive No-Bake Gingerbread Cookie Trifle
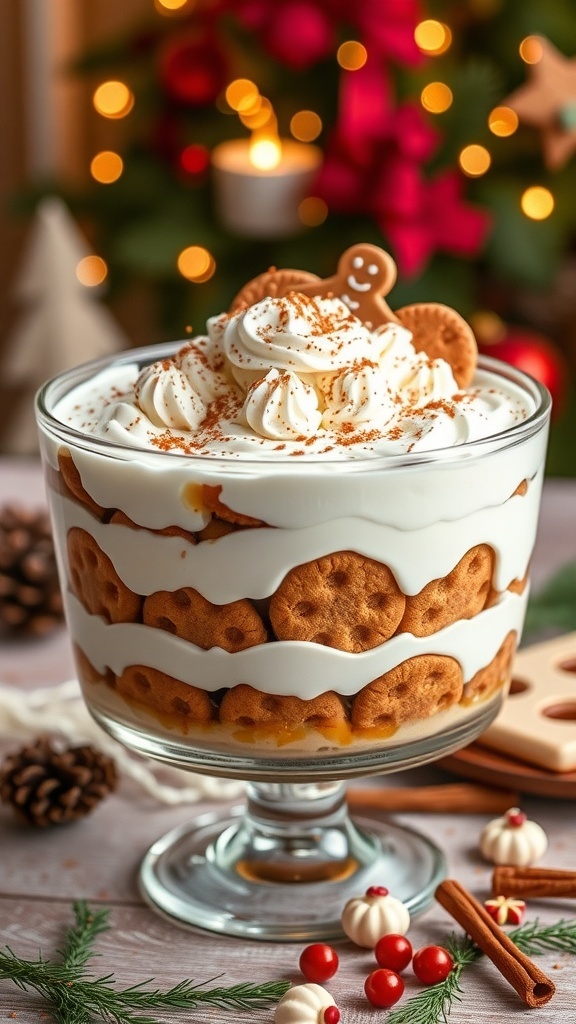
Get into the holiday spirit with a delightful no-bake gingerbread cookie trifle! This dessert is perfect for gatherings, bringing a cozy feel to your table. The layers of creamy goodness and crunchy gingerbread cookies create a treat that everyone will love.
The trifle showcases a beautiful combination of textures and flavors. You’ll see layers of whipped cream, gingerbread cookies, and a hint of spice that makes it festive. It’s not just a feast for the taste buds but also for the eyes, especially with the twinkling lights in the background.
Making this trifle is simple and fun. You can even involve the kids in layering the ingredients. It’s a great way to create memories while preparing for the holidays. Plus, it’s a no-bake recipe, so you won’t have to worry about turning on the oven!
Ingredients
- 2 cups whipped cream
- 1 cup gingerbread cookies, crushed
- 1 cup vanilla yogurt
- 1 teaspoon ground cinnamon
- 1/2 teaspoon ground nutmeg
- 1/4 cup caramel sauce (optional)
- Gingerbread men for decoration
Instructions
- Start by mixing the whipped cream and yogurt in a bowl. Add cinnamon and nutmeg, stirring until well combined.
- In a trifle dish or a large glass bowl, layer half of the crushed gingerbread cookies at the bottom.
- Spread half of the whipped cream mixture over the cookies, smoothing it out.
- Repeat the layers with the remaining cookies and whipped cream mixture.
- If using, drizzle caramel sauce on top and finish with gingerbread men for decoration.
- Chill in the refrigerator for at least 2 hours before serving to let the flavors meld together.
Delight In No-Bake Chocolate Mint Cheesecake
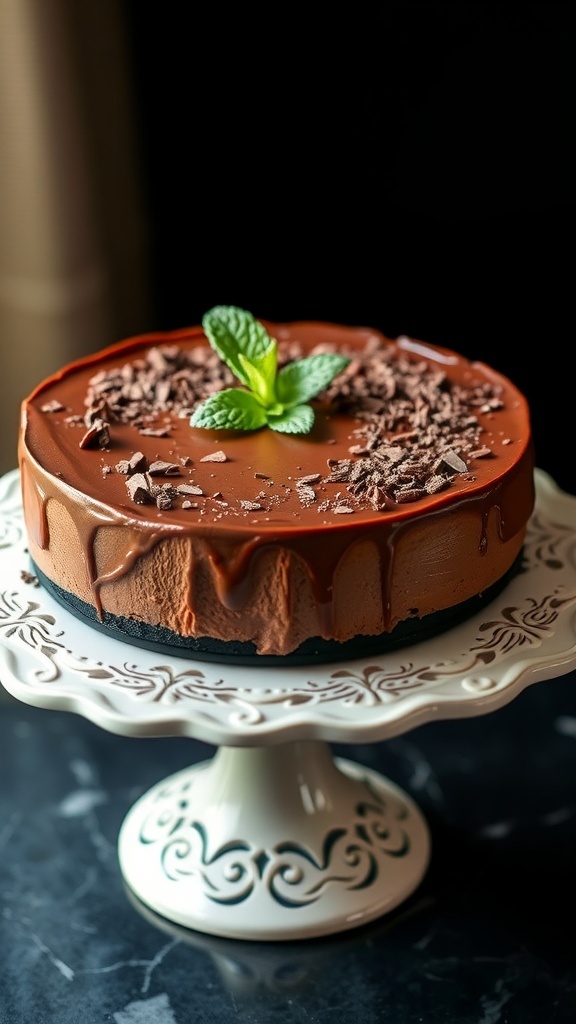
No-bake desserts are a fantastic way to enjoy sweet treats without the hassle of baking. One standout option is the No-Bake Chocolate Mint Cheesecake. This dessert is not only easy to make but also brings a refreshing twist with its minty flavor. The rich chocolate combined with the coolness of mint makes it a perfect choice for holiday gatherings.
The image showcases a beautifully crafted cheesecake, sitting elegantly on a decorative stand. The smooth chocolate topping is adorned with fresh mint leaves and chocolate shavings, adding a touch of elegance. The contrasting colors of the dark chocolate and vibrant green mint create an inviting presentation that is sure to impress your guests.
Making this cheesecake is simple and requires no oven. It’s a great way to save time while still offering a delicious dessert. Let’s get into the recipe so you can whip this up for your next holiday celebration!
Ingredients
- 1 ½ cups chocolate cookie crumbs
- ½ cup unsalted butter, melted
- 2 cups cream cheese, softened
- 1 cup powdered sugar
- 1 teaspoon vanilla extract
- 1 teaspoon peppermint extract
- 1 cup heavy whipping cream
- 2 tablespoons cocoa powder
- Chocolate shavings and mint leaves for garnish
Instructions
- Prepare the Crust: In a bowl, mix the chocolate cookie crumbs with melted butter until combined. Press the mixture firmly into the bottom of a 9-inch springform pan to create a crust.
- Make the Filling: In a large bowl, beat the softened cream cheese until smooth. Gradually add the powdered sugar, vanilla extract, and peppermint extract, mixing until well combined.
- Whip the Cream: In another bowl, whip the heavy cream until stiff peaks form. Gently fold the whipped cream into the cream cheese mixture until fully incorporated.
- Add Cocoa: Sprinkle in the cocoa powder and fold gently to combine, ensuring the mixture remains light and airy.
- Assemble the Cheesecake: Pour the filling over the prepared crust and smooth the top with a spatula. Refrigerate for at least 4 hours or until set.
- Garnish: Once set, remove the cheesecake from the springform pan. Top with chocolate shavings and fresh mint leaves before serving.
Enjoy The Crunch Of Peanut Butter Chocolate Pretzel Bars
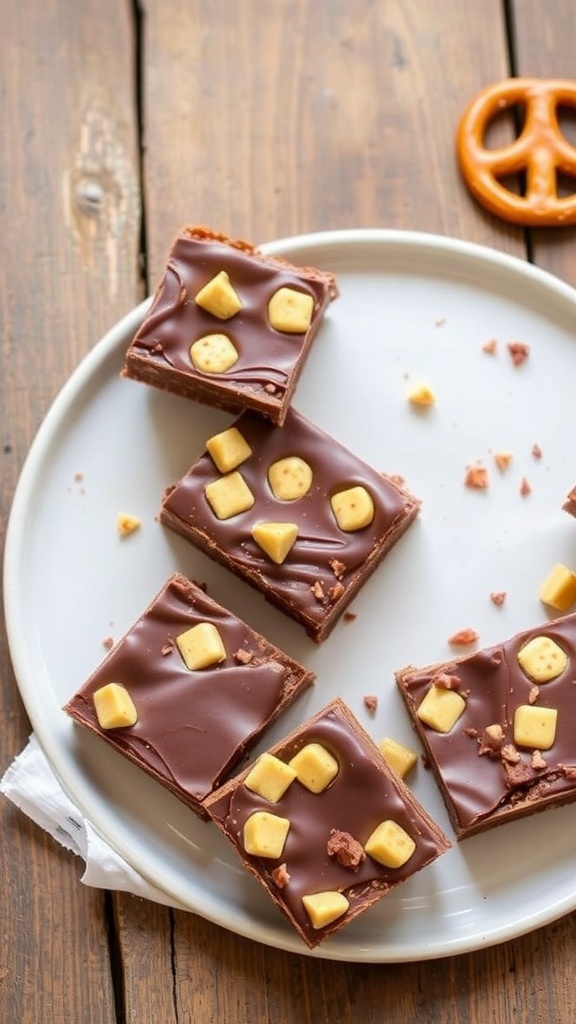
Peanut Butter Chocolate Pretzel Bars are a delightful treat that combines sweet and salty flavors. These bars are perfect for holiday gatherings or cozy nights in. The crunchy pretzels add a satisfying texture, while the creamy peanut butter and rich chocolate create a delicious contrast.
Making these bars is simple and fun. You can whip them up in no time, and they require no baking! Just layer your ingredients, chill, and enjoy. They are sure to impress your friends and family.
Here’s how to make your own Peanut Butter Chocolate Pretzel Bars:
Ingredients
- 2 cups crushed pretzels
- 1 cup creamy peanut butter
- 1/2 cup honey or maple syrup
- 1 cup chocolate chips
- 1/4 cup coconut oil
- 1/2 cup chopped peanuts (optional)
Instructions
- Prepare the Base: In a large bowl, mix crushed pretzels, peanut butter, and honey until well combined. Press this mixture into the bottom of a lined 8x8 inch baking dish.
- Melt the Chocolate: In a small saucepan, combine chocolate chips and coconut oil. Heat over low, stirring until melted and smooth.
- Layer the Chocolate: Pour the melted chocolate over the pretzel base, spreading it evenly. If you like, sprinkle chopped peanuts on top for extra crunch.
- Chill: Place the dish in the refrigerator for at least 2 hours to set.
- Slice and Serve: Once set, cut into bars and enjoy your delicious Peanut Butter Chocolate Pretzel Bars!
Savor The Simplicity Of No-Bake Chocolate Chip Rice Crispy Treats
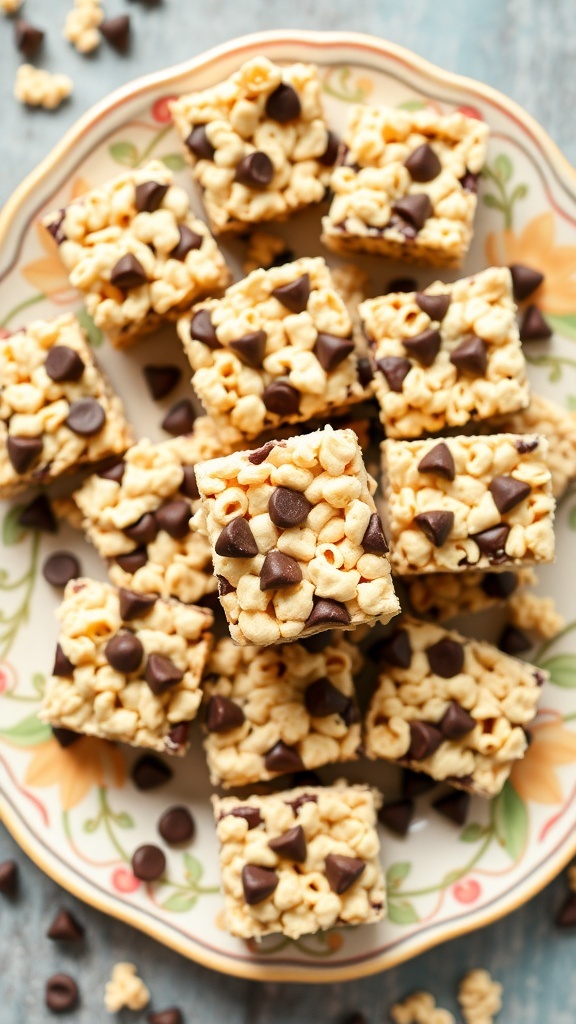
No-bake desserts are a lifesaver during the holidays, especially when you want something quick and delicious. These no-bake chocolate chip rice crispy treats are a perfect example. They are easy to make and require minimal ingredients, making them a go-to choice for gatherings.
The image shows a delightful platter of these treats, cut into neat squares and topped with chocolate chips. The golden color of the rice crispies contrasts beautifully with the dark chocolate, making them visually appealing. It’s hard to resist reaching for one!
These treats are not only tasty but also fun to make with family or friends. Kids can help mix the ingredients, and everyone can enjoy the sweet, crunchy result. They’re a great addition to any holiday spread, bringing a touch of nostalgia and joy.
Ingredients
- 4 cups rice crispy cereal
- 1 cup mini chocolate chips
- 1/2 cup creamy peanut butter
- 1/2 cup honey or maple syrup
- 1 teaspoon vanilla extract
Instructions
- Prepare the Pan: Line an 8x8 inch baking dish with parchment paper for easy removal.
- Mix the Wet Ingredients: In a saucepan over low heat, combine peanut butter, honey, and vanilla extract. Stir until smooth and well combined.
- Add the Cereal: Remove the saucepan from heat and stir in the rice crispy cereal until fully coated.
- Add Chocolate Chips: Gently fold in half of the mini chocolate chips, reserving the rest for topping.
- Press into the Pan: Pour the mixture into the prepared baking dish. Press down firmly with a spatula to create an even layer.
- Top with Chocolate Chips: Sprinkle the remaining chocolate chips on top, pressing them in slightly.
- Chill: Refrigerate for at least 30 minutes to set before cutting into squares.
Enjoy these no-bake chocolate chip rice crispy treats at your next holiday gathering!
Comments
Post a Comment