- Get link
- X
- Other Apps
15 Delicious No-Bake Clean Eating Desserts Perfect for Any Occasion
No-bake desserts are the perfect solution for satisfying your sweet tooth without turning on the oven! This collection showcases easy, clean-eating recipes that come together in no time, using wholesome ingredients you can feel good about. From creamy cheesecakes to chewy energy bites, you'll find a variety of treats that are not only tasty but also simple enough to whip up anytime. Get ready to enjoy deliciously guilt-free sweets with minimal effort!
Refreshing Coconut Chia Pudding: A Tropical Treat
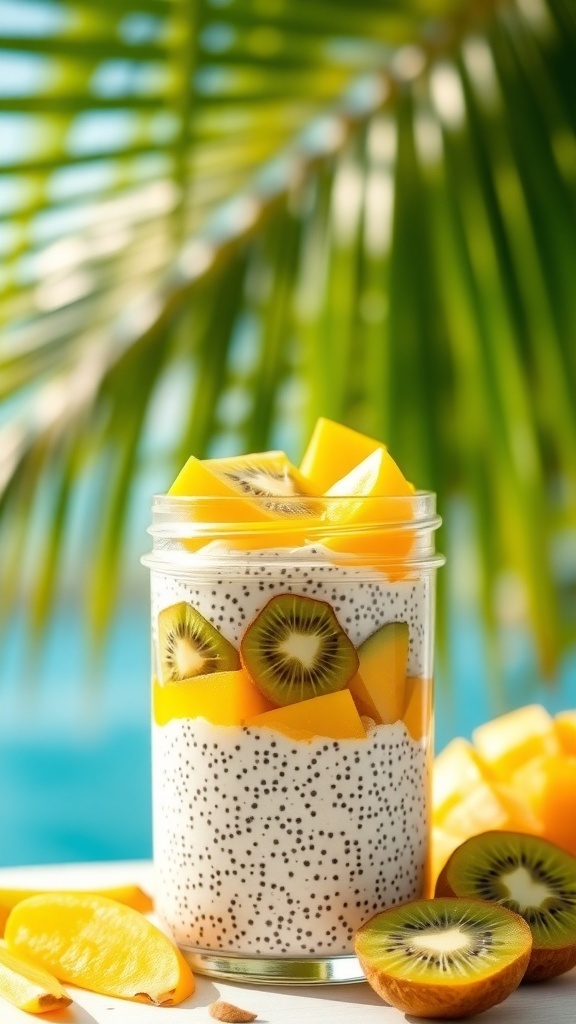
Imagine a sunny day by the beach, with a refreshing dessert in hand. This coconut chia pudding is just that! It’s light, creamy, and packed with tropical flavors. The chia seeds create a delightful texture, while the coconut adds a sweet, nutty taste. Topped with fresh mango and kiwi, this dish is not only delicious but also visually stunning.
This no-bake treat is perfect for warm days or whenever you crave something sweet without the oven. It’s simple to make and can be prepared in advance, making it a great option for gatherings or meal prep.
Ingredients
- 1 cup coconut milk
- 1/4 cup chia seeds
- 2 tablespoons honey or maple syrup
- 1 teaspoon vanilla extract
- 1 ripe mango, diced
- 1 kiwi, sliced
- Fresh mint leaves for garnish (optional)
Instructions
- In a bowl, mix coconut milk, chia seeds, honey, and vanilla extract. Stir well to combine.
- Let the mixture sit for about 10 minutes, then stir again to prevent clumping.
- Cover the bowl and refrigerate for at least 2 hours or overnight to allow the chia seeds to expand and thicken the pudding.
- Once set, layer the chia pudding in a glass with diced mango and kiwi slices.
- Garnish with fresh mint leaves if desired. Serve chilled and enjoy!
Decadent No-Bake Peanut Butter Bars: A Nutty Indulgence
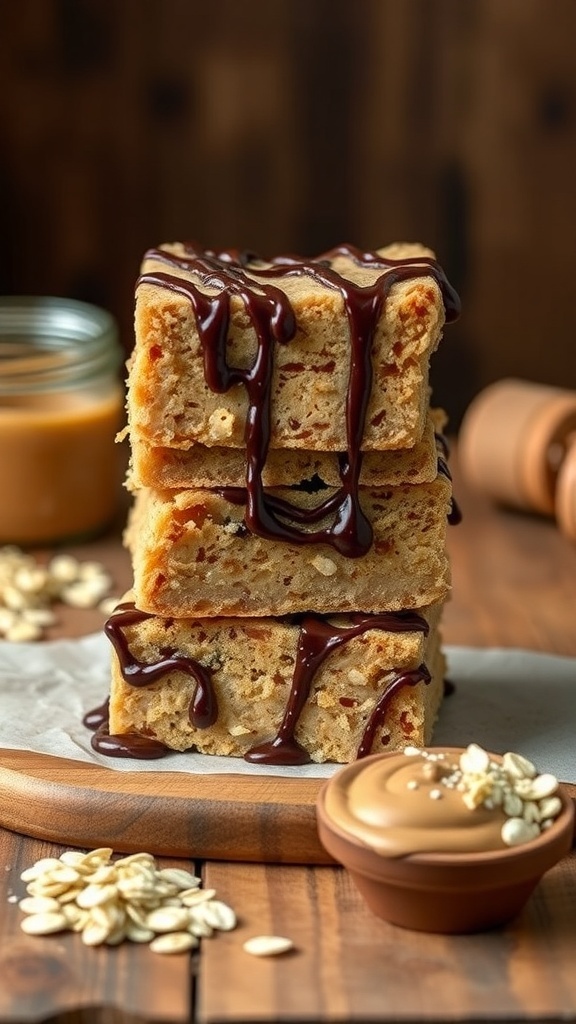
These no-bake peanut butter bars are a delightful treat that brings together the rich flavors of peanut butter and chocolate. The image showcases a stack of golden, chewy bars drizzled with luscious chocolate, sitting on a wooden board. A small bowl of creamy peanut butter and scattered oats hint at the wholesome ingredients used in this recipe.
Making these bars is super simple and requires no oven, making it perfect for warm days or when you just want a quick dessert. The combination of peanut butter, oats, and a touch of sweetness creates a satisfying snack that everyone will love.
Let’s get to the recipe so you can whip up these tasty treats!
Ingredients
- 1 cup natural peanut butter
- 1/2 cup honey or maple syrup
- 2 cups rolled oats
- 1/2 cup chocolate chips
- 1/4 cup unsweetened cocoa powder
- 1 teaspoon vanilla extract
- Pinch of salt
Instructions
- Mix the Base: In a large bowl, combine peanut butter and honey (or maple syrup). Stir until smooth.
- Add Dry Ingredients: Mix in rolled oats, cocoa powder, vanilla extract, and a pinch of salt until everything is well combined.
- Press into Pan: Line an 8x8 inch baking dish with parchment paper. Press the mixture evenly into the bottom of the dish.
- Melt the Chocolate: In a microwave-safe bowl, melt the chocolate chips in 30-second intervals, stirring in between until smooth.
- Drizzle and Chill: Pour the melted chocolate over the pressed mixture and spread it evenly. Refrigerate for at least 2 hours until firm.
- Cut and Serve: Once set, lift the bars out of the pan using the parchment paper. Cut into squares and enjoy!
Fruity No-Bake Cheesecake: A Sweet Escape
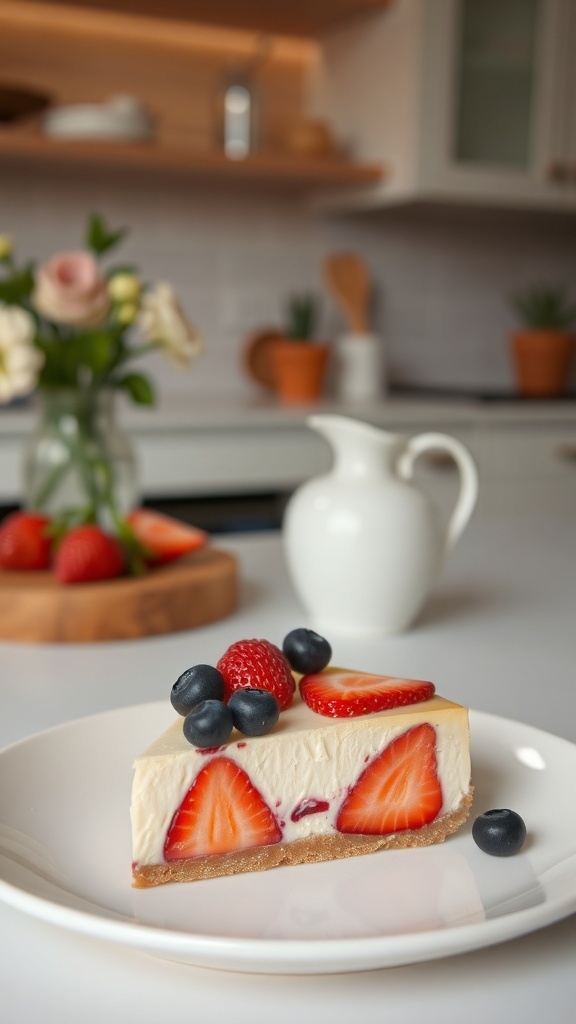
This fruity no-bake cheesecake is a delightful treat that brings together the freshness of strawberries and blueberries. The creamy filling sits atop a crunchy base, making it a perfect dessert for any occasion. The vibrant colors of the fruit not only make it visually appealing but also add a burst of flavor that everyone will love.
Making this cheesecake is super easy. You don’t need an oven, which means less hassle and more time to enjoy your dessert. Just gather your ingredients, mix them up, and let the fridge do the work. It’s a great way to satisfy your sweet tooth while sticking to clean eating principles.
Now, let’s get to the fun part! Here’s how you can whip up this delicious cheesecake at home.
Ingredients
- 1 ½ cups graham cracker crumbs
- ½ cup unsalted butter, melted
- 2 cups cream cheese, softened
- 1 cup Greek yogurt
- ½ cup honey or maple syrup
- 1 teaspoon vanilla extract
- 1 cup fresh strawberries, sliced
- 1 cup fresh blueberries
Instructions
- Prepare the Crust: In a bowl, mix the graham cracker crumbs and melted butter until well combined. Press this mixture into the bottom of a springform pan to create an even layer.
- Make the Filling: In another bowl, beat the softened cream cheese until smooth. Add the Greek yogurt, honey, and vanilla extract. Mix until creamy and well blended.
- Layer the Fruit: Pour half of the cream cheese mixture over the crust. Arrange half of the sliced strawberries and blueberries on top. Pour the remaining cream cheese mixture over the fruit, then top with the rest of the berries.
- Chill: Cover the cheesecake with plastic wrap and refrigerate for at least 4 hours or overnight to set.
- Serve: Once set, carefully remove the sides of the springform pan. Slice and enjoy your fruity no-bake cheesecake!
Chocolate Hazelnut Energy Bites: A Power Snack
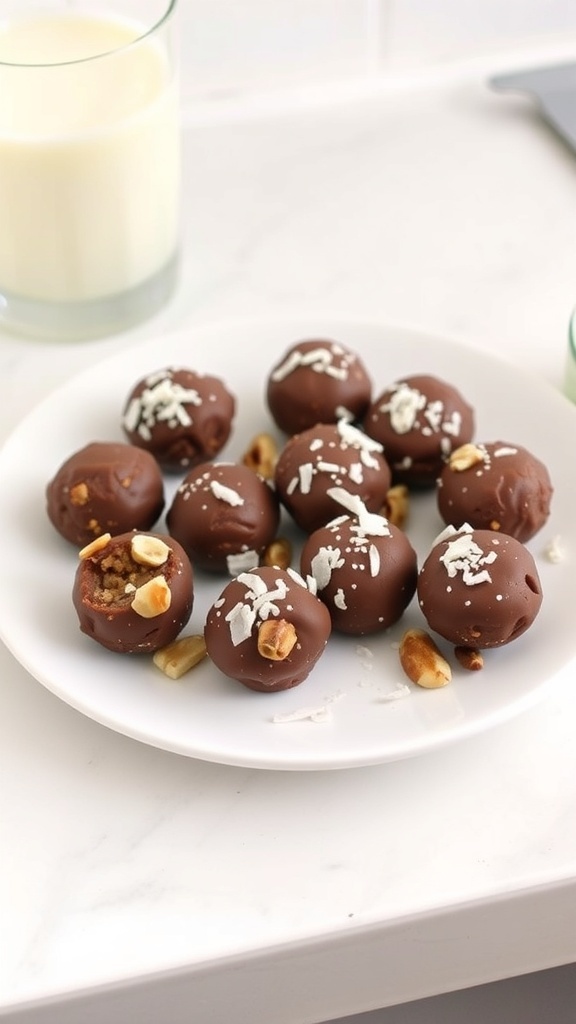
Chocolate Hazelnut Energy Bites are the perfect snack for anyone looking for a quick energy boost. These little bites are not only delicious but also packed with nutrients. They combine the rich flavor of chocolate with the nutty goodness of hazelnuts, making them a satisfying treat.
In the image, you can see a plate filled with these delightful energy bites. They are coated in a smooth chocolate layer and topped with bits of nuts and coconut flakes, adding a nice crunch. A glass of milk sits nearby, making it a great pairing for a snack or dessert.
These energy bites are super easy to make and require no baking. Just mix the ingredients, roll them into balls, and chill. They are perfect for meal prep or a quick grab-and-go snack!
Ingredients
- 1 cup rolled oats
- 1/2 cup hazelnut butter
- 1/4 cup honey or maple syrup
- 1/4 cup cocoa powder
- 1/4 cup chopped hazelnuts
- 1/4 cup dark chocolate chips
- 1/4 cup shredded coconut (optional)
Instructions
- Mix Ingredients: In a large bowl, combine rolled oats, hazelnut butter, honey or maple syrup, cocoa powder, chopped hazelnuts, and dark chocolate chips. Stir until well combined.
- Form Bites: Using your hands, take small amounts of the mixture and roll them into bite-sized balls.
- Chill: Place the energy bites on a baking sheet lined with parchment paper. Refrigerate for at least 30 minutes to firm up.
- Serve: Enjoy your energy bites chilled or at room temperature. Store any leftovers in an airtight container in the fridge.
Classic Fruit And Yogurt Parfait: A Breakfast Favorite
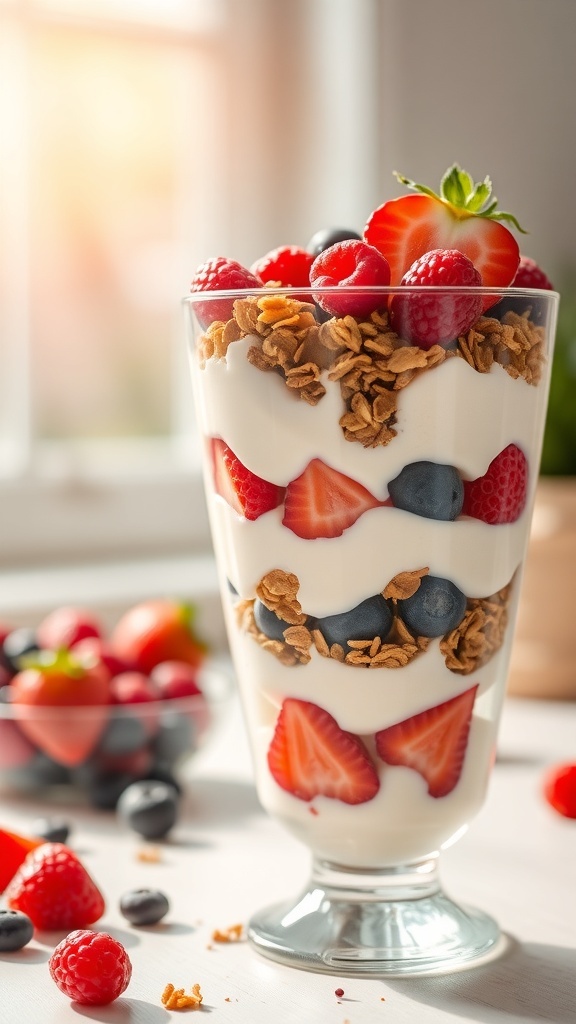
The classic fruit and yogurt parfait is a delightful way to start your day. This simple yet satisfying dish layers creamy yogurt, fresh fruits, and crunchy granola, making it a perfect breakfast or snack option. The vibrant colors of the fruits, like strawberries, blueberries, and raspberries, create an inviting look that’s hard to resist.
Making a parfait is easy and fun. You can customize it with your favorite fruits and yogurt flavors. The combination of textures—smooth yogurt, juicy fruits, and crispy granola—makes every bite enjoyable. Plus, it’s a healthy choice packed with vitamins and nutrients.
To prepare your parfait, simply layer yogurt at the bottom of a glass, followed by a mix of fruits and granola. Repeat the layers until you reach the top. Finish with a few extra pieces of fruit for a beautiful presentation. This dish is not only delicious but also visually appealing, making it a great option for brunch gatherings or a quick breakfast on the go.
Ingredients
- 2 cups plain Greek yogurt
- 1 cup strawberries, sliced
- 1 cup blueberries
- 1 cup raspberries
- 1 cup granola
- Honey or maple syrup (optional)
Instructions
- Start by preparing your fruits. Wash and slice the strawberries.
- In a glass or bowl, add a layer of Greek yogurt at the bottom.
- Add a layer of sliced strawberries, followed by a layer of granola.
- Next, add a layer of blueberries and then another layer of yogurt.
- Repeat the layers until the glass is full, finishing with a layer of fruit on top.
- If desired, drizzle honey or maple syrup over the top for added sweetness.
- Serve immediately and enjoy your delicious parfait!
Nutty Date And Coconut Rolls: A Simple Treat
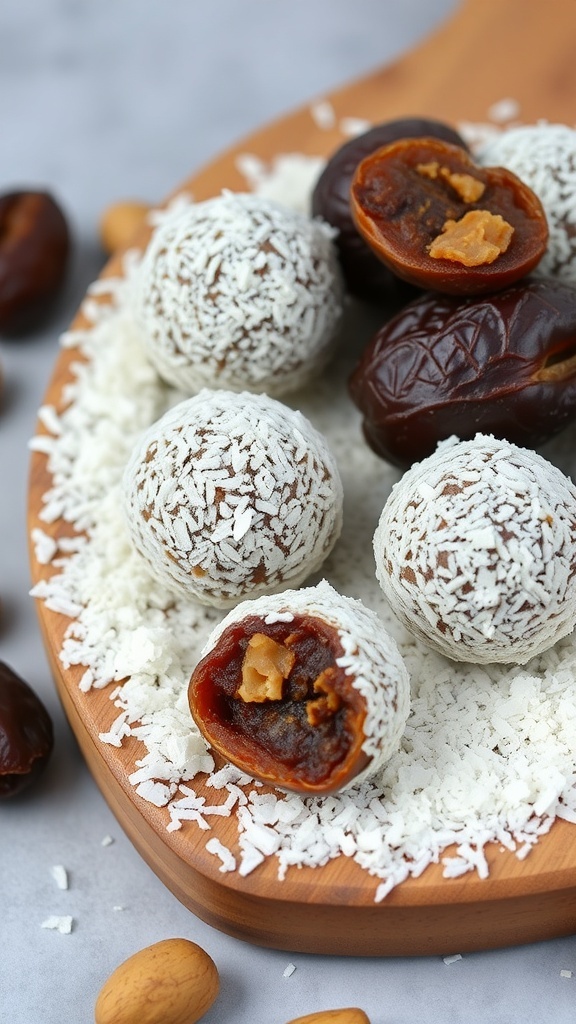
Nutty Date and Coconut Rolls are a delightful no-bake treat that’s perfect for satisfying your sweet tooth. These little bites are not only easy to make but also packed with natural goodness. The combination of dates, nuts, and coconut creates a rich flavor that everyone will love.
In the image, you can see these tasty rolls coated in shredded coconut, resting on a wooden platter. The texture looks inviting, and you can spot the gooey date filling peeking out from one of the rolls. It’s a simple yet appealing presentation that makes these treats hard to resist!
These rolls are great for snacking or as a quick dessert. Plus, they’re made with clean ingredients, so you can enjoy them without any guilt. Let’s get into how you can whip these up in no time!
Ingredients
- 1 cup Medjool dates, pitted
- 1/2 cup almonds (or your favorite nuts)
- 1/4 cup shredded coconut (plus more for coating)
- 1 tablespoon nut butter (optional)
- Pinch of salt
Instructions
- Blend the Ingredients: In a food processor, combine the pitted dates, almonds, shredded coconut, nut butter, and salt. Pulse until the mixture is well combined and sticky.
- Form the Rolls: Take small portions of the mixture and roll them into bite-sized balls. If the mixture is too sticky, wet your hands slightly to make rolling easier.
- Coat with Coconut: Roll each ball in additional shredded coconut until fully coated.
- Chill: Place the rolls in the refrigerator for about 30 minutes to firm up.
- Serve: Enjoy your Nutty Date and Coconut Rolls as a quick snack or dessert!
Zesty Lemon Coconut Bars: A Citrus Bliss
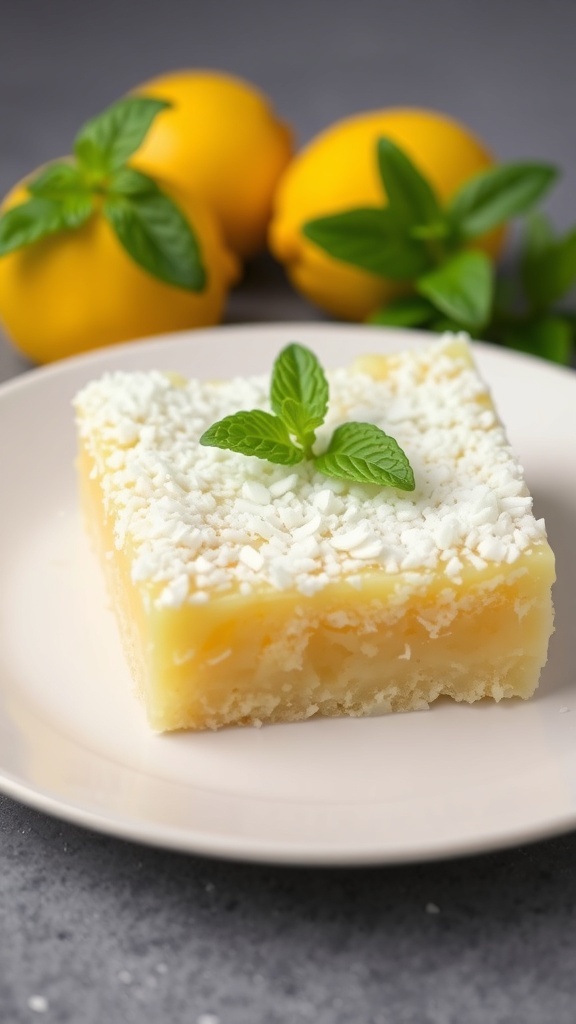
These Zesty Lemon Coconut Bars are a delightful treat that brings a burst of sunshine to your day. The bright yellow color of the bars, topped with a sprinkle of coconut, makes them visually appealing and perfect for any occasion. The fresh lemons add a tangy flavor that pairs beautifully with the sweetness of coconut, creating a balance that is simply irresistible.
Making these bars is a breeze. You don’t need an oven, just a few simple ingredients and a little time in the fridge. They are great for a quick dessert or a refreshing snack. Plus, they fit perfectly into a clean eating lifestyle!
Here’s how you can whip up these delicious bars:
Ingredients
- 1 cup almond flour
- 1/2 cup shredded coconut
- 1/4 cup honey or maple syrup
- 1/4 cup coconut oil, melted
- 1/2 cup fresh lemon juice
- 2 tablespoons lemon zest
- 1/4 cup coconut cream
- 1/4 teaspoon salt
Instructions
- Prepare the Base: In a mixing bowl, combine almond flour, shredded coconut, honey, and melted coconut oil. Mix until well combined.
- Press the Mixture: Press the mixture firmly into the bottom of a lined 8x8 inch baking dish. Make sure it’s even.
- Make the Filling: In another bowl, whisk together lemon juice, lemon zest, coconut cream, and salt until smooth.
- Pour the Filling: Pour the lemon mixture over the pressed base in the baking dish.
- Chill: Place the dish in the refrigerator for at least 2 hours, or until set.
- Serve: Once set, cut into squares and enjoy your refreshing lemon coconut bars!
Peanut Butter Banana Nice Cream: A Healthy Twist
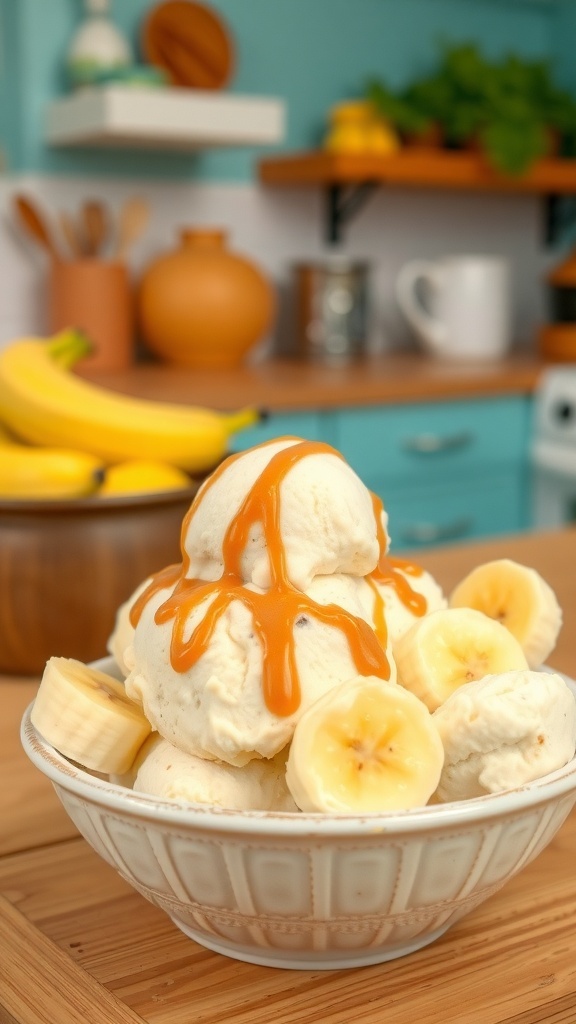
Peanut Butter Banana Nice Cream is a delightful treat that’s both creamy and satisfying. This dessert is perfect for those hot days when you crave something sweet but want to keep it healthy. The combination of ripe bananas and peanut butter creates a rich flavor that feels indulgent without the guilt.
The image shows a bowl filled with creamy nice cream topped with a drizzle of caramel and surrounded by fresh banana slices. The vibrant colors and inviting presentation make it hard to resist. Plus, it’s a no-bake recipe, which means you can whip it up quickly without turning on the oven!
Making this nice cream is simple. You just need a few ingredients and a blender. It’s a fun way to enjoy a classic flavor combination while sticking to clean eating principles.
Ingredients
- 4 ripe bananas
- 1/4 cup peanut butter
- 1 tablespoon honey or maple syrup (optional)
- 1 teaspoon vanilla extract
- 1/4 cup almond milk (or any milk of choice)
- Caramel sauce for drizzling (optional)
Instructions
- Slice the bananas and freeze them for at least 2 hours until solid.
- In a blender, combine the frozen bananas, peanut butter, honey or maple syrup, vanilla extract, and almond milk.
- Blend until smooth and creamy, scraping down the sides as needed.
- Serve immediately for a soft-serve texture or transfer to a container and freeze for an hour for a firmer nice cream.
- Top with caramel sauce and extra banana slices if desired.
No-Bake Chocolate Oatmeal Cookies: A Childhood Classic
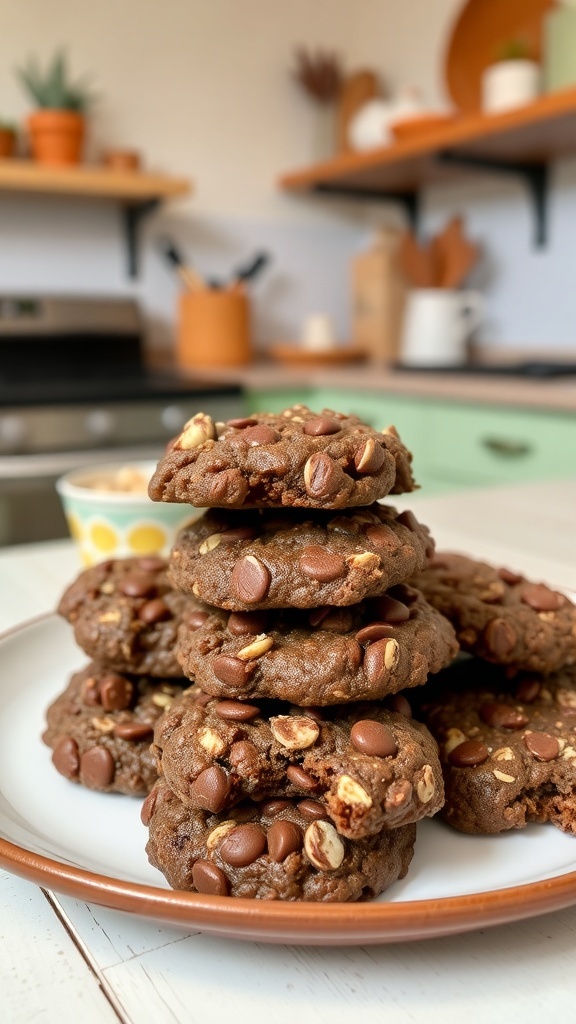
No-bake chocolate oatmeal cookies are a delightful treat that many of us remember from our childhood. These cookies are quick to make and require no oven, making them perfect for a sweet fix any time of the year. The combination of chocolate and oats creates a chewy texture that’s hard to resist.
In the image, you can see a stack of these delicious cookies, showcasing their rich chocolate color and the bits of oats and chocolate chips peeking through. The cozy kitchen background adds a warm touch, inviting you to grab a cookie and enjoy it with a glass of milk.
These cookies are not just nostalgic; they are also easy to whip up. With just a few simple ingredients, you can create a batch that will satisfy your sweet tooth and bring back fond memories.
Ingredients
- 1 cup natural peanut butter
- 1/2 cup honey or maple syrup
- 1/2 cup cocoa powder
- 2 cups rolled oats
- 1/2 cup chocolate chips
- 1 teaspoon vanilla extract
- 1/4 teaspoon salt
Instructions
- In a medium saucepan, combine peanut butter, honey, and cocoa powder. Heat over medium heat, stirring until smooth.
- Remove from heat and stir in vanilla extract and salt.
- Add rolled oats and chocolate chips, mixing until well combined.
- Drop spoonfuls of the mixture onto a parchment-lined baking sheet.
- Refrigerate for about 30 minutes or until set. Enjoy your no-bake chocolate oatmeal cookies!
Creamy Avocado Chocolate Pudding: A Unique Dessert
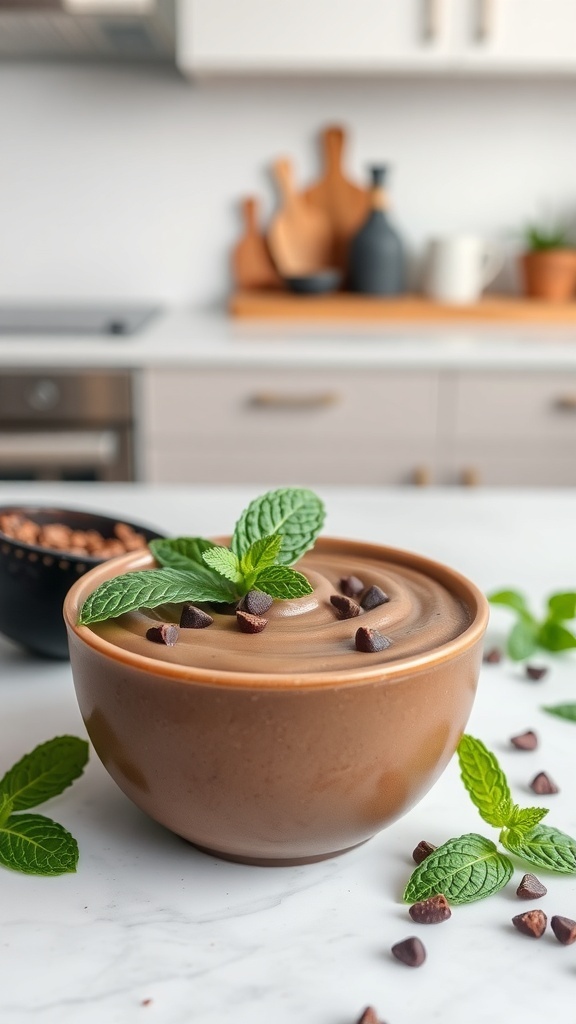
If you’re looking for a dessert that’s both creamy and healthy, this avocado chocolate pudding is a fantastic choice. The image shows a rich, velvety pudding topped with fresh mint leaves and chocolate chips, all served in a charming brown bowl. The pudding’s deep chocolate color hints at the indulgent flavor, while the mint adds a refreshing touch.
This dessert is not only delicious but also packed with nutrients. Avocados provide healthy fats, making this pudding a guilt-free treat. Plus, it’s super easy to whip up, requiring no baking at all. Just blend the ingredients, chill, and enjoy!
Let’s get into how you can make this delightful dessert at home.
Ingredients
- 2 ripe avocados
- 1/2 cup unsweetened cocoa powder
- 1/4 cup honey or maple syrup
- 1/4 cup almond milk (or any milk of your choice)
- 1 teaspoon vanilla extract
- Pinch of salt
- Chocolate chips and mint leaves for garnish
Instructions
- Prepare the Avocados: Cut the avocados in half, remove the pit, and scoop the flesh into a blender.
- Add Ingredients: To the blender, add cocoa powder, honey or maple syrup, almond milk, vanilla extract, and a pinch of salt.
- Blend Until Smooth: Blend everything together until you get a creamy and smooth consistency. You may need to scrape down the sides to ensure everything is well mixed.
- Taste and Adjust: Taste the pudding and adjust the sweetness if needed by adding more honey or syrup.
- Chill: Transfer the pudding into serving bowls and chill in the refrigerator for at least 30 minutes before serving.
- Serve: Top with chocolate chips and fresh mint leaves for a beautiful presentation.
Delicious No-Bake Berry Tart: A Summer Sensation
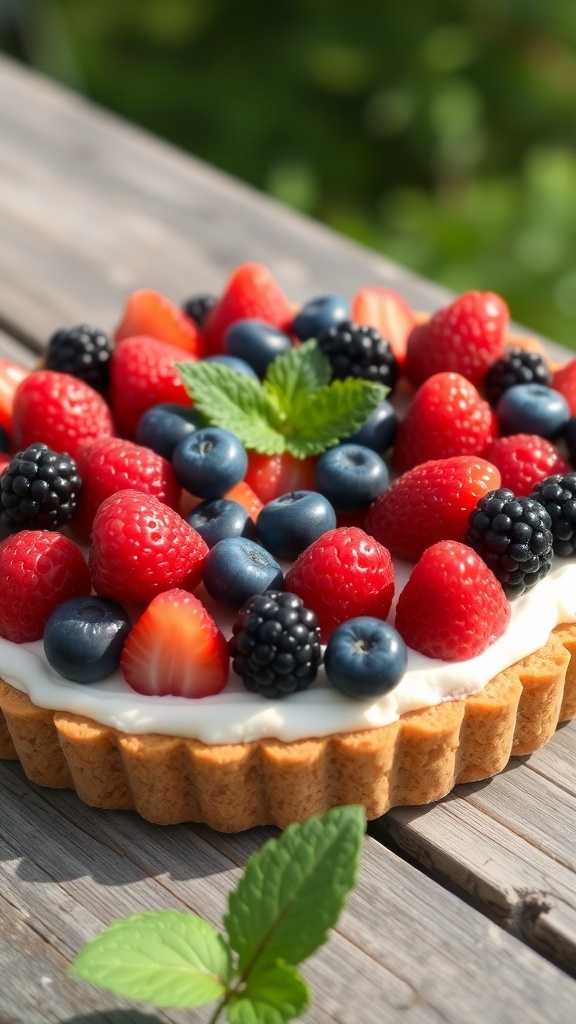
Summer is the perfect time to enjoy fresh berries, and what better way to showcase them than in a no-bake berry tart? This dessert is not only easy to make, but it also looks stunning. The vibrant colors of strawberries, blueberries, raspberries, and blackberries create a feast for the eyes. The creamy filling pairs perfectly with the crisp tart crust, making each bite a delightful experience.
This berry tart is a great choice for gatherings or a refreshing treat on a hot day. Plus, it requires no baking, so you can whip it up in no time. Just layer your favorite berries on a smooth cream filling, and you’re all set!
Ingredients
- 1 pre-made graham cracker crust
- 1 cup cream cheese, softened
- 1/2 cup powdered sugar
- 1 teaspoon vanilla extract
- 1 cup heavy whipping cream
- 1 cup strawberries, sliced
- 1 cup blueberries
- 1 cup raspberries
- 1 cup blackberries
Instructions
- Prepare the Filling: In a large bowl, beat the softened cream cheese until smooth. Add the powdered sugar and vanilla extract, mixing until well combined.
- Whip the Cream: In another bowl, whip the heavy cream until stiff peaks form. Gently fold the whipped cream into the cream cheese mixture until fully incorporated.
- Assemble the Tart: Spread the cream filling evenly into the graham cracker crust. Arrange the sliced strawberries, blueberries, raspberries, and blackberries on top of the filling.
- Chill: Refrigerate the tart for at least 2 hours to set. This helps the flavors meld together and makes it easier to slice.
- Serve: Slice the tart and enjoy this refreshing summer dessert!
Crunchy Granola Bars: A Perfect On-The-Go Snack

Crunchy granola bars are a fantastic option for anyone looking for a quick and healthy snack. They are easy to make and perfect for busy days. The image shows a stack of delicious granola bars, showcasing their crunchy texture and colorful ingredients. These bars are not only satisfying but also packed with nutrients.
Making your own granola bars means you can control what goes in them. You can add your favorite nuts, seeds, and dried fruits to create a snack that suits your taste. Plus, they are great for taking along on hikes, picnics, or just for a quick bite between meals.
Here’s a simple recipe to whip up your own crunchy granola bars:
Ingredients
- 2 cups rolled oats
- 1 cup mixed nuts (like almonds and peanuts)
- 1/2 cup honey or maple syrup
- 1/2 cup nut butter (like almond or peanut butter)
- 1/2 cup dried fruit (like raisins or cranberries)
- 1/4 teaspoon salt
- 1/2 teaspoon vanilla extract
Instructions
- Mix the Ingredients: In a large bowl, combine the rolled oats, mixed nuts, dried fruit, and salt.
- Heat the Wet Ingredients: In a small saucepan, warm the honey and nut butter over low heat until melted. Stir in the vanilla extract.
- Combine: Pour the wet mixture over the dry ingredients and mix well until everything is coated.
- Press into a Pan: Line an 8x8 inch baking dish with parchment paper. Press the mixture firmly into the dish.
- Chill: Refrigerate for at least 2 hours until set. Once firm, cut into bars.
- Store: Keep the bars in an airtight container for up to a week.
Tropical Mango Coconut Pudding: A Vacation In A Bowl
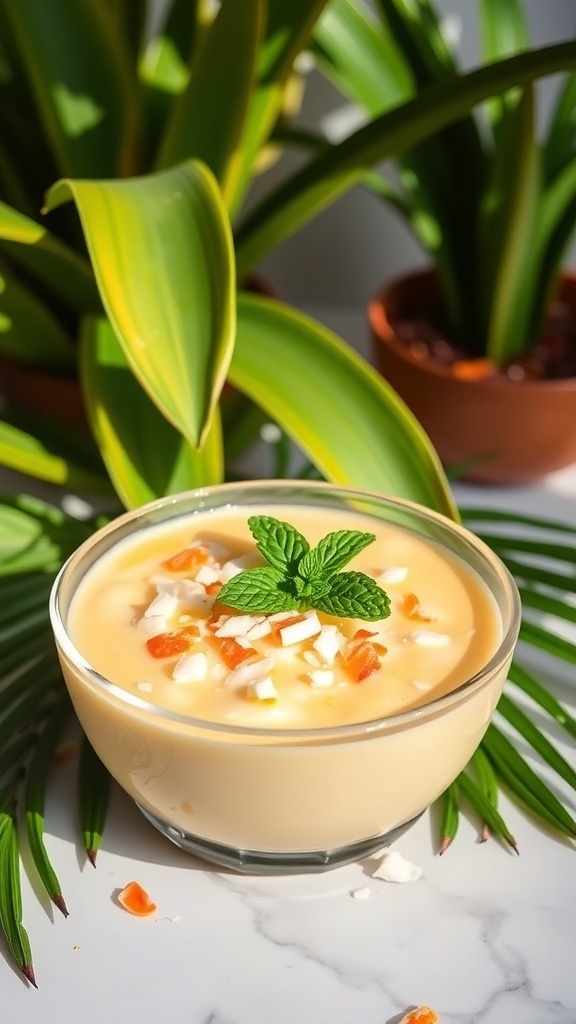
This Tropical Mango Coconut Pudding is a delightful treat that brings a taste of paradise right to your kitchen. The creamy texture and sweet flavors of mango and coconut make it feel like a mini-vacation in every bite. With a sprinkle of toasted coconut and a fresh mint leaf on top, it’s not just delicious but also visually appealing.
Making this pudding is super easy and requires no baking at all. Just blend, chill, and enjoy! It’s perfect for warm days or when you need a quick dessert that feels special. Plus, it’s a clean-eating option that everyone will love.
Ingredients
- 2 ripe mangoes, peeled and diced
- 1 cup coconut milk
- 1/4 cup honey or maple syrup
- 1 tablespoon chia seeds
- 1 teaspoon vanilla extract
- 1/2 cup shredded coconut, toasted
- Fresh mint leaves for garnish
Instructions
- Blend the mangoes: In a blender, combine the diced mangoes, coconut milk, honey, chia seeds, and vanilla extract. Blend until smooth.
- Chill the mixture: Pour the blended mixture into serving bowls or cups. Cover and refrigerate for at least 2 hours to allow it to thicken.
- Prepare the topping: While the pudding chills, toast the shredded coconut in a dry skillet over medium heat until golden brown. Keep an eye on it to prevent burning.
- Serve: Once the pudding is set, remove it from the fridge. Top with toasted coconut and a mint leaf before serving.
Nutritious No-Bake Almond Joy Bars: A Chocolate Lover'S Dream
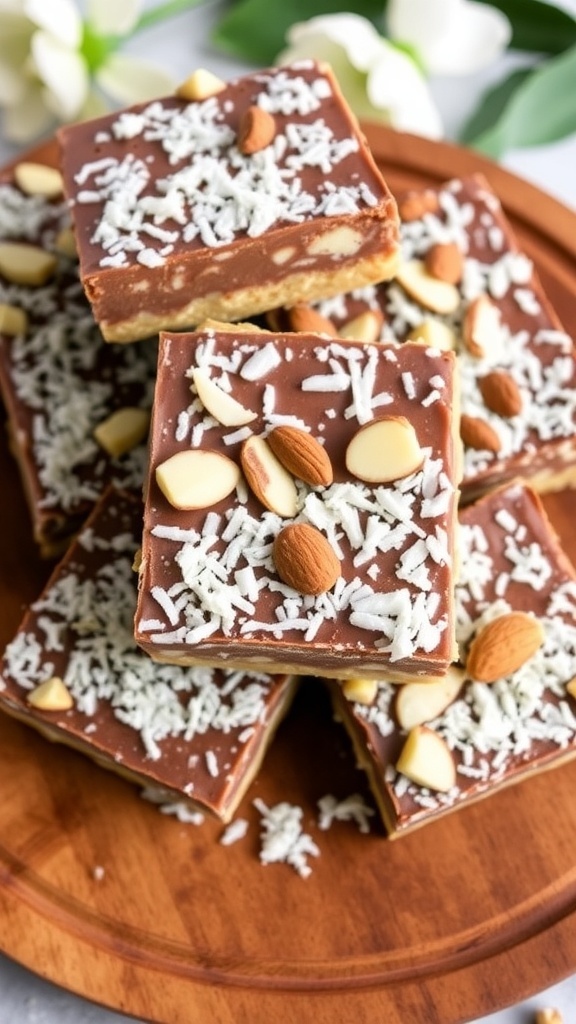
If you love chocolate and coconut, these no-bake Almond Joy bars are a perfect treat. They combine the rich flavors of chocolate with the crunch of almonds and the sweetness of coconut. Plus, they’re super easy to make!
These bars are not only delicious but also nutritious. They use wholesome ingredients that fit perfectly into a clean eating lifestyle. You can enjoy a sweet snack without the guilt!
To make these bars, you’ll need ingredients like almond flour, shredded coconut, almond butter, and dark chocolate. The best part? No oven is required! Just mix, layer, and chill.
Ingredients
- 1 cup almond flour
- 1 cup shredded coconut
- 1/2 cup almond butter
- 1/4 cup honey or maple syrup
- 1/2 cup dark chocolate chips
- 1/4 cup chopped almonds
- 1 tablespoon coconut oil
Instructions
- Mix the Base: In a bowl, combine almond flour, shredded coconut, almond butter, and honey. Stir until well mixed.
- Press into a Pan: Line an 8x8 inch pan with parchment paper. Press the mixture evenly into the bottom of the pan.
- Melt the Chocolate: In a small saucepan, melt dark chocolate chips and coconut oil over low heat. Stir until smooth.
- Spread the Chocolate: Pour the melted chocolate over the almond mixture and spread it evenly. Top with chopped almonds and extra shredded coconut if desired.
- Chill: Place the pan in the fridge for at least 2 hours to set. Once firm, cut into bars and enjoy!
Rich Dark Chocolate Coconut Truffles: A Decadent Delight

These rich dark chocolate coconut truffles are a perfect treat for anyone who loves a sweet indulgence without the hassle of baking. The image showcases a beautiful plate of these truffles, dusted with cocoa powder, making them look even more tempting. The contrast of the dark chocolate against the decorative plate adds a touch of elegance to this simple dessert.
Making these truffles is easy and fun. You only need a few ingredients, and the best part? No oven required! Just mix, roll, and chill. They are perfect for a quick dessert or a special occasion. Plus, they fit perfectly into a clean eating lifestyle.
Let’s get to the recipe so you can enjoy these delightful treats!
Ingredients
- 1 cup dark chocolate chips or chopped dark chocolate
- 1/2 cup sweetened shredded coconut
- 1/2 cup heavy cream
- 1 teaspoon vanilla extract
- 1/4 cup cocoa powder for dusting
- 1/4 cup additional shredded coconut for coating
Instructions
- Melt Chocolate: In a heatproof bowl, combine dark chocolate and heavy cream. Microwave in 30-second intervals, stirring in between, until melted and smooth.
- Add Coconut: Stir in the shredded coconut and vanilla extract until well combined.
- Chill Mixture: Cover the bowl with plastic wrap and refrigerate for about 1 hour, or until the mixture is firm enough to handle.
- Form Truffles: Once chilled, use a small scoop or your hands to form the mixture into small balls.
- Coat Truffles: Roll the truffles in cocoa powder or additional shredded coconut to coat them evenly.
- Serve: Place the truffles in a decorative box or on a serving plate. Enjoy immediately or store in the refrigerator until ready to serve.
Comments
Post a Comment