- Get link
- X
- Other Apps
15 Delicious No Bake Desserts Perfect for Your Next Party
If you're short on time but still want to impress at your next gathering, no-bake desserts are your secret weapon! With minimal effort and no oven required, these treats are not just easy to whip up—they’re also delicious crowd-pleasers that will have your guests talking. Let's jump right into some of the best no-bake options that make party planning a breeze!
Decadent Chocolate Mousse Cups For Your Celebration
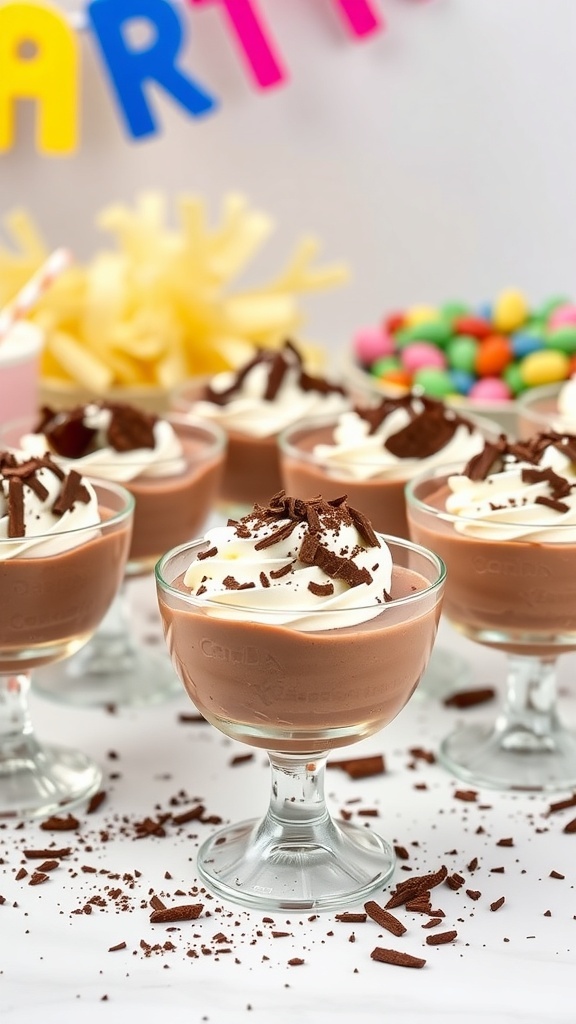
Chocolate mousse cups are a delightful treat that can elevate any party. These little cups are not just visually appealing; they are also incredibly tasty. The creamy chocolate mousse topped with whipped cream and chocolate shavings makes them a hit among guests of all ages.
Imagine serving these at your next gathering. They are easy to make and can be prepared ahead of time, allowing you to enjoy the party without stress. The vibrant colors in the background, like the playful 'PARTY' banner and colorful candies, add to the festive atmosphere, making these mousse cups the perfect addition to your dessert table.
Ingredients
- 1 cup heavy cream
- 1 cup semi-sweet chocolate chips
- 2 large eggs
- 1/4 cup granulated sugar
- 1 teaspoon vanilla extract
- Whipped cream for topping
- Chocolate shavings for garnish
Instructions
- Melt the chocolate: In a microwave-safe bowl, melt the chocolate chips in 30-second intervals, stirring in between until smooth. Let it cool slightly.
- Whip the cream: In a separate bowl, whip the heavy cream until soft peaks form. Set aside.
- Mix eggs and sugar: In another bowl, whisk the eggs and granulated sugar until light and fluffy. Stir in the melted chocolate and vanilla extract.
- Fold in the cream: Gently fold the whipped cream into the chocolate mixture until fully combined.
- Chill: Spoon the mousse into serving cups and refrigerate for at least 2 hours to set.
- Serve: Top with whipped cream and chocolate shavings before serving. Enjoy your delicious chocolate mousse cups!
Refreshing No-Bake Lemon Cheesecake Bites
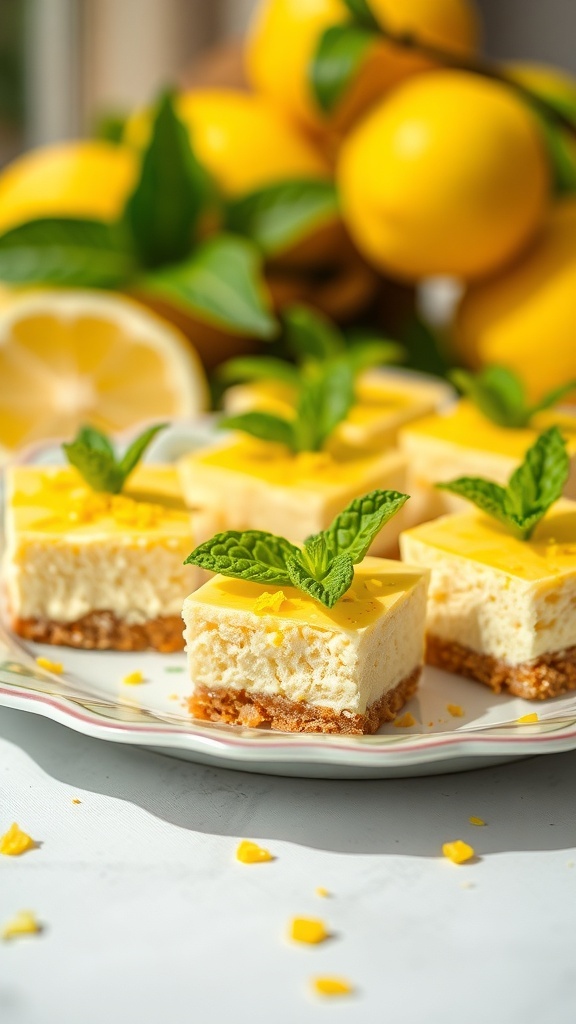
These no-bake lemon cheesecake bites are a delightful treat for any gathering. They are creamy, tangy, and topped with a bright lemon glaze. The fresh mint leaves add a pop of color and flavor, making them perfect for summer parties or any occasion.
The base is made from crushed graham crackers, giving a nice crunch that complements the smooth cheesecake filling. The vibrant yellow color from the lemon topping makes these bites visually appealing, and they are sure to impress your guests.
They are easy to make and require no baking, which means you can whip them up quickly and enjoy more time with your friends and family. Serve them chilled for a refreshing dessert that everyone will love!
Ingredients
- 1 1/2 cups graham cracker crumbs
- 1/4 cup granulated sugar
- 1/2 cup unsalted butter, melted
- 16 oz cream cheese, softened
- 1 cup powdered sugar
- 1/4 cup fresh lemon juice
- 1 tablespoon lemon zest
- 1 teaspoon vanilla extract
- 1 cup heavy whipping cream
- 1/2 cup lemon curd (for topping)
- Fresh mint leaves (for garnish)
Instructions
- Prepare the Crust: In a bowl, mix graham cracker crumbs, granulated sugar, and melted butter until combined. Press the mixture firmly into the bottom of a lined 8x8 inch baking dish.
- Make the Filling: In a large bowl, beat the softened cream cheese until smooth. Gradually add powdered sugar, lemon juice, lemon zest, and vanilla extract. Mix until well combined.
- Whip the Cream: In another bowl, whip the heavy cream until stiff peaks form. Gently fold the whipped cream into the cream cheese mixture until fully incorporated.
- Assemble: Spread the cheesecake filling over the crust in the baking dish. Smooth the top and refrigerate for at least 4 hours or until set.
- Top and Serve: Once set, spread lemon curd over the cheesecake. Cut into squares, garnish with fresh mint leaves, and serve chilled.
Creamy No-Bake Peanut Butter Pie
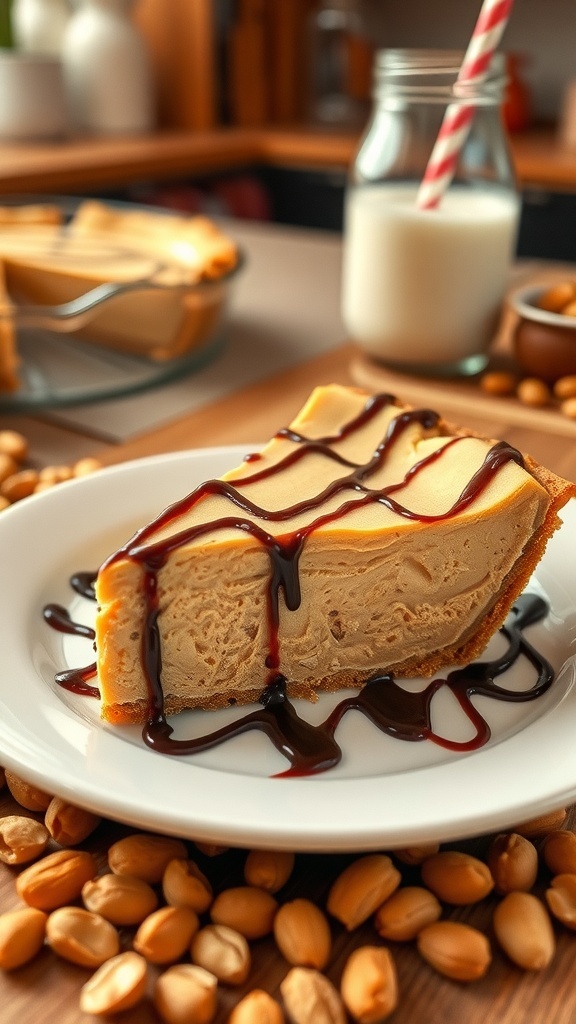
This creamy no-bake peanut butter pie is a crowd-pleaser at any party. Imagine a smooth, rich filling made from peanut butter, cream cheese, and whipped topping, all nestled in a buttery graham cracker crust. The pie is drizzled with chocolate sauce, making it not just delicious but also visually appealing.
The image shows a slice of this delightful pie, perfectly plated and garnished with chocolate syrup. Surrounding the pie are scattered peanuts, adding a rustic touch and hinting at the nutty flavor that awaits. A glass of milk in the background complements the dessert, making it a perfect pairing.
This dessert is simple to make and requires no baking, which means you can whip it up quickly before your next gathering. It's creamy, sweet, and has that irresistible peanut butter flavor that everyone loves.
Ingredients
- 1 ½ cups graham cracker crumbs
- ½ cup unsalted butter, melted
- 1 cup creamy peanut butter
- 8 oz cream cheese, softened
- 1 cup powdered sugar
- 1 cup whipped topping
- Chocolate syrup, for drizzling
- Chopped peanuts, for garnish (optional)
Instructions
- Prepare the Crust: In a bowl, mix graham cracker crumbs with melted butter. Press the mixture into the bottom of a pie dish to form a crust.
- Make the Filling: In a mixing bowl, beat together peanut butter, softened cream cheese, and powdered sugar until smooth. Gently fold in the whipped topping until well combined.
- Fill the Crust: Pour the peanut butter filling into the prepared crust, smoothing the top with a spatula.
- Chill: Refrigerate the pie for at least 4 hours, or until set.
- Serve: Drizzle chocolate syrup over the top and sprinkle with chopped peanuts before slicing and serving.
Tasty Coconut Cream Pie Bars
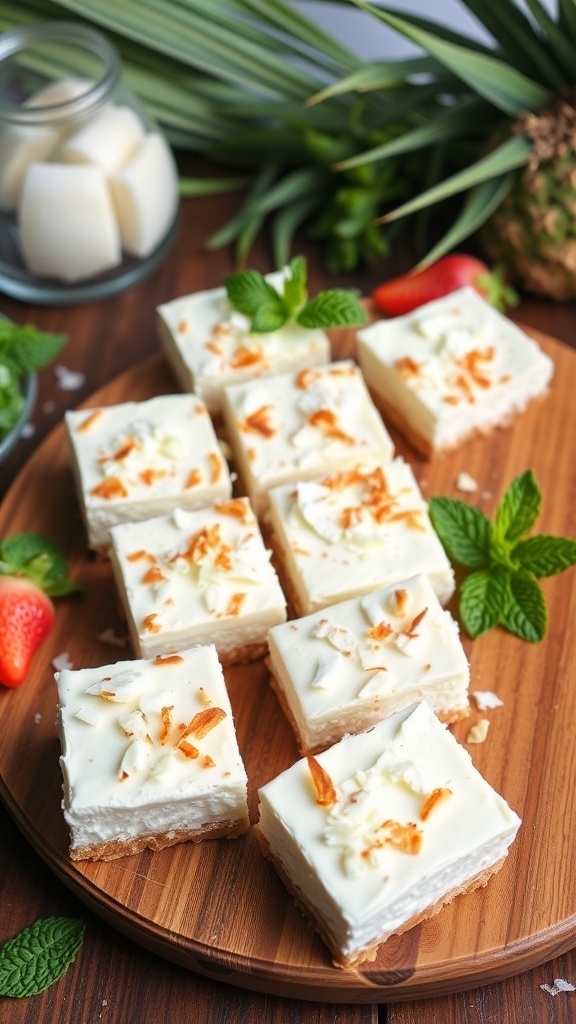
Coconut cream pie bars are a delightful treat that everyone loves. These bars are creamy, sweet, and packed with coconut flavor. They are perfect for parties, as they can be made ahead of time and served chilled. The image shows a beautiful platter of coconut cream pie bars, garnished with toasted coconut and fresh mint leaves. The bars have a smooth, creamy topping that looks irresistible.
Making these bars is simple and fun. You start with a buttery crust, then layer on a rich coconut filling. Finally, top it off with whipped cream and toasted coconut for that extra crunch. They are sure to impress your guests!
Ingredients
- 1 cup graham cracker crumbs
- 1/4 cup granulated sugar
- 1/2 cup unsalted butter, melted
- 1 (8 oz) package cream cheese, softened
- 1 cup powdered sugar
- 1 cup coconut milk
- 1 cup shredded coconut
- 1 (8 oz) container whipped topping
- 1/4 cup toasted coconut for garnish
Instructions
- Preheat the oven to 350°F (175°C). In a bowl, mix graham cracker crumbs, sugar, and melted butter until combined. Press the mixture into the bottom of a greased 9x9 inch baking dish.
- Bake the crust for 10 minutes, then let it cool completely.
- In another bowl, beat the cream cheese and powdered sugar until smooth. Add coconut milk and shredded coconut, mixing until well combined.
- Spread the coconut mixture over the cooled crust. Chill in the refrigerator for at least 2 hours.
- Before serving, spread whipped topping over the coconut layer and sprinkle with toasted coconut. Cut into bars and enjoy!
Luscious No-Bake Oreo Cheesecake
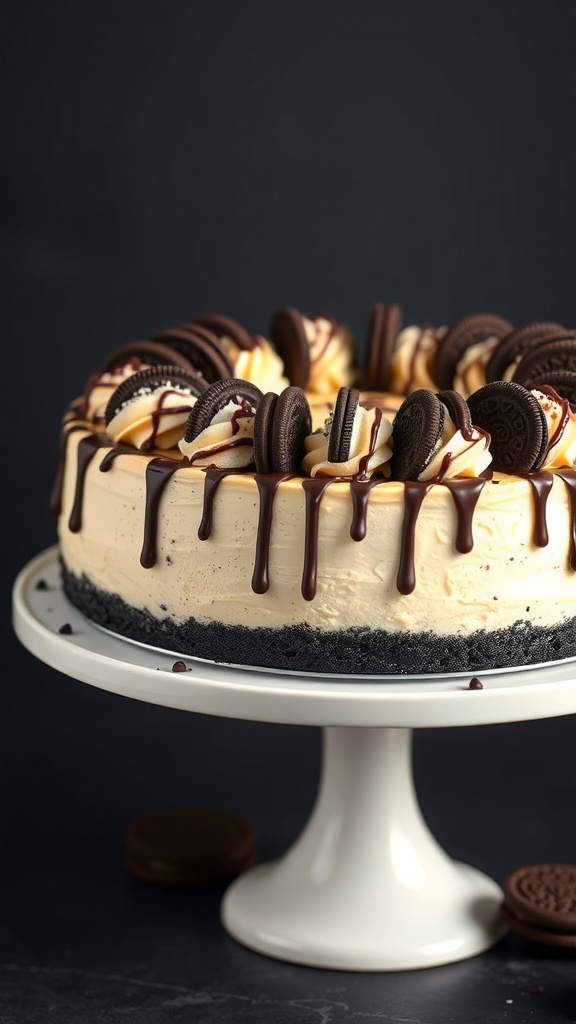
If you're looking for a showstopper dessert that requires no baking, this No-Bake Oreo Cheesecake is the perfect choice. Imagine a creamy cheesecake filling sitting atop a crunchy Oreo crust, all topped with more Oreos and a drizzle of chocolate. It’s a dessert that’s sure to impress your guests at any party!
The image showcases a stunning cheesecake, beautifully presented on a white cake stand. The rich, creamy filling is adorned with whole Oreo cookies and a glossy chocolate drizzle, making it not just delicious but also visually appealing. This dessert is a crowd-pleaser, perfect for any occasion.
Making this cheesecake is simple and fun. You can whip it up in no time, and it will set in the fridge while you prepare for your party. Let’s get to the ingredients and instructions so you can make this delightful treat!
Ingredients
- 24 Oreo cookies, crushed
- 1/4 cup unsalted butter, melted
- 16 oz cream cheese, softened
- 1 cup powdered sugar
- 1 teaspoon vanilla extract
- 2 cups whipped cream
- 8 Oreo cookies, for topping
- 1/4 cup chocolate sauce, for drizzling
Instructions
- Prepare the Crust: In a bowl, mix the crushed Oreo cookies with melted butter. Press the mixture into the bottom of a 9-inch springform pan to form the crust.
- Make the Filling: In a large bowl, beat the softened cream cheese until smooth. Gradually add the powdered sugar and vanilla extract, mixing until well combined.
- Fold in the Whipped Cream: Gently fold the whipped cream into the cream cheese mixture until fully incorporated.
- Assemble the Cheesecake: Pour the filling over the Oreo crust and smooth the top. Refrigerate for at least 4 hours or until set.
- Decorate: Once set, remove the cheesecake from the springform pan. Top with additional Oreo cookies and drizzle with chocolate sauce before serving.
Silky No-Bake Chocolate Chip Cookie Dough Dip
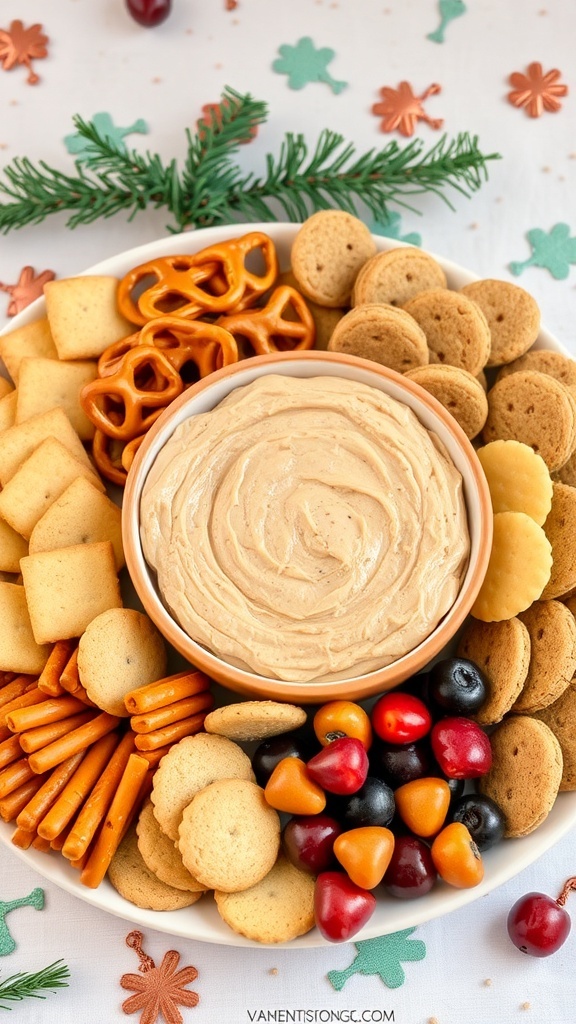
This Silky No-Bake Chocolate Chip Cookie Dough Dip is a crowd-pleaser at any party. It's creamy, sweet, and packed with that classic cookie dough flavor we all love. The dip is beautifully presented in a bowl at the center of a platter, surrounded by a variety of dippables like pretzels, cookies, and colorful candies. The festive touch from the garnishes adds to the fun vibe, making it perfect for gatherings.
Making this dip is super easy. You don’t need to bake anything, which means less mess and more time to enjoy the party. Just mix together a few simple ingredients, and you’re ready to serve. Pair it with your favorite snacks, and watch it disappear!
Ingredients
- 1 cup cream cheese, softened
- 1/2 cup unsalted butter, softened
- 3/4 cup brown sugar, packed
- 1/4 cup granulated sugar
- 1 teaspoon vanilla extract
- 1 cup all-purpose flour (heat-treated)
- 1/2 cup mini chocolate chips
- Assorted dippers (cookies, pretzels, fruits)
Instructions
- In a large bowl, beat the cream cheese and butter together until smooth and creamy.
- Add the brown sugar, granulated sugar, and vanilla extract. Mix until well combined.
- Gradually add the heat-treated flour, mixing until fully incorporated.
- Fold in the mini chocolate chips.
- Transfer the dip to a serving bowl and chill in the refrigerator for about 30 minutes before serving.
- Serve with assorted dippers like cookies, pretzels, and fruits.
Simple And Elegant Tiramisu Cups
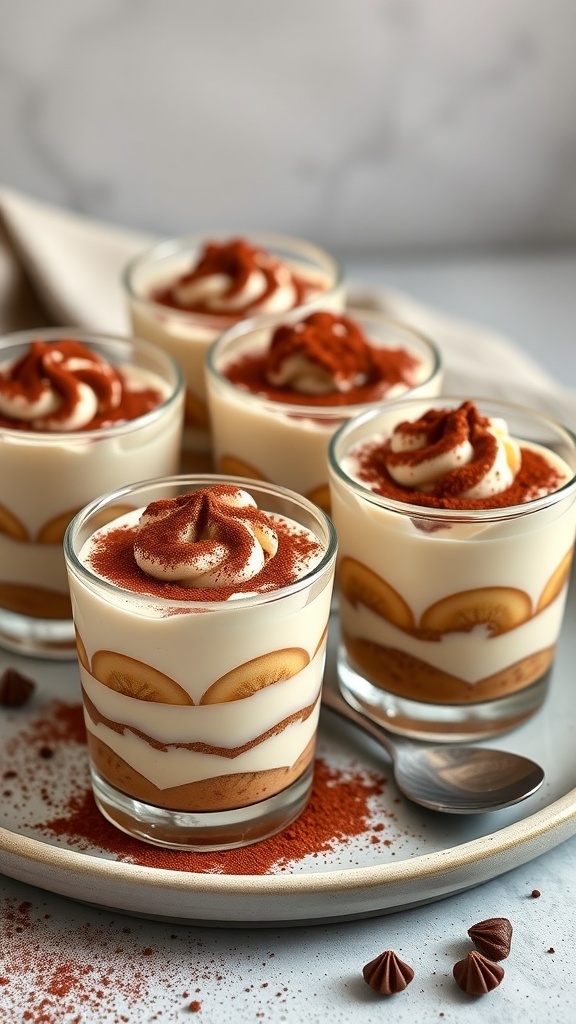
Tiramisu cups are a delightful way to serve this classic Italian dessert at your next gathering. These individual servings are not only easy to make but also look stunning on the table. Each cup features layers of creamy mascarpone cheese, coffee-soaked ladyfingers, and a dusting of cocoa powder, creating a treat that’s both simple and elegant.
The beauty of tiramisu cups lies in their presentation. The transparent glasses allow guests to see the beautiful layers, making each cup a mini work of art. Plus, they’re perfect for portion control, ensuring everyone gets just the right amount of sweetness.
To make these cups, you’ll need a few basic ingredients. The combination of coffee, cocoa, and mascarpone creates a rich flavor that’s hard to resist. Whether it’s a birthday party, a holiday gathering, or just a casual get-together, these tiramisu cups are sure to impress.
Ingredients
- 1 cup strong brewed coffee, cooled
- 2 tablespoons coffee liqueur (optional)
- 1 cup mascarpone cheese
- 1 cup heavy cream
- 1/2 cup powdered sugar
- 1 teaspoon vanilla extract
- 12 ladyfingers
- Cocoa powder for dusting
Instructions
- Prepare the Coffee: Brew a strong cup of coffee and let it cool. If using, mix in the coffee liqueur.
- Make the Cream: In a mixing bowl, combine mascarpone cheese, heavy cream, powdered sugar, and vanilla extract. Whip until soft peaks form.
- Assemble the Cups: Dip each ladyfinger into the cooled coffee for a few seconds, then layer them in the bottom of your cups. Add a layer of the mascarpone mixture on top.
- Repeat Layers: Continue layering until the cups are filled, finishing with the mascarpone mixture on top.
- Chill and Serve: Refrigerate the cups for at least 2 hours to set. Before serving, dust the tops with cocoa powder.
Heavenly No-Bake Cheesecake With Berry Topping
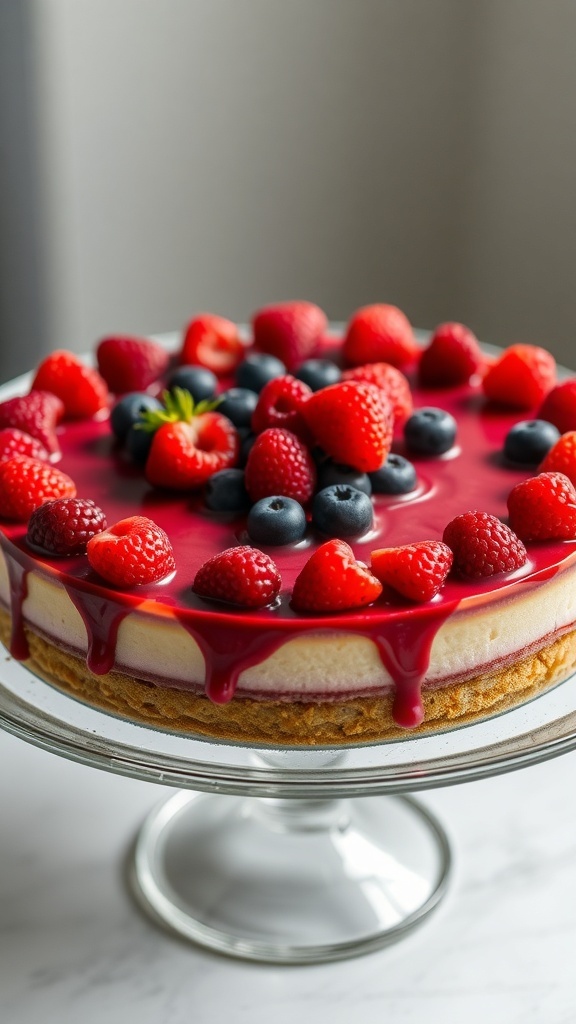
No-bake cheesecake is a crowd-pleaser, especially when topped with fresh berries. This dessert is creamy, smooth, and perfect for any gathering. The vibrant colors of the berries add a pop of freshness, making it visually appealing and delicious.
To make this cheesecake, you’ll need a few simple ingredients. The base is made from cream cheese, sugar, and whipped cream, creating a light and fluffy texture. The berry topping brings a sweet and tangy flavor that complements the cheesecake beautifully.
Here’s how to whip up this delightful dessert:
Ingredients
- 2 cups graham cracker crumbs
- 1/2 cup unsalted butter, melted
- 1 cup granulated sugar
- 16 oz cream cheese, softened
- 1 teaspoon vanilla extract
- 2 cups heavy whipping cream
- 1 cup mixed berries (strawberries, blueberries, raspberries)
- 1/2 cup berry sauce (optional)
Instructions
- Prepare the Crust: In a bowl, mix graham cracker crumbs and melted butter until combined. Press the mixture into the bottom of a springform pan to form an even layer.
- Make the Filling: In a large bowl, beat the softened cream cheese and sugar until smooth. Add vanilla extract and mix well. In another bowl, whip the heavy cream until stiff peaks form. Gently fold the whipped cream into the cream cheese mixture.
- Combine: Pour the filling over the crust in the springform pan. Smooth the top with a spatula. Cover and refrigerate for at least 4 hours or until set.
- Prepare the Topping: Once the cheesecake is set, top with fresh berries and drizzle with berry sauce if desired.
- Serve: Carefully remove the cheesecake from the pan, slice, and enjoy!
Zesty Key Lime Pie In Jars
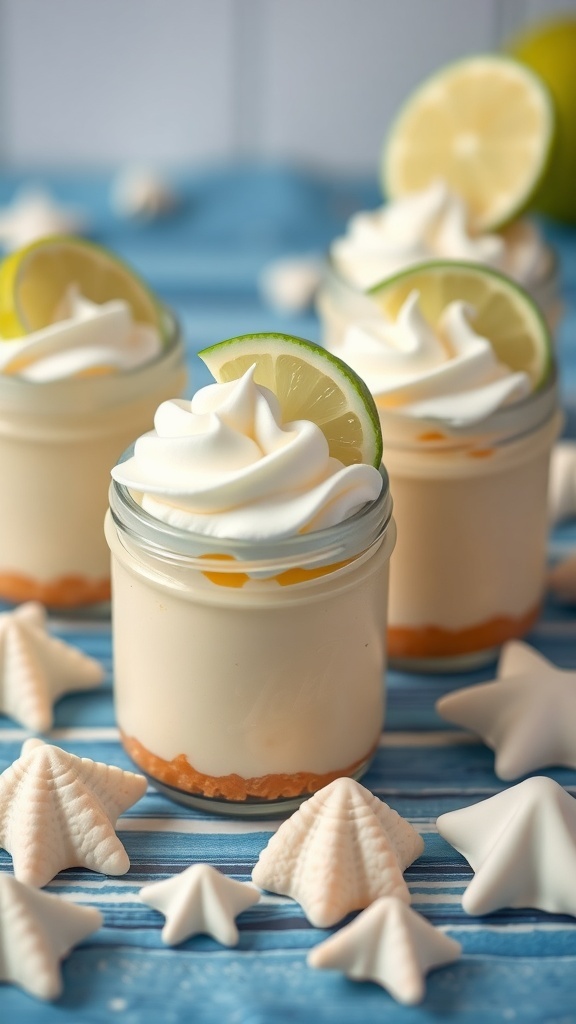
These zesty key lime pie jars are a fun twist on a classic dessert. Perfect for parties, they bring a burst of citrus flavor in a cute, portable package. The creamy filling sits atop a crunchy graham cracker crust, all topped with a swirl of whipped cream and a slice of lime. They not only look great but taste amazing too!
Making these jars is simple and requires no baking. Just layer the ingredients, and you’re good to go. They’re a hit at any gathering, and everyone loves the refreshing taste of key lime. Plus, serving them in jars makes for easy cleanup and a charming presentation.
Ingredients
- 1 cup graham cracker crumbs
- 1/4 cup unsalted butter, melted
- 1 can (14 oz) sweetened condensed milk
- 1/2 cup key lime juice
- 1 teaspoon lime zest
- 1 cup heavy whipping cream
- 2 tablespoons powdered sugar
- Lime slices for garnish
Instructions
- Prepare the Crust: In a bowl, mix graham cracker crumbs and melted butter until combined. Spoon the mixture into the bottom of small jars, pressing down to form a crust.
- Make the Filling: In another bowl, whisk together sweetened condensed milk, key lime juice, and lime zest until smooth. Pour this mixture over the crust in each jar.
- Whip the Cream: In a separate bowl, beat the heavy whipping cream and powdered sugar until soft peaks form. Spoon or pipe the whipped cream on top of the key lime filling.
- Garnish: Top each jar with a slice of lime for a fresh look. Chill in the refrigerator for at least 2 hours before serving.
Nutty Chocolate Bark With Dried Fruits
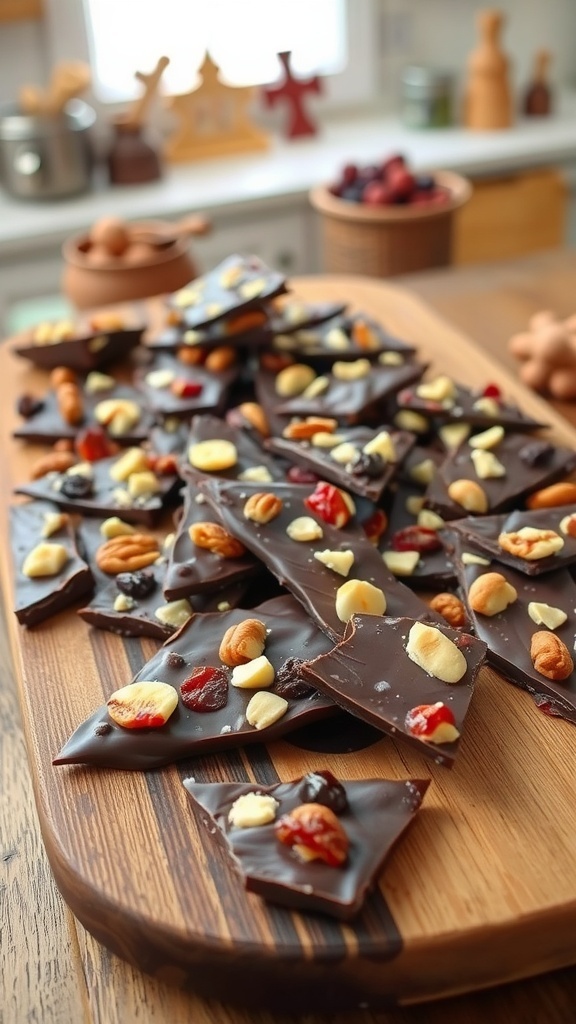
Nutty chocolate bark with dried fruits is a fantastic treat for any gathering. This dessert is not only easy to make but also visually appealing. The combination of rich chocolate, crunchy nuts, and chewy dried fruits creates a delightful mix of textures and flavors.
Imagine a beautiful wooden platter filled with pieces of chocolate bark, each adorned with colorful bits of dried fruits and a variety of nuts. This dessert is sure to catch the eye of your guests and make them eager to try a piece. Plus, it’s a no-bake option, which means less time in the kitchen and more time enjoying the party!
To make this delicious treat, you’ll need just a few simple ingredients. Melted chocolate forms the base, while your choice of nuts and dried fruits adds the finishing touches. Feel free to get creative with your toppings!
Ingredients
- 2 cups dark chocolate chips
- 1 cup mixed nuts (almonds, cashews, walnuts)
- 1 cup dried fruits (cranberries, apricots, raisins)
- 1 teaspoon sea salt (optional)
Instructions
- Melt the Chocolate: In a microwave-safe bowl, melt the dark chocolate chips in 30-second intervals, stirring in between until smooth.
- Prepare the Baking Sheet: Line a baking sheet with parchment paper for easy removal.
- Spread the Chocolate: Pour the melted chocolate onto the prepared baking sheet and spread it evenly with a spatula.
- Add Toppings: Sprinkle the mixed nuts and dried fruits over the melted chocolate. Press them down gently to ensure they stick.
- Chill: Place the baking sheet in the refrigerator for about 30 minutes or until the chocolate is firm.
- Break into Pieces: Once set, remove the chocolate bark from the parchment paper and break it into pieces.
This nutty chocolate bark with dried fruits is a perfect addition to any party spread. It’s simple, delicious, and sure to impress your guests!
Festive No-Bake Pumpkin Cheesecake
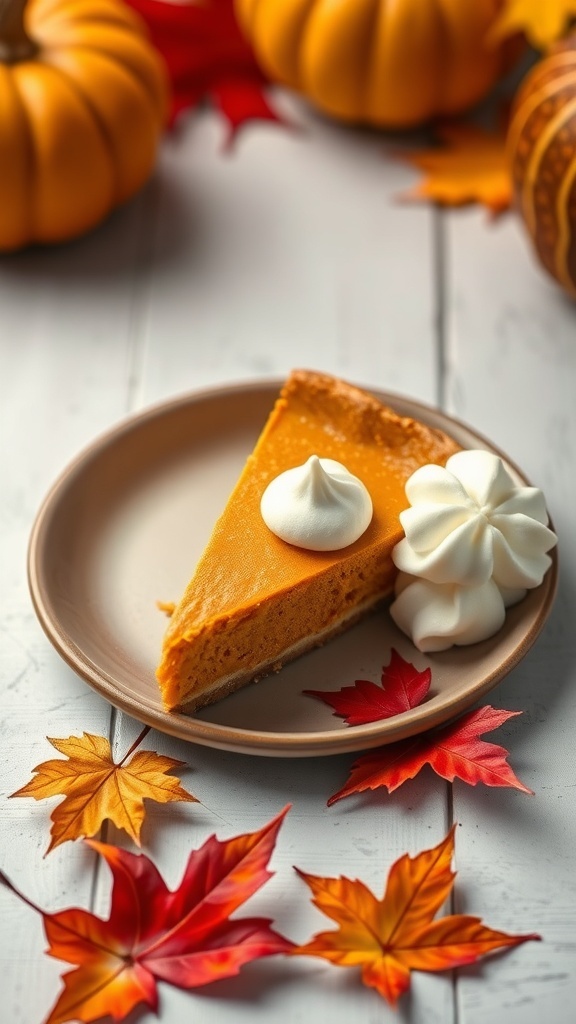
Fall is the perfect time for a delicious pumpkin dessert. This no-bake pumpkin cheesecake is not only easy to make, but it also looks stunning on your dessert table. The vibrant orange color of the cheesecake, paired with the creamy texture, makes it a festive treat for any gathering.
Imagine serving this cheesecake topped with a dollop of whipped cream and surrounded by colorful autumn leaves. The warm hues of the season complement the flavors perfectly, creating a cozy atmosphere. Plus, it’s a great way to enjoy pumpkin without the fuss of baking.
Gather your friends and family around to share this delightful dessert. It’s sure to be a hit, bringing smiles and satisfied taste buds to everyone at the party!
Ingredients
- 1 1/2 cups graham cracker crumbs
- 1/4 cup granulated sugar
- 1/2 cup unsalted butter, melted
- 2 cups cream cheese, softened
- 1 cup pumpkin puree
- 1 cup powdered sugar
- 1 teaspoon vanilla extract
- 1 teaspoon ground cinnamon
- 1/2 teaspoon ground nutmeg
- 1/2 teaspoon ground ginger
- 1 cup heavy whipping cream
Instructions
- Make the Crust: In a bowl, mix graham cracker crumbs, granulated sugar, and melted butter until combined. Press the mixture into the bottom of a 9-inch springform pan to form an even layer.
- Prepare the Filling: In a large bowl, beat the softened cream cheese until smooth. Add pumpkin puree, powdered sugar, vanilla, cinnamon, nutmeg, and ginger. Mix until well combined and creamy.
- Whip the Cream: In another bowl, whip the heavy cream until stiff peaks form. Gently fold the whipped cream into the pumpkin mixture until fully incorporated.
- Assemble: Pour the pumpkin filling over the crust in the springform pan. Smooth the top with a spatula. Cover and refrigerate for at least 4 hours, or overnight for best results.
- Serve: Once set, carefully remove the cheesecake from the springform pan. Top with whipped cream and enjoy!
Charming No-Bake Raspberry Cloud Cake
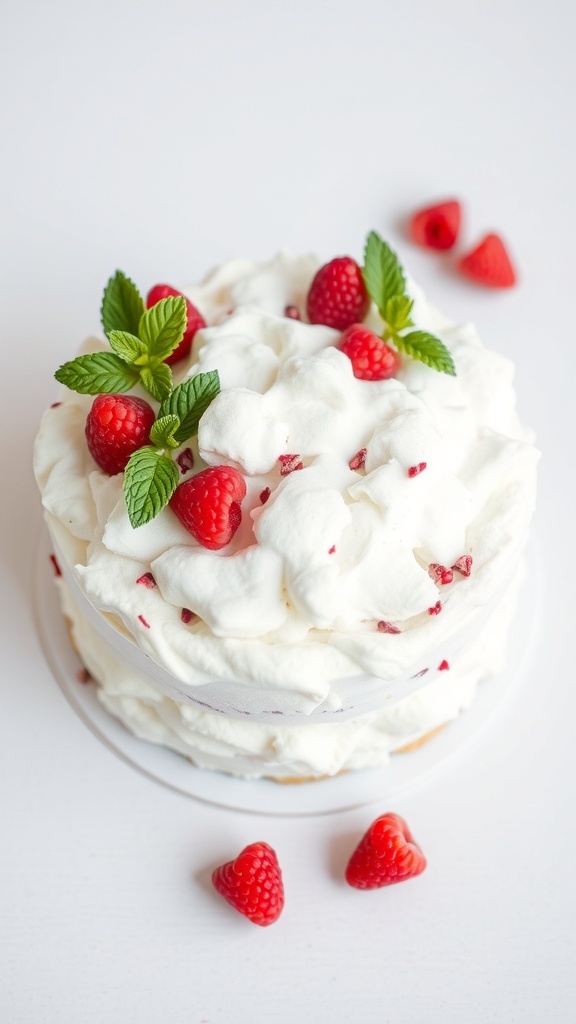
This no-bake raspberry cloud cake is a delightful treat that’s perfect for any gathering. With its fluffy layers of whipped cream and fresh raspberries, it looks as good as it tastes. The vibrant red berries pop against the creamy white, making it a showstopper on any dessert table.
Making this cake is a breeze. You won’t need to turn on the oven, which is a huge plus, especially during warmer months. Just layer the ingredients, let it chill, and you’re ready to impress your guests!
Here’s how to whip up this charming dessert:
Ingredients
- 2 cups heavy whipping cream
- 1/2 cup powdered sugar
- 1 teaspoon vanilla extract
- 2 cups fresh raspberries
- 1 package of ladyfinger cookies (about 24 cookies)
- Mint leaves for garnish
Instructions
- In a large bowl, whip the heavy cream until soft peaks form. Gradually add the powdered sugar and vanilla, continuing to whip until stiff peaks form.
- In a serving dish, layer half of the ladyfinger cookies at the bottom. Spread half of the whipped cream over the cookies.
- Add half of the raspberries on top of the whipped cream.
- Repeat the layers with the remaining ladyfingers, whipped cream, and raspberries.
- Cover and refrigerate for at least 4 hours, or overnight for best results.
- Before serving, garnish with fresh mint leaves and a few extra raspberries on top.
Gourmet Chocolate-Covered Pretzel Rods
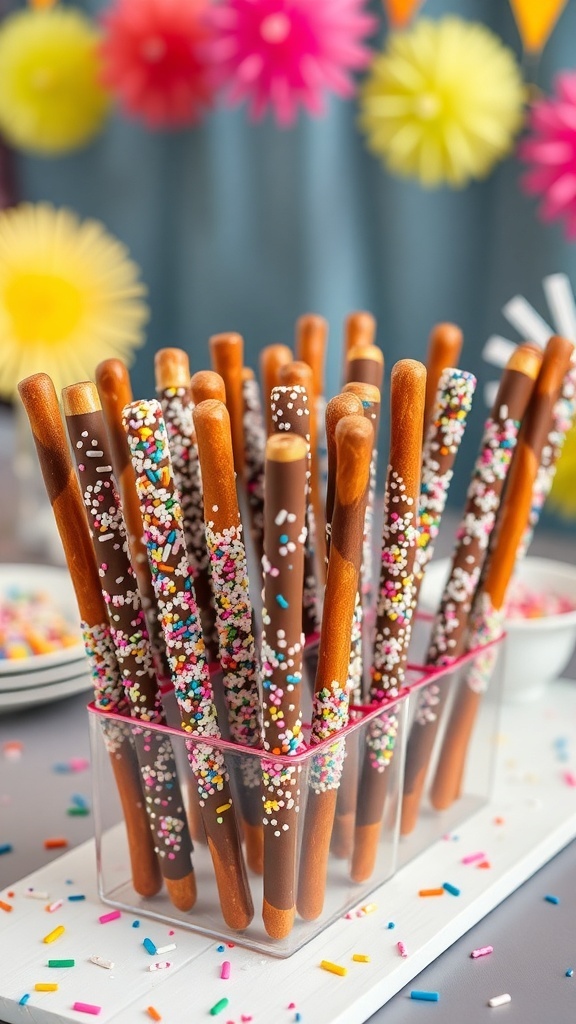
Gourmet chocolate-covered pretzel rods are a delightful treat that combines sweet and salty flavors. These tasty snacks are perfect for parties, adding a fun and festive touch to any gathering. The image showcases a colorful display of pretzel rods dipped in chocolate and sprinkled with vibrant toppings. The bright colors and playful presentation make them a hit with both kids and adults.
Making these treats is simple and requires minimal ingredients. You can customize them with different types of chocolate and a variety of sprinkles or toppings to match your party theme. They are not only easy to prepare but also a great way to get creative in the kitchen.
Ingredients
- 1 cup chocolate chips (milk, dark, or white)
- 20-25 pretzel rods
- 1/2 cup assorted sprinkles
- Wax paper
Instructions
- Melt the Chocolate: In a microwave-safe bowl, melt the chocolate chips in 30-second intervals, stirring in between until smooth.
- Dip the Pretzels: Hold each pretzel rod by one end and dip it into the melted chocolate, covering about two-thirds of the rod. Let the excess chocolate drip off.
- Add Sprinkles: While the chocolate is still wet, roll the pretzel in the sprinkles or sprinkle them on top for a festive look.
- Set to Dry: Place the decorated pretzel rods on a sheet of wax paper and let them cool until the chocolate hardens.
- Serve and Enjoy: Once set, arrange the pretzel rods in a container or on a platter for your guests to enjoy!
Easy No-Bake Mud Pie
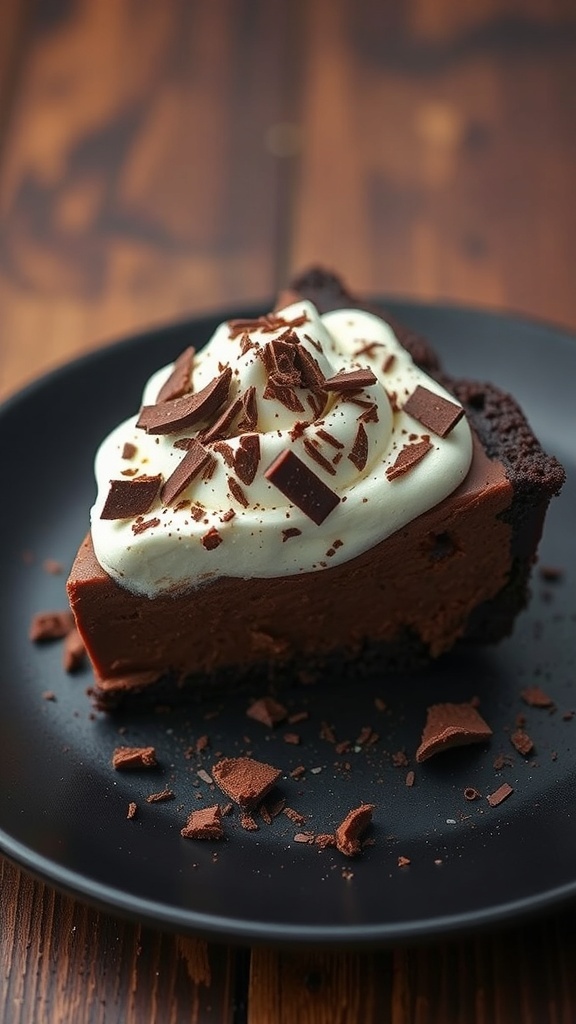
No-bake mud pie is a delightful dessert that’s perfect for any gathering. This treat features a rich chocolate filling, a smooth whipped topping, and a crunchy crust that everyone loves. The image shows a slice of mud pie, topped with fluffy whipped cream and chocolate shavings, sitting on a dark plate. The combination of textures and flavors makes it a crowd-pleaser.
Making this dessert is simple and requires no baking, which is a huge plus. You can whip it up quickly, and it’s sure to impress your guests. The chocolate filling is creamy and indulgent, while the crust adds a satisfying crunch. Serve it chilled for the best experience!
Ingredients
- 1 ½ cups chocolate cookie crumbs
- ½ cup unsalted butter, melted
- 2 cups heavy cream
- 1 cup powdered sugar
- 1 teaspoon vanilla extract
- 1 cup chocolate pudding mix
- 2 cups milk
- Chocolate shavings for garnish
Instructions
- Prepare the Crust: In a bowl, mix chocolate cookie crumbs with melted butter. Press the mixture into the bottom of a pie dish to form a crust. Chill in the refrigerator for about 15 minutes.
- Make the Filling: In another bowl, whisk together the chocolate pudding mix and milk until thickened. Set aside.
- Whip the Cream: In a large mixing bowl, beat the heavy cream, powdered sugar, and vanilla extract until soft peaks form.
- Combine: Gently fold half of the whipped cream into the chocolate pudding mixture. Pour this filling into the chilled crust and smooth the top.
- Add Topping: Spread the remaining whipped cream over the chocolate filling. Garnish with chocolate shavings.
- Chill: Refrigerate for at least 2 hours before serving to let it set.
Delicious No-Bake Cheesecake Bars

No-bake cheesecake bars are a fantastic choice for parties. They are creamy, sweet, and topped with vibrant fruit, making them visually appealing and delicious. The image shows a tray of these delightful bars, each cut into perfect squares and topped with a glossy cherry and berry glaze. The bright colors of the fruit contrast beautifully with the creamy cheesecake layer and the golden graham cracker crust.
These bars are not only easy to make but also a hit with guests. You can prepare them ahead of time, leaving you free to enjoy the party. The combination of the crunchy crust and the smooth filling creates a wonderful texture that everyone loves.
Ingredients
- 1 ½ cups graham cracker crumbs
- ½ cup unsalted butter, melted
- 1 cup powdered sugar
- 2 cups cream cheese, softened
- 1 teaspoon vanilla extract
- 1 cup heavy whipping cream
- 1 can cherry pie filling (or your favorite fruit topping)
Instructions
- Prepare the Crust: In a bowl, mix graham cracker crumbs and melted butter until combined. Press the mixture firmly into the bottom of a greased 9x13 inch pan.
- Make the Filling: In another bowl, beat the cream cheese until smooth. Gradually add powdered sugar and vanilla, mixing until well combined. In a separate bowl, whip the heavy cream until stiff peaks form. Gently fold the whipped cream into the cream cheese mixture.
- Combine: Spread the cream cheese filling over the crust evenly. Smooth the top with a spatula.
- Chill: Cover the pan and refrigerate for at least 4 hours or until set.
- Add Topping: Once set, spread the cherry pie filling over the cheesecake layer. Cut into squares and serve chilled.
Comments
Post a Comment