- Get link
- X
- Other Apps
15 Delicious No-Bake Desserts You Can Make in Minutes
No-Bake Easy Desserts are perfect for satisfying your sweet tooth without the fuss of an oven. These simple and quick treats deliver delicious flavors and delightful textures in no time. With minimal ingredients and a bit of creativity, you can whip up satisfying desserts that will impress friends and family alike. Get ready to enjoy some stress-free sweet creations!
Delightfully Rich Chocolate Mousse Cups
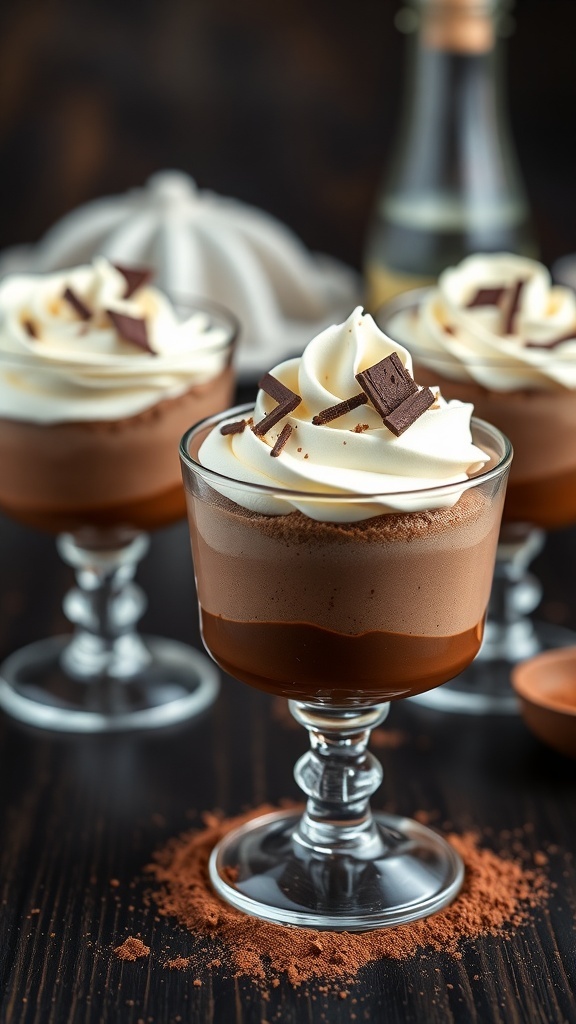
Chocolate mousse cups are a treat that never fails to impress. These little desserts are rich, creamy, and perfect for any occasion. The image shows elegant cups filled with layers of chocolate mousse, topped with fluffy whipped cream and chocolate shavings. They look so inviting and delicious, making them hard to resist!
This no-bake dessert is not only simple to make but also a great way to satisfy your chocolate cravings. The combination of smooth chocolate and airy whipped cream creates a delightful texture that melts in your mouth. Plus, you can prepare them ahead of time, making them perfect for parties or a cozy night in.
Let’s get started on making these delightful chocolate mousse cups!
Ingredients
- 1 cup heavy cream
- 1/2 cup semi-sweet chocolate chips
- 2 tablespoons granulated sugar
- 1 teaspoon vanilla extract
- 1/4 cup whipped cream (for topping)
- Chocolate shavings (for garnish)
Instructions
- Melt the Chocolate: In a microwave-safe bowl, heat the chocolate chips in 30-second intervals, stirring in between until smooth.
- Whip the Cream: In a separate bowl, whip the heavy cream, sugar, and vanilla extract until soft peaks form.
- Combine: Gently fold the melted chocolate into the whipped cream until fully combined. Be careful not to deflate the mixture.
- Chill: Spoon the mousse into serving cups and refrigerate for at least 2 hours to set.
- Serve: Top with whipped cream and chocolate shavings before serving. Enjoy your delightful chocolate mousse cups!
Creamy No-Bake Cheesecake With Fresh Berries
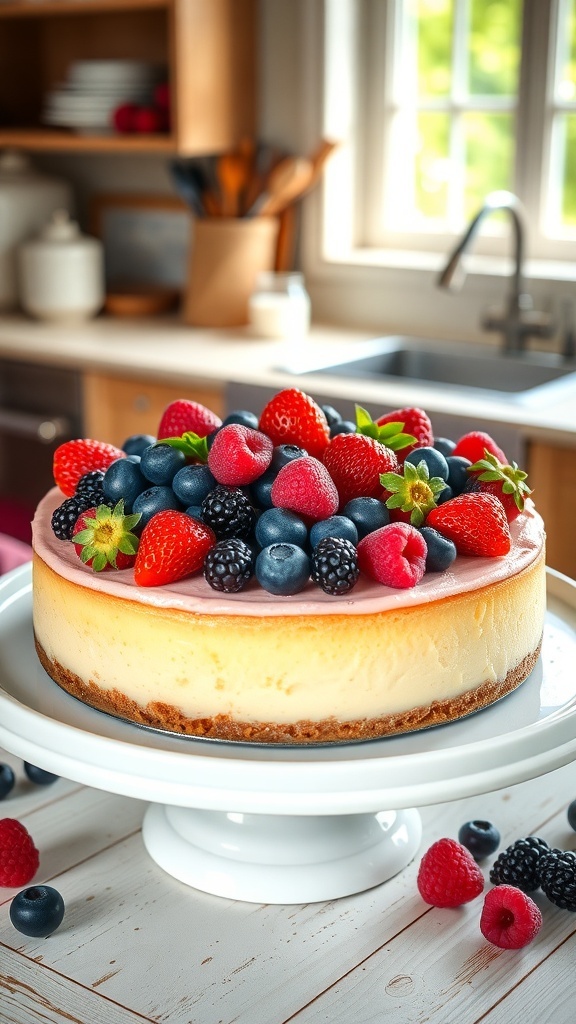
This creamy no-bake cheesecake is a delightful treat that’s perfect for any occasion. The image showcases a beautifully crafted cheesecake topped with a vibrant mix of fresh berries. The strawberries, blueberries, raspberries, and blackberries not only add color but also a burst of flavor that complements the smooth, rich filling.
Making this cheesecake is simple and requires no oven time, making it a great option for warm days or when you want a quick dessert. The crust is made from crushed graham crackers, providing a crunchy base that contrasts nicely with the creamy filling. The cheesecake itself is light and fluffy, thanks to whipped cream folded into the cream cheese mixture.
As you prepare this dessert, you’ll enjoy the sweet aroma of the berries and the creamy filling coming together. It’s a treat that’s sure to impress your family and friends. Serve it chilled for the best experience!
Ingredients
- 1 ½ cups graham cracker crumbs
- ½ cup unsalted butter, melted
- 2 cups cream cheese, softened
- 1 cup powdered sugar
- 1 teaspoon vanilla extract
- 1 cup heavy whipping cream
- 2 cups mixed fresh berries (strawberries, blueberries, raspberries, blackberries)
Instructions
- Prepare the Crust: In a bowl, mix the graham cracker crumbs and melted butter until combined. Press the mixture into the bottom of a 9-inch springform pan to form an even layer.
- Make the Filling: In a large bowl, beat the softened cream cheese until smooth. Gradually add the powdered sugar and vanilla extract, mixing until well combined.
- Whip the Cream: In another bowl, whip the heavy cream until stiff peaks form. Gently fold the whipped cream into the cream cheese mixture until fully incorporated.
- Assemble the Cheesecake: Pour the filling over the crust in the springform pan. Smooth the top with a spatula. Cover and refrigerate for at least 4 hours or until set.
- Top with Berries: Once set, remove the cheesecake from the pan. Decorate the top with fresh berries before serving.
Refreshing Key Lime Pie Parfaits
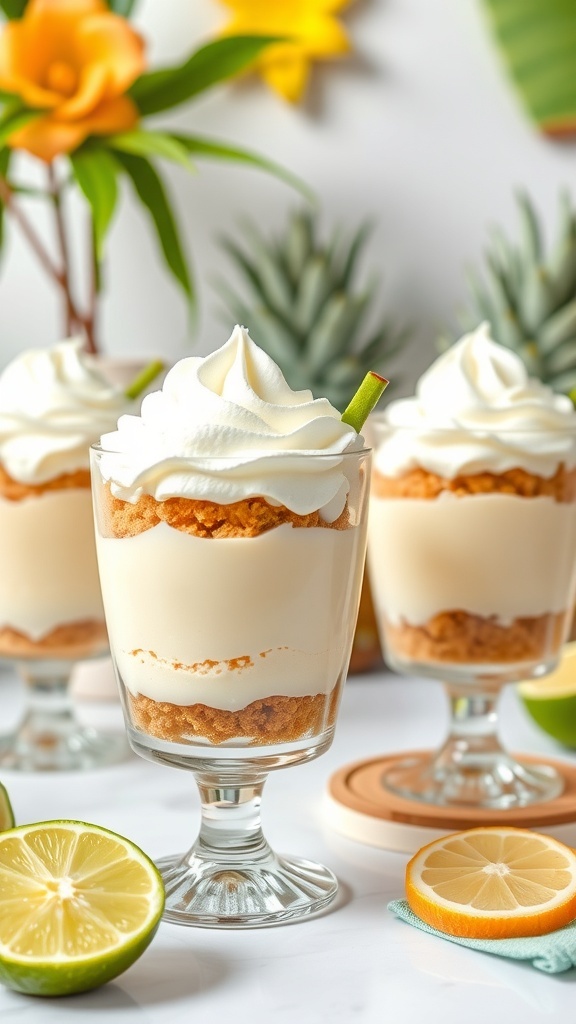
Key Lime Pie Parfaits are a delightful twist on the classic dessert. These parfaits are light, creamy, and bursting with zesty lime flavor. The layers of whipped cream, graham cracker crumbs, and key lime filling create a refreshing treat perfect for any occasion.
In the image, you can see these beautiful parfaits served in elegant glasses. The creamy filling is topped with a generous swirl of whipped cream, making them look irresistible. The bright colors of lime and lemon slices in the foreground add a cheerful touch, hinting at the refreshing flavors inside.
Making these parfaits is simple and fun. They require no baking, which means you can whip them up in no time. Just layer the ingredients in your favorite glasses, and you have a stunning dessert ready to impress your guests!
Ingredients
- 1 cup heavy cream
- 1/2 cup powdered sugar
- 1 cup cream cheese, softened
- 1/2 cup key lime juice
- 1 teaspoon vanilla extract
- 1 cup graham cracker crumbs
- 1 tablespoon lime zest
Instructions
- Whip the Cream: In a bowl, beat the heavy cream and powdered sugar until soft peaks form. Set aside.
- Make the Filling: In another bowl, mix the softened cream cheese, key lime juice, vanilla extract, and lime zest until smooth.
- Combine: Gently fold the whipped cream into the cream cheese mixture until well combined.
- Layer: In serving glasses, add a layer of graham cracker crumbs, followed by a layer of the key lime filling. Repeat the layers until the glasses are full.
- Chill: Refrigerate for at least 2 hours before serving to let the flavors meld.
- Serve: Top with additional whipped cream and lime slices for garnish.
Classic No-Bake Chocolate Oatmeal Cookies
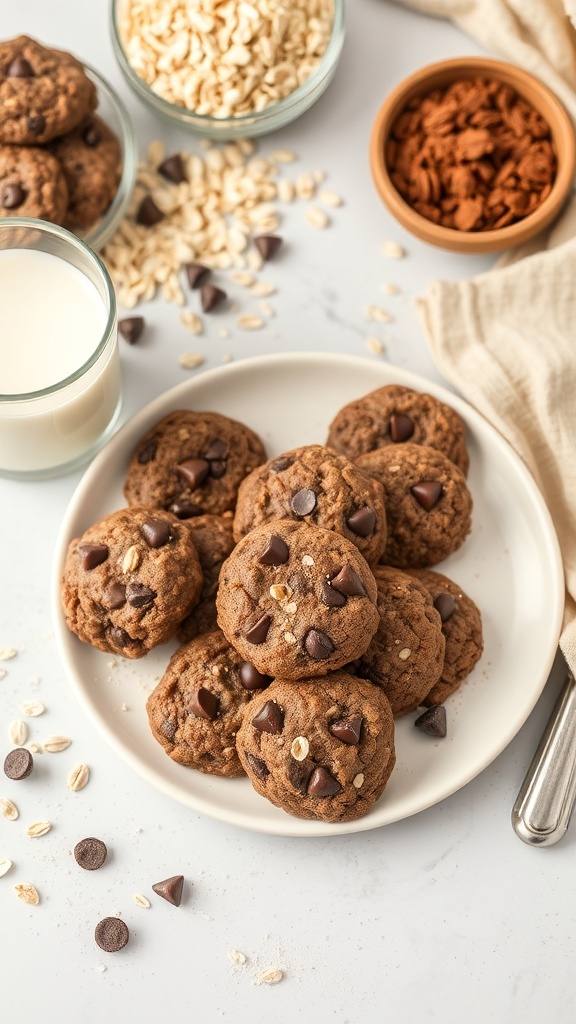
No-bake chocolate oatmeal cookies are a classic treat that everyone loves. They are quick to make and require no oven, making them perfect for warm days or when you want a sweet fix without the fuss. The image captures a plate of these delightful cookies, showcasing their chewy texture and rich chocolate flavor. Surrounded by ingredients like oats and cocoa powder, they look inviting and delicious.
These cookies combine the goodness of oats with the sweetness of chocolate. They are often made with simple ingredients that you probably already have in your pantry. Plus, they come together in just a few easy steps, making them a go-to recipe for busy days.
Let’s get started on making your own batch of these tasty treats!
Ingredients
- 1 cup granulated sugar
- 1/2 cup unsweetened cocoa powder
- 1/2 cup unsalted butter
- 1/2 cup milk
- 3 cups quick oats
- 1 teaspoon vanilla extract
- 1/2 cup chocolate chips (optional)
Instructions
- In a medium saucepan, combine sugar, cocoa powder, butter, and milk. Cook over medium heat, stirring constantly until the mixture comes to a boil. Let it boil for 1 minute.
- Remove the saucepan from heat and stir in the vanilla extract and quick oats until well combined.
- If using, fold in the chocolate chips for an extra chocolatey touch.
- Drop spoonfuls of the mixture onto wax paper or a baking sheet. Let them cool and set for about 30 minutes.
- Once set, enjoy your delicious no-bake chocolate oatmeal cookies!
Decadent Peanut Butter Pie With Chocolate Drizzle
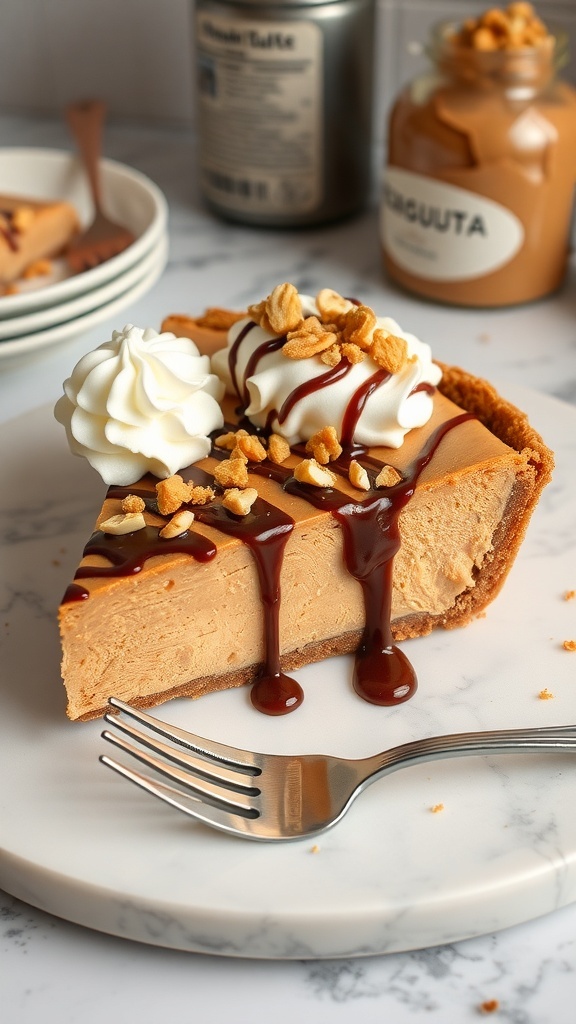
This peanut butter pie is a showstopper! It features a creamy filling made with rich peanut butter, all nestled in a crunchy graham cracker crust. The pie is topped with a luscious chocolate drizzle, making it a perfect treat for any occasion.
As you take a slice, you’ll notice the smooth texture of the filling, complemented by the sweet and salty flavors of peanut butter. The chocolate drizzle adds a delightful touch, making each bite even more enjoyable. This dessert is not just easy to make; it’s also a crowd-pleaser!
Let’s get to the fun part—making this delicious pie!
Ingredients
- 1 ½ cups graham cracker crumbs
- ½ cup unsalted butter, melted
- 1 cup creamy peanut butter
- 1 cup powdered sugar
- 1 cup heavy whipping cream
- 1 teaspoon vanilla extract
- ½ cup chocolate syrup
- Chopped peanuts for garnish (optional)
Instructions
- Prepare the Crust: In a bowl, mix graham cracker crumbs and melted butter until combined. Press the mixture into the bottom and sides of a 9-inch pie pan. Chill in the refrigerator for about 10 minutes.
- Make the Filling: In a large bowl, beat together peanut butter and powdered sugar until smooth. In another bowl, whip the heavy cream and vanilla extract until stiff peaks form. Gently fold the whipped cream into the peanut butter mixture until well combined.
- Fill the Crust: Pour the peanut butter filling into the chilled crust, smoothing the top with a spatula. Refrigerate for at least 2 hours to set.
- Add the Drizzle: Once the pie is set, drizzle chocolate syrup over the top. You can also sprinkle chopped peanuts for extra crunch.
- Serve: Slice and enjoy this delightful pie with family and friends!
Sweet And Tangy No-Bake Lemon Bars

No-bake lemon bars are a delightful treat that combines sweetness with a zesty punch. The image showcases a beautiful tray of these bars, perfectly cut into squares, each topped with a light dusting of powdered sugar. The vibrant yellow color of the lemon filling is eye-catching, and the fresh lemon slices and mint leaves add a refreshing touch.
These bars are not only easy to make but also perfect for any occasion. Whether you’re hosting a summer gathering or just craving something sweet, these lemon bars will surely impress. The tangy lemon flavor paired with the creamy texture makes for a satisfying dessert that everyone will love.
Let’s get into the ingredients and steps to whip up these delicious no-bake lemon bars!
Ingredients
- 1 cup graham cracker crumbs
- 1/2 cup unsalted butter, melted
- 1 cup powdered sugar
- 1/2 cup fresh lemon juice
- 1 tablespoon lemon zest
- 1 (8 oz) package cream cheese, softened
- 1 cup whipped topping
Instructions
- Prepare the Crust: In a bowl, mix graham cracker crumbs and melted butter until combined. Press the mixture into the bottom of a greased 9x9 inch baking dish.
- Make the Filling: In another bowl, beat together the softened cream cheese and powdered sugar until smooth. Add in the lemon juice and zest, mixing until well combined.
- Fold in the Whipped Topping: Gently fold in the whipped topping until the mixture is light and fluffy.
- Spread the Filling: Pour the lemon filling over the crust, spreading it evenly. Smooth the top with a spatula.
- Chill: Refrigerate the lemon bars for at least 4 hours or until set. Cut into squares and serve, garnished with lemon slices and mint leaves if desired.
Indulgent No-Bake S'Mores Dessert Cups
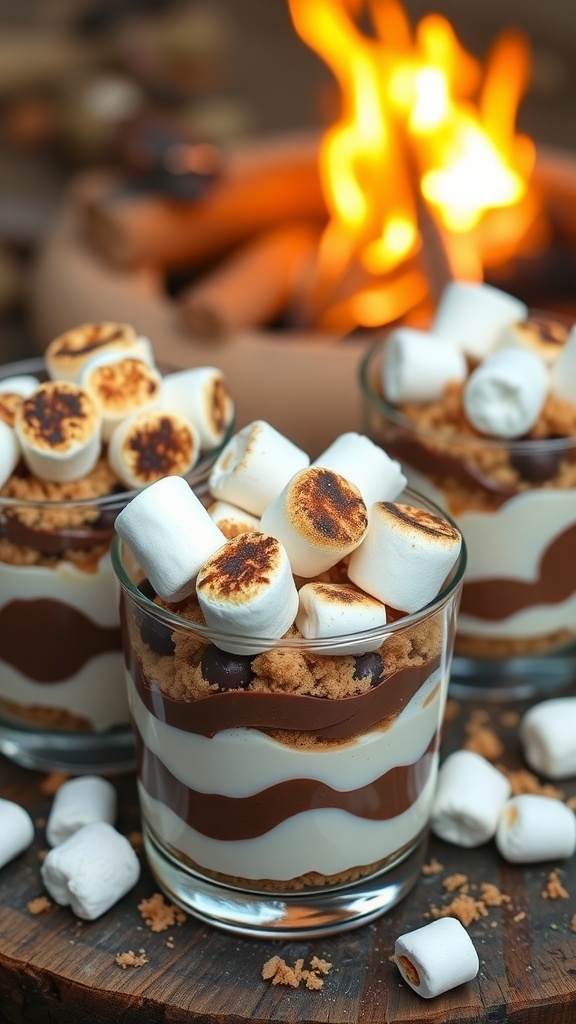
These no-bake s'mores dessert cups are a fun twist on the classic campfire treat. Picture layers of creamy chocolate, fluffy marshmallows, and crunchy graham crackers all in a cute cup. Perfect for gatherings or a cozy night in, they bring the taste of summer right to your table.
The cups are filled with a rich chocolate pudding, topped with whipped cream, and finished off with toasted marshmallows. The combination of textures makes every bite a delight. Plus, you don’t need an oven, which is a win for hot days!
Gather your friends and family, and enjoy these delicious cups while reminiscing about campfire nights. They’re easy to make and even easier to devour!
Ingredients
- 1 cup chocolate pudding mix
- 2 cups milk
- 1 cup whipped cream
- 1 cup graham cracker crumbs
- 1 cup mini marshmallows
- 1/2 cup chocolate chips
Instructions
- In a bowl, whisk together the chocolate pudding mix and milk until smooth. Let it sit for about 5 minutes to thicken.
- In serving cups, layer the graham cracker crumbs at the bottom.
- Add a layer of chocolate pudding on top of the crumbs.
- Next, add a layer of whipped cream.
- Repeat the layers until the cups are filled, finishing with whipped cream on top.
- Toast the mini marshmallows using a kitchen torch or under a broiler until golden brown.
- Garnish the dessert cups with toasted marshmallows and sprinkle chocolate chips on top.
- Serve immediately or chill in the fridge for a bit before enjoying.
Fruity No-Bake Strawberry Shortcake
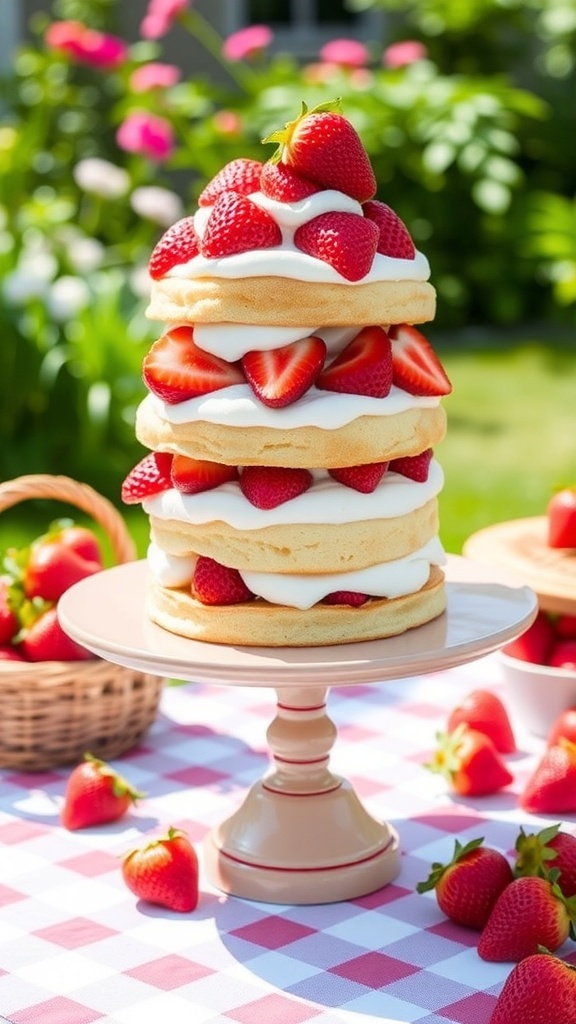
Fruity no-bake strawberry shortcake is a delightful treat that’s perfect for any occasion. This dessert features layers of fluffy cake and fresh strawberries, all topped with creamy goodness. The vibrant colors and textures make it a feast for the eyes as well as the taste buds.
The image showcases a stunning tower of shortcake, beautifully arranged with ripe strawberries and whipped cream. The layers are stacked high, creating an inviting look that makes you want to dig in right away. The bright green background adds a refreshing touch, making this dessert feel even more appealing.
This no-bake recipe is simple and quick, making it a great choice for warm days when you want something sweet without turning on the oven. Let’s get to the ingredients and instructions so you can whip this up in no time!
Ingredients
- 1 pound fresh strawberries, sliced
- 2 cups heavy whipping cream
- 1/4 cup powdered sugar
- 1 teaspoon vanilla extract
- 1 package of store-bought sponge cake or ladyfingers
- Mint leaves for garnish (optional)
Instructions
- Prepare the Strawberries: Wash and slice the strawberries. Set aside some for decoration.
- Make the Whipped Cream: In a mixing bowl, combine heavy whipping cream, powdered sugar, and vanilla extract. Whip until soft peaks form.
- Layer the Cake: In a serving dish, place a layer of sponge cake or ladyfingers. Spread a layer of whipped cream over it, followed by a layer of sliced strawberries.
- Repeat Layers: Continue layering until you run out of ingredients, finishing with whipped cream on top.
- Garnish: Decorate the top with the reserved strawberries and mint leaves if desired.
- Chill: Refrigerate for at least 1 hour before serving to let the flavors meld.
Tasty No-Bake Coconut Cream Pie
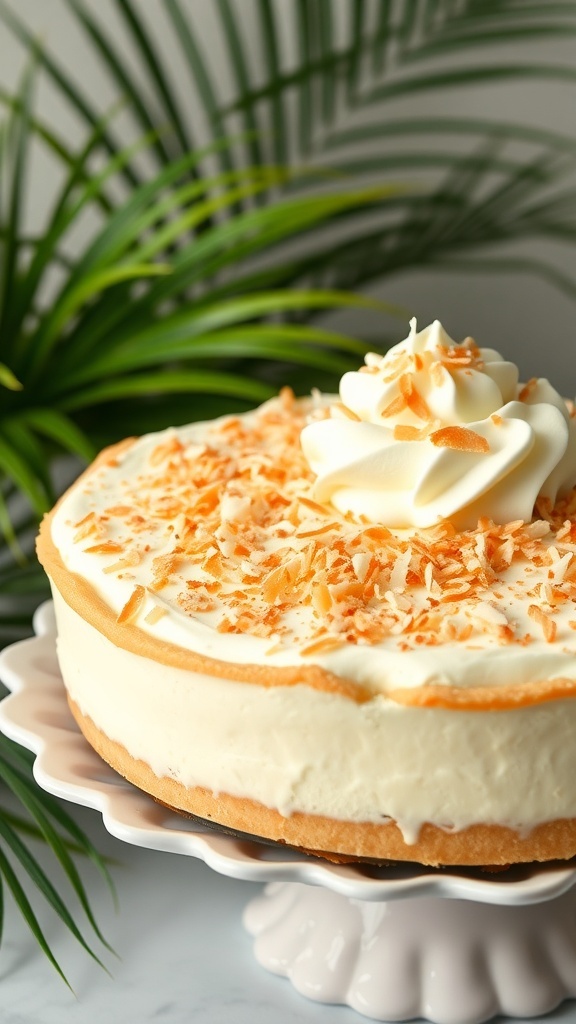
No-bake desserts are a lifesaver, especially when you want something sweet without the fuss of baking. This coconut cream pie is creamy, dreamy, and oh-so-delicious. The image shows a beautifully crafted pie topped with whipped cream and toasted coconut flakes, making it a perfect treat for any occasion.
The crust is simple yet satisfying, providing a crunchy base that complements the smooth filling. The coconut flavor shines through, making every bite a tropical delight. Whether it's a hot summer day or a cozy gathering, this pie is sure to impress.
Making this dessert is easy and requires minimal effort. You can whip it up in no time, and it’s a great way to use coconut if you have it on hand. Plus, it’s a hit with both kids and adults!
Ingredients
- 1 ½ cups graham cracker crumbs
- ½ cup unsweetened shredded coconut
- ½ cup unsalted butter, melted
- 1 cup heavy whipping cream
- 1 cup sweetened condensed milk
- 1 cup coconut milk
- 1 teaspoon vanilla extract
- 1 cup whipped cream for topping
- ¼ cup toasted coconut flakes for garnish
Instructions
- Prepare the Crust: In a bowl, mix graham cracker crumbs, shredded coconut, and melted butter until combined. Press the mixture into the bottom of a pie dish to form the crust.
- Make the Filling: In another bowl, whisk together heavy cream, sweetened condensed milk, coconut milk, and vanilla extract until smooth. Pour the filling into the prepared crust.
- Chill: Cover the pie with plastic wrap and refrigerate for at least 4 hours, or until set.
- Serve: Once set, top with whipped cream and sprinkle toasted coconut flakes on top before serving. Enjoy your delicious coconut cream pie!
Zesty No-Bake Cherry Cheesecake
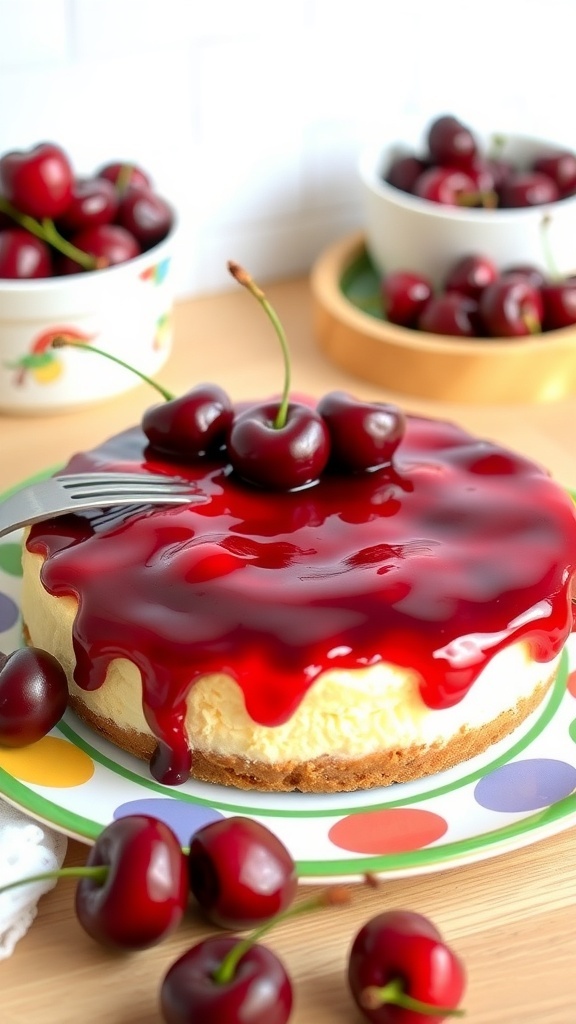
If you're looking for a dessert that's both easy and delicious, this no-bake cherry cheesecake is a winner. The creamy filling pairs perfectly with the sweet cherry topping, making it a delightful treat for any occasion. Plus, it’s simple to whip up, so you can spend more time enjoying it with friends and family.
The cheesecake has a smooth texture and a rich flavor that comes from cream cheese and whipped topping. The cherry glaze adds a pop of color and a burst of fruity goodness. It's a dessert that looks impressive but requires minimal effort.
To make this cheesecake, you’ll need a few basic ingredients. The crust is made from crushed graham crackers mixed with melted butter, giving it a nice crunch. The filling is a blend of cream cheese, sugar, and whipped topping, which creates a light and airy texture. Finally, the cherry topping is simply a can of cherry pie filling, making it super easy!
Ingredients
- 1 ½ cups graham cracker crumbs
- ½ cup unsalted butter, melted
- 2 cups cream cheese, softened
- 1 cup powdered sugar
- 1 teaspoon vanilla extract
- 2 cups whipped topping
- 1 can (21 oz) cherry pie filling
Instructions
- Prepare the Crust: In a bowl, mix the graham cracker crumbs and melted butter until combined. Press the mixture into the bottom of a 9-inch springform pan to form the crust.
- Make the Filling: In a large bowl, beat the softened cream cheese until smooth. Gradually add the powdered sugar and vanilla extract, mixing until well combined. Fold in the whipped topping until everything is blended.
- Assemble: Spread the cream cheese mixture over the crust in the springform pan. Smooth the top with a spatula.
- Chill: Cover the cheesecake and refrigerate for at least 4 hours, or until set.
- Top with Cherries: Once set, spread the cherry pie filling over the top of the cheesecake before serving.
Easy No-Bake Tiramisu Cups
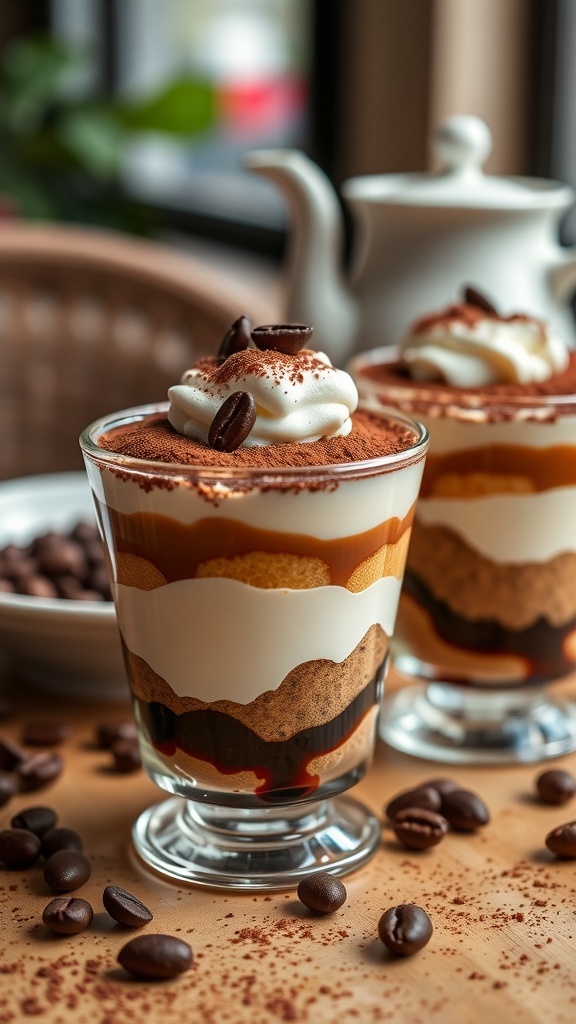
No-bake desserts are a lifesaver when you want something sweet without the fuss of baking. Tiramisu cups are a perfect example of this. They combine layers of coffee-soaked ladyfingers, creamy mascarpone, and a dusting of cocoa powder. The result is a delightful treat that’s both simple and elegant.
The image shows beautifully layered tiramisu cups, topped with whipped cream and coffee beans. The rich colors of the layers make it visually appealing. These cups are not just a feast for the eyes; they also promise a burst of flavor with every spoonful.
Making these tiramisu cups is straightforward. You’ll need a few key ingredients, and you can whip them up in no time. They are perfect for gatherings or a cozy night in.
Ingredients
- 1 cup strong brewed coffee, cooled
- 2 tablespoons coffee liqueur (optional)
- 8 ounces mascarpone cheese
- 1 cup heavy cream
- 1/2 cup powdered sugar
- 1 teaspoon vanilla extract
- 12-15 ladyfingers
- Cocoa powder for dusting
- Chocolate shavings or coffee beans for garnish (optional)
Instructions
- Prepare the Coffee: Brew strong coffee and let it cool. If using, mix in coffee liqueur.
- Make the Cream Mixture: In a bowl, beat mascarpone cheese, heavy cream, powdered sugar, and vanilla extract until soft peaks form.
- Assemble the Cups: Dip each ladyfinger briefly in the coffee mixture. Layer them in serving cups, followed by a layer of the cream mixture.
- Repeat Layers: Continue layering until the cups are filled, finishing with the cream mixture on top.
- Chill: Cover and refrigerate for at least 4 hours, or overnight for best results.
- Serve: Before serving, dust with cocoa powder and add chocolate shavings or coffee beans for garnish.
Chilled No-Bake Chocolate And Mint Bars
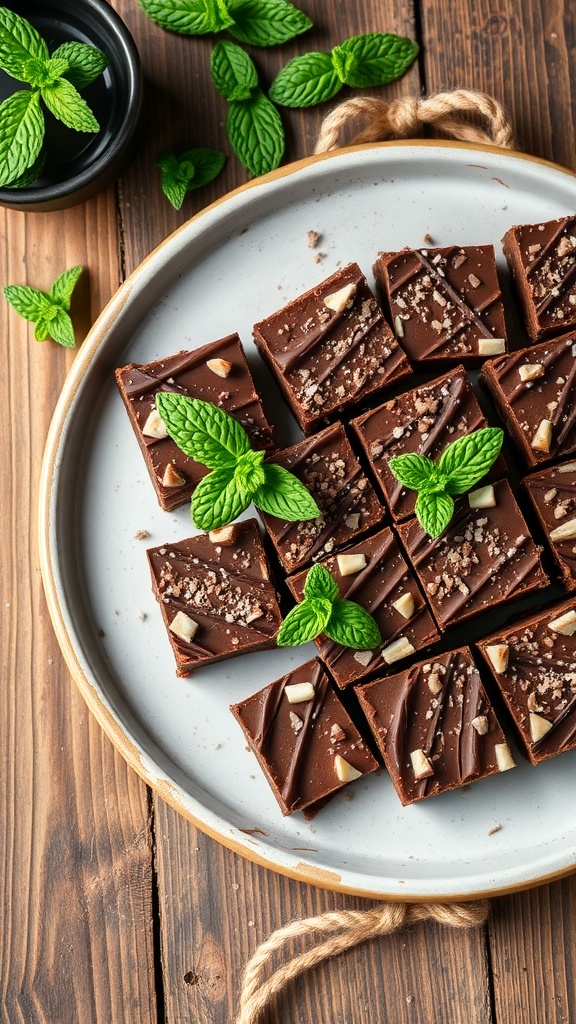
These chilled no-bake chocolate and mint bars are a delightful treat that combines rich chocolate with refreshing mint. They are perfect for satisfying your sweet tooth without the need for baking. The bars are beautifully arranged on a plate, showcasing their glossy chocolate surface and garnished with fresh mint leaves. This simple yet elegant presentation makes them a great choice for gatherings or a cozy night in.
Making these bars is straightforward. You’ll love how easy it is to whip them up. The combination of chocolate and mint creates a refreshing flavor that is hard to resist. Plus, they require minimal ingredients, making them a go-to dessert for any occasion.
Ingredients
- 1 cup chocolate chips
- 1/2 cup sweetened condensed milk
- 1/4 cup unsweetened cocoa powder
- 1 teaspoon peppermint extract
- 1/2 cup crushed graham crackers
- 1/4 cup chopped nuts (optional)
- Fresh mint leaves for garnish
Instructions
- Prepare the Base: In a medium saucepan, combine chocolate chips and sweetened condensed milk over low heat. Stir until melted and smooth.
- Add Flavor: Remove from heat and mix in cocoa powder and peppermint extract until well combined.
- Mix in Dry Ingredients: Stir in crushed graham crackers and chopped nuts, if using. Ensure everything is evenly mixed.
- Set in a Pan: Line an 8x8 inch pan with parchment paper. Pour the mixture into the pan and spread it evenly. Press down firmly.
- Chill: Refrigerate for at least 2 hours until set. Once firm, cut into bars.
- Serve: Garnish with fresh mint leaves before serving. Enjoy your delicious no-bake chocolate and mint bars!
Colorful No-Bake Fruit Tart

This colorful no-bake fruit tart is a delightful treat that’s perfect for any occasion. The vibrant fruits on top make it visually appealing, while the creamy filling and crunchy crust create a wonderful mix of textures. It’s a dessert that’s sure to impress your friends and family without requiring hours in the kitchen.
The tart features a buttery crust that holds a smooth, sweet filling. Topped with an array of fresh fruits like strawberries, blueberries, and oranges, it’s a feast for the eyes and the taste buds. This dessert is not only easy to make but also a great way to enjoy seasonal fruits.
Gather your ingredients and get ready to whip up this delicious tart. It’s a no-bake recipe, so you can enjoy it without the hassle of turning on the oven!
Ingredients
- 1 ½ cups graham cracker crumbs
- ½ cup unsalted butter, melted
- 2 cups cream cheese, softened
- 1 cup powdered sugar
- 1 teaspoon vanilla extract
- 2 cups mixed fresh fruits (strawberries, blueberries, kiwi, oranges)
- 1 tablespoon lemon juice
Instructions
- Prepare the Crust: In a bowl, mix graham cracker crumbs and melted butter until combined. Press the mixture into the bottom and sides of a tart pan. Chill in the refrigerator for about 30 minutes.
- Make the Filling: In another bowl, beat the cream cheese until smooth. Gradually add powdered sugar and vanilla extract, mixing until well combined.
- Assemble the Tart: Spread the cream cheese filling evenly over the chilled crust. Arrange the mixed fresh fruits on top, drizzling with lemon juice to enhance flavor and prevent browning.
- Chill and Serve: Refrigerate the tart for at least 2 hours before serving. Slice and enjoy your colorful no-bake fruit tart!
Delectable No-Bake Chocolate Peanut Butter Bars
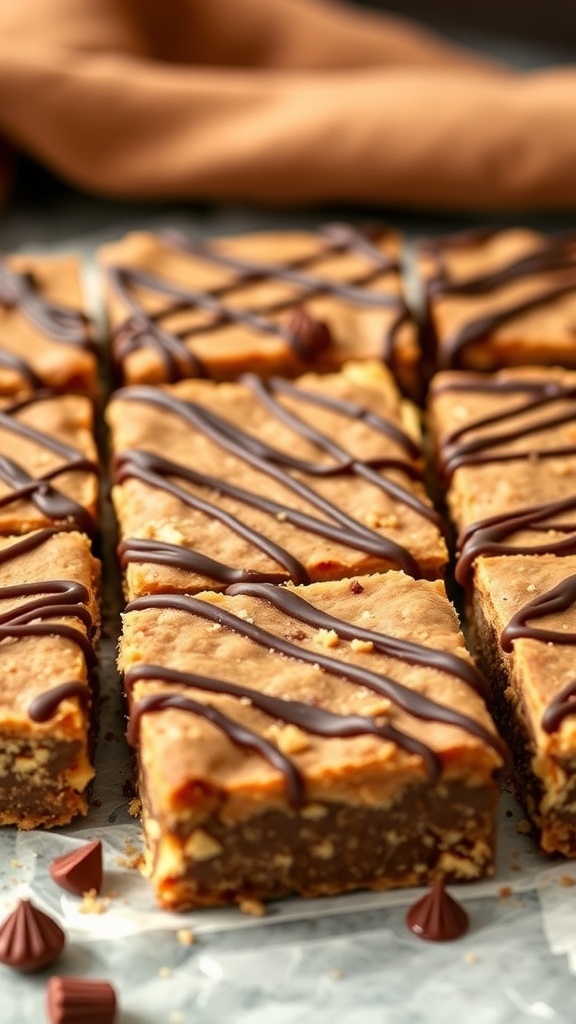
These no-bake chocolate peanut butter bars are a sweet treat that everyone will love. They are easy to make and require no oven time, making them perfect for warm days or when you just want something quick. The combination of chocolate and peanut butter is always a winner, and these bars take it to the next level.
The image shows beautifully cut bars with a rich layer of peanut butter on top, drizzled with chocolate. They look so inviting and are sure to satisfy any sweet tooth. The texture appears creamy and smooth, with a crunchy base that adds a delightful contrast.
Making these bars is simple. You just mix the ingredients, press them into a pan, and let them chill. In no time, you’ll have a delicious dessert that’s perfect for sharing with friends or enjoying all by yourself!
Ingredients
- 1 cup graham cracker crumbs
- 1 cup powdered sugar
- 1/2 cup unsweetened cocoa powder
- 1 cup creamy peanut butter
- 1/2 cup unsalted butter, melted
- 1 cup chocolate chips
Instructions
- Prepare the Base: In a mixing bowl, combine graham cracker crumbs, powdered sugar, cocoa powder, peanut butter, and melted butter. Mix until well combined.
- Press into Pan: Line an 8x8 inch pan with parchment paper. Press the mixture evenly into the bottom of the pan.
- Melt Chocolate: In a microwave-safe bowl, melt the chocolate chips in 30-second intervals, stirring in between until smooth.
- Top the Bars: Pour the melted chocolate over the peanut butter layer and spread evenly. You can drizzle extra chocolate on top for a nice touch.
- Chill: Refrigerate for at least 2 hours until set. Once firm, cut into bars and enjoy!
Creamy No-Bake Vanilla Pudding Cups
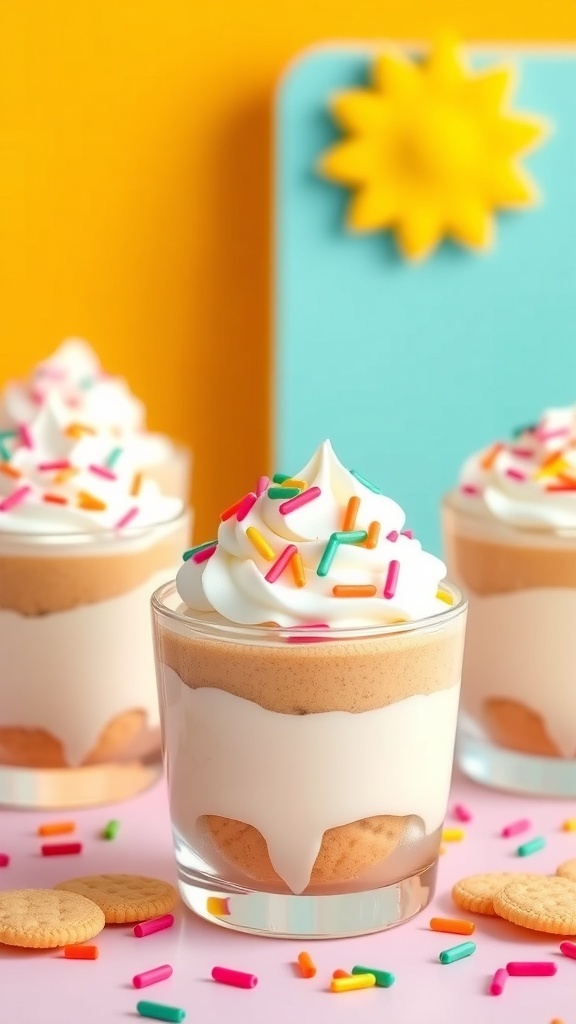
These creamy no-bake vanilla pudding cups are a delightful treat that anyone can whip up in no time. The image shows beautifully layered pudding cups topped with fluffy whipped cream and colorful sprinkles, making them look as fun as they taste. Perfect for any occasion, these cups are sure to impress your family and friends.
The base is made with simple ingredients, and the best part is that you don’t need to turn on the oven. Just layer the ingredients in your favorite cups, and you’re set! The combination of smooth vanilla pudding and crunchy cookies creates a delicious texture that everyone will love.
Let’s get started on making these delightful pudding cups!
Ingredients
- 2 cups milk
- 1 package (3.4 oz) instant vanilla pudding mix
- 1 cup whipped cream (store-bought or homemade)
- 1 cup crushed vanilla wafers
- Sprinkles for topping
Instructions
- Prepare the Pudding: In a mixing bowl, whisk together the milk and instant vanilla pudding mix until smooth. Let it sit for about 5 minutes to thicken.
- Layer the Cups: In clear cups, add a layer of crushed vanilla wafers at the bottom. Then, spoon in a layer of the prepared pudding, followed by a layer of whipped cream.
- Repeat Layers: Continue layering with more crushed wafers, pudding, and whipped cream until the cups are filled, finishing with a dollop of whipped cream on top.
- Add Sprinkles: Top each cup with colorful sprinkles for a fun touch.
- Chill and Serve: Refrigerate the pudding cups for at least 30 minutes before serving to allow the flavors to meld.
Comments
Post a Comment