- Get link
- X
- Other Apps
15 Healthy Fruit Desserts Perfect for Parties
Healthy fruit desserts can be the perfect addition to any party, offering a delicious and guilt-free sweet to satisfy everyone’s cravings. From colorful fruit salads to refreshing sorbets, these treats not only taste great but also bring a burst of natural goodness. With simple recipes and vibrant flavors, you can impress your guests while keeping things light and fun!
Decadent Chocolate-Dipped Strawberries For A Sweet Treat

Chocolate-dipped strawberries are a classic dessert that never fails to impress. They combine the sweetness of ripe strawberries with the rich taste of chocolate, making them a perfect addition to any party. The image showcases these delightful treats, beautifully arranged and ready to be enjoyed.
The strawberries are dipped in smooth, melted chocolate, creating a glossy finish that looks irresistible. Fresh mint leaves add a pop of color and a hint of freshness, enhancing the overall appeal. A small bowl of chocolate sits nearby, hinting at the fun of dipping and decorating these treats.
These chocolate-dipped strawberries are not just visually appealing; they are also simple to make. They can be customized with various toppings, such as sprinkles or crushed nuts, to suit your taste. Whether you're hosting a gathering or just want a sweet snack, these treats are sure to be a hit.
Ingredients
- 1 pound fresh strawberries
- 8 ounces dark chocolate, chopped
- 1 tablespoon coconut oil (optional)
- Sprinkles or crushed nuts for topping (optional)
Instructions
- Prepare the Strawberries: Wash the strawberries and dry them thoroughly. Make sure they are completely dry to ensure the chocolate adheres well.
- Melt the Chocolate: In a microwave-safe bowl, combine the chopped chocolate and coconut oil. Microwave in 30-second intervals, stirring in between, until the chocolate is fully melted and smooth.
- Dip the Strawberries: Hold each strawberry by the stem and dip it into the melted chocolate, coating it about two-thirds of the way up. Allow any excess chocolate to drip off.
- Add Toppings: If desired, sprinkle your choice of toppings over the chocolate before it sets.
- Set the Strawberries: Place the dipped strawberries on a parchment-lined baking sheet. Let them sit at room temperature until the chocolate hardens, or refrigerate them for quicker results.
- Serve and Enjoy: Once the chocolate has set, serve the strawberries on a platter and enjoy your sweet treat!
Lemon Blueberry Parfait For A Zesty Finish
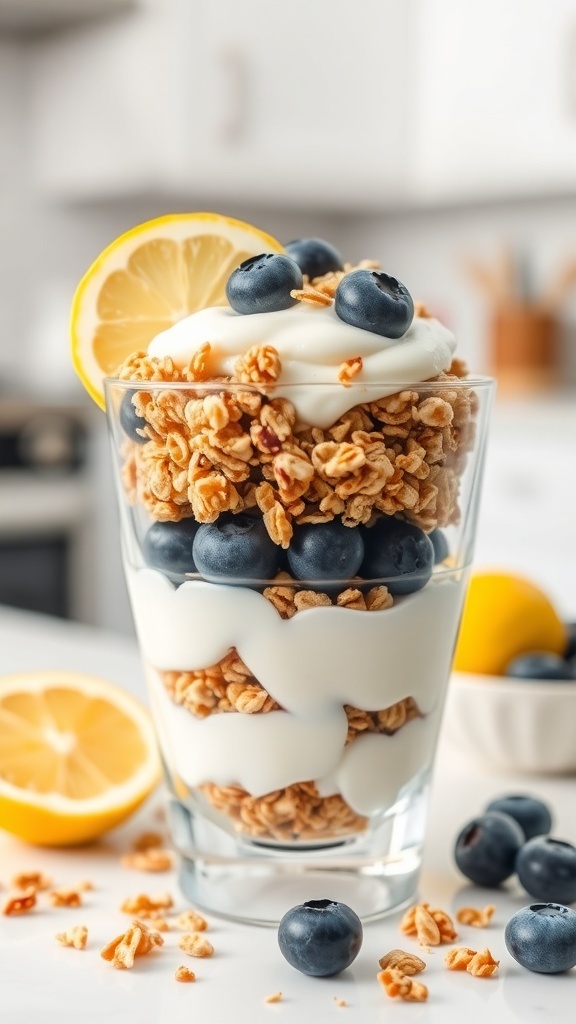
Lemon blueberry parfaits are a delightful way to end any gathering. This dessert combines the tartness of lemon with the sweetness of blueberries, creating a refreshing treat. The layers of creamy yogurt, crunchy granola, and juicy berries look stunning in a glass, making it a perfect centerpiece for your dessert table.
To make this parfait, you'll need fresh blueberries, creamy yogurt, crunchy granola, and a hint of lemon. The bright yellow of the lemon slices adds a cheerful touch, while the blueberries provide a pop of color. Each spoonful is a mix of textures and flavors that everyone will enjoy.
Not only is this dessert visually appealing, but it’s also healthy. It’s a great option for those looking for something light yet satisfying. Plus, it’s easy to prepare, allowing you to spend more time enjoying the party with your guests.
Ingredients
- 2 cups Greek yogurt
- 1 cup granola
- 2 cups fresh blueberries
- 1 lemon, sliced
- 2 tablespoons honey (optional)
Instructions
- In a glass, layer half of the Greek yogurt at the bottom.
- Add a layer of granola on top of the yogurt.
- Next, add a layer of fresh blueberries.
- Repeat the layers until the glass is filled, finishing with blueberries on top.
- Garnish with a lemon slice and drizzle honey if desired.
- Serve immediately and enjoy the refreshing taste!
Coconut Mango Chia Seed Pudding For A Tropical Twist

This Coconut Mango Chia Seed Pudding is a delightful treat that brings a taste of the tropics to your party. The layers of creamy coconut and sweet mango create a beautiful presentation that’s sure to impress your guests. Plus, it’s healthy and easy to make!
The pudding is made with chia seeds, which are packed with nutrients. When soaked in coconut milk, they create a lovely, pudding-like texture. The fresh mango adds a burst of flavor and color, making this dessert not only tasty but visually appealing.
To prepare this dish, you’ll need a few simple ingredients. The combination of coconut milk and mango is refreshing, making it perfect for warm weather gatherings. Serve it in individual jars for a fun and casual vibe.
Ingredients
- 1 cup coconut milk
- 1/4 cup chia seeds
- 2 tablespoons honey or maple syrup
- 1 ripe mango, diced
- 1/4 cup shredded coconut (unsweetened)
Instructions
- In a bowl, mix coconut milk, chia seeds, and honey or maple syrup. Stir well and let it sit for about 10 minutes.
- After 10 minutes, stir again to break up any clumps. Cover and refrigerate for at least 2 hours, or overnight.
- Once the chia pudding is set, layer it with diced mango in serving jars.
- Top with shredded coconut for added texture and flavor.
- Serve chilled and enjoy your tropical dessert!
Classic Peach Cobbler With A Healthy Twist
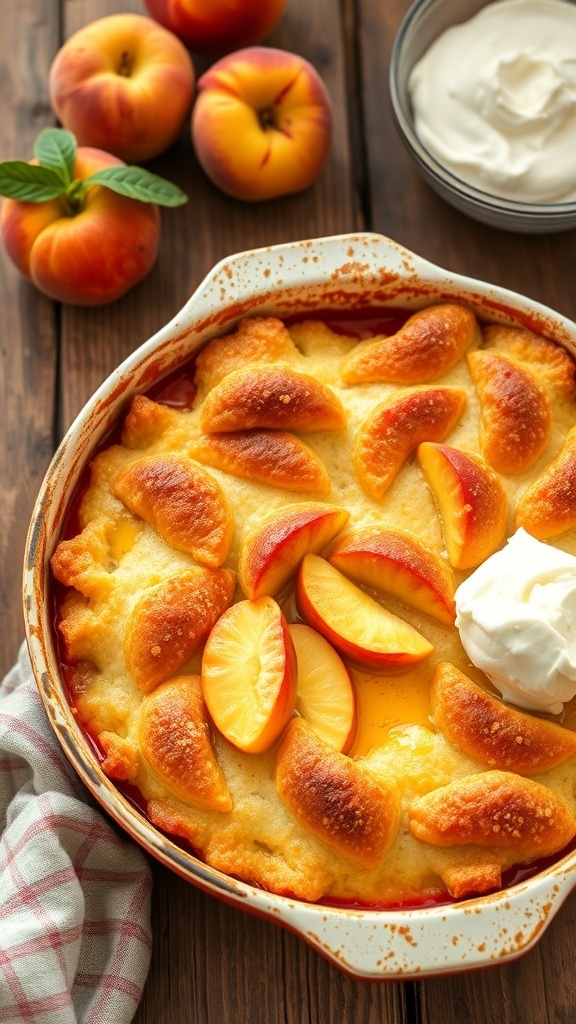
Peach cobbler is a beloved dessert that brings comfort and joy to any gathering. This version keeps the classic flavors while making it a bit healthier. The golden crust is perfectly baked, cradling juicy slices of fresh peaches. Topped with a dollop of whipped cream, it’s a treat that feels indulgent without the guilt.
Using fresh peaches not only enhances the flavor but also adds natural sweetness. This cobbler is easy to make and can be a star at your next party. Serve it warm, and watch your guests enjoy every bite!
Ingredients
- 4 cups fresh peaches, sliced
- 1 cup whole wheat flour
- 1/2 cup coconut sugar
- 1 tablespoon baking powder
- 1/2 teaspoon salt
- 1 cup almond milk
- 1/4 cup coconut oil, melted
- 1 teaspoon vanilla extract
- 1 teaspoon cinnamon
- Whipped cream for serving
Instructions
- Preheat your oven to 350°F (175°C).
- In a bowl, combine sliced peaches with a sprinkle of cinnamon and set aside.
- In another bowl, mix flour, coconut sugar, baking powder, and salt.
- Add almond milk, melted coconut oil, and vanilla extract to the dry ingredients. Stir until just combined.
- Pour the batter into a greased baking dish and top with the peach slices.
- Bake for 30-35 minutes or until the top is golden brown.
- Let it cool slightly before serving with whipped cream.
Crispy Baked Apple Chips For Crunchy Snacking
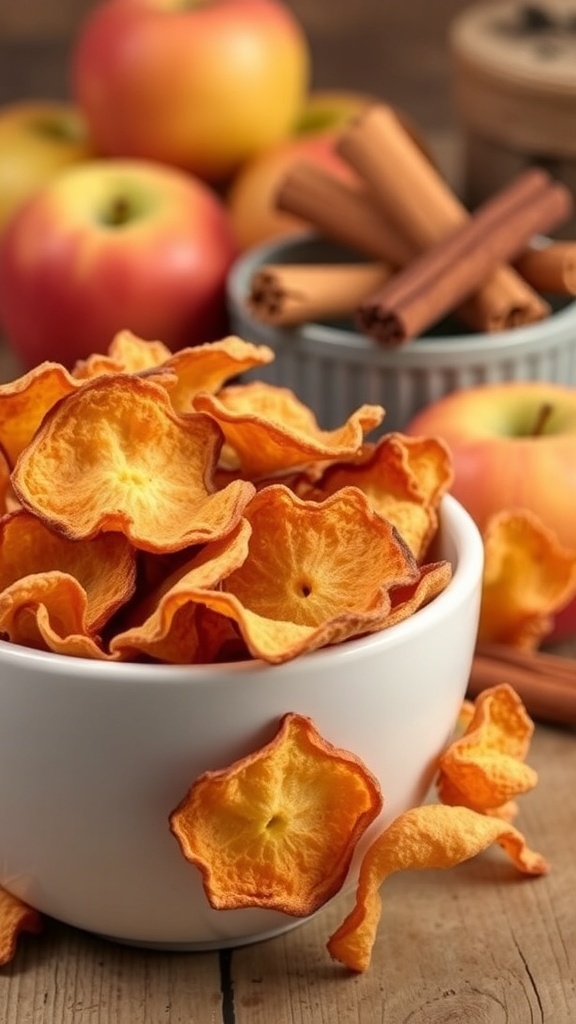
Looking for a fun and healthy snack for your next gathering? Crispy baked apple chips are a fantastic choice! They are light, crunchy, and bursting with natural sweetness. Plus, they are super easy to make and will impress your guests.
The image shows a delightful bowl of golden-brown apple chips, perfectly crisped and ready to munch on. Surrounding the bowl are fresh apples and cinnamon sticks, hinting at the delicious flavors that await. These chips not only taste great but also look beautiful on any snack table.
To make these apple chips, you’ll need just a few simple ingredients. The process involves slicing apples thinly, seasoning them lightly, and baking until they reach that perfect crunch. They’re a great alternative to traditional chips and are sure to be a hit!
Ingredients
- 2 large apples (any variety)
- 1 teaspoon cinnamon (optional)
- 1 tablespoon lemon juice
- 1 tablespoon sugar (optional)
Instructions
- Preheat the Oven: Preheat your oven to 200°F (93°C). Line a baking sheet with parchment paper.
- Prepare the Apples: Core and slice the apples thinly (about 1/8 inch thick). You can leave the skin on for added texture.
- Add Lemon Juice: In a bowl, toss the apple slices with lemon juice to prevent browning. If desired, sprinkle with sugar and cinnamon.
- Arrange on Baking Sheet: Lay the apple slices in a single layer on the prepared baking sheet, ensuring they do not overlap.
- Bake: Place the baking sheet in the oven and bake for 1.5 to 2 hours, flipping the apple slices halfway through, until they are dry and crispy.
- Cool and Store: Remove from the oven and let the apple chips cool completely. Store in an airtight container.
Berry Nice Yogurt Bark For A Colorful Snack
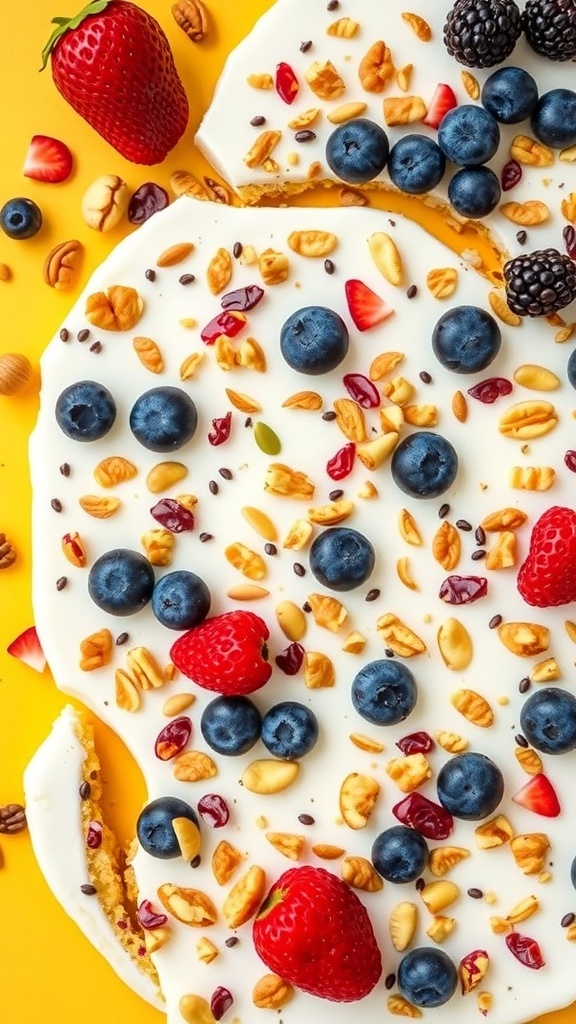
Berry Nice Yogurt Bark is a fun and healthy dessert that’s perfect for any gathering. This colorful treat combines creamy yogurt with a variety of fresh berries and crunchy toppings. It’s not just tasty; it’s also visually appealing, making it a great addition to your party spread.
The vibrant colors of strawberries, blueberries, and blackberries pop against the white yogurt base. Sprinkling granola and seeds adds a delightful crunch. This dessert is simple to make and can be prepared in advance, allowing you to enjoy the party without stress.
To make this yogurt bark, you’ll need a few basic ingredients. It’s a great way to incorporate fruits into your dessert menu while keeping things light and refreshing. Everyone will love this sweet yet healthy option!
Ingredients
- 2 cups Greek yogurt
- 1 tablespoon honey (optional)
- 1 cup mixed berries (strawberries, blueberries, blackberries)
- 1/4 cup granola
- 1 tablespoon chia seeds or flaxseeds
Instructions
- Prepare the Yogurt: In a bowl, mix the Greek yogurt and honey until well combined.
- Spread the Mixture: Line a baking sheet with parchment paper. Spread the yogurt mixture evenly across the sheet.
- Add Toppings: Scatter the mixed berries, granola, and seeds over the yogurt.
- Freeze: Place the baking sheet in the freezer for about 3-4 hours or until the yogurt is firm.
- Break and Serve: Once frozen, break the yogurt bark into pieces and serve immediately. Enjoy your colorful and healthy snack!
Decadent Chocolate Avocado Mousse For A Rich Dessert
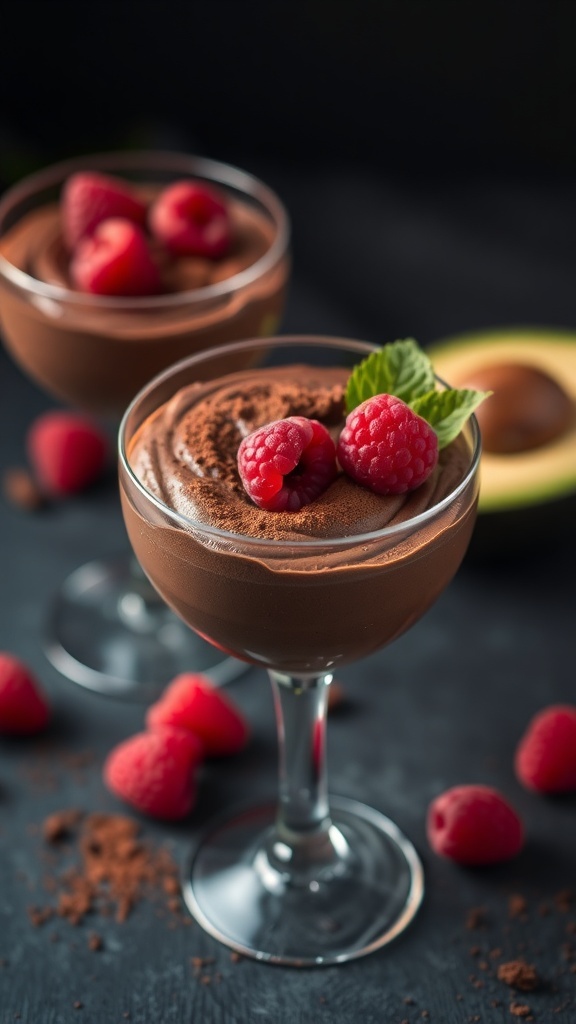
This Chocolate Avocado Mousse is a delightful treat that combines the richness of chocolate with the creaminess of avocado. It’s a perfect dessert for parties, offering a unique twist that will surprise and please your guests. The mousse is not only delicious but also packed with healthy fats from the avocado, making it a guilt-free indulgence.
The mousse is beautifully presented in elegant glasses, topped with fresh raspberries and a sprinkle of cocoa powder. The contrast of the dark chocolate and the vibrant red of the raspberries creates an inviting look that draws everyone in.
To make this mousse, you’ll need ripe avocados, cocoa powder, maple syrup, vanilla extract, and a pinch of salt. Simply blend everything until smooth, chill it, and serve. It’s that easy!
Ingredients
- 2 ripe avocados
- 1/2 cup unsweetened cocoa powder
- 1/4 cup maple syrup (adjust to taste)
- 1 teaspoon vanilla extract
- 1/4 teaspoon salt
- Fresh raspberries for topping
- Cocoa powder for garnish
Instructions
- Prepare the Avocados: Cut the avocados in half, remove the pit, and scoop the flesh into a blender.
- Blend Ingredients: Add cocoa powder, maple syrup, vanilla extract, and salt to the blender. Blend until the mixture is completely smooth.
- Taste and Adjust: Taste the mousse and adjust the sweetness by adding more maple syrup if desired. Blend again if you add more ingredients.
- Chill: Transfer the mousse into serving glasses and refrigerate for at least 30 minutes to set.
- Serve: Before serving, top with fresh raspberries and a sprinkle of cocoa powder for a beautiful finish.
Chilled Kiwi And Lime Sorbet For A Tart Delight

When it comes to refreshing desserts, a chilled kiwi and lime sorbet is a fantastic choice. This vibrant treat not only looks appealing but also offers a delightful tartness that can brighten up any gathering. Imagine serving this sorbet on a warm day, with the sun shining and laughter all around. It’s a perfect way to impress your guests while keeping things healthy.
The sorbet’s bright green color, complemented by the zesty lime, makes it a showstopper on any dessert table. It’s light, fruity, and incredibly easy to make. Plus, it’s a great way to incorporate fresh fruits into your party menu. You can serve it in elegant bowls or even in halved kiwi shells for a fun twist!
Now, let’s get to the recipe so you can whip up this delicious sorbet for your next event!
Ingredients
- 4 ripe kiwis, peeled and chopped
- 1/2 cup fresh lime juice
- 1/2 cup granulated sugar
- 1 cup water
- 1 tablespoon lime zest
Instructions
- Prepare the Syrup: In a small saucepan, combine water and sugar. Heat over medium heat until the sugar dissolves. Remove from heat and let it cool.
- Blend the Ingredients: In a blender, combine the chopped kiwis, lime juice, lime zest, and the cooled syrup. Blend until smooth.
- Chill the Mixture: Pour the mixture into a shallow dish and place it in the freezer. Stir every 30 minutes for about 2-3 hours until it’s fully frozen and fluffy.
- Serve: Scoop the sorbet into bowls and enjoy! You can garnish with extra lime slices or kiwi for a fun presentation.
Pineapple Upside-Down Cake With A Healthier Spin
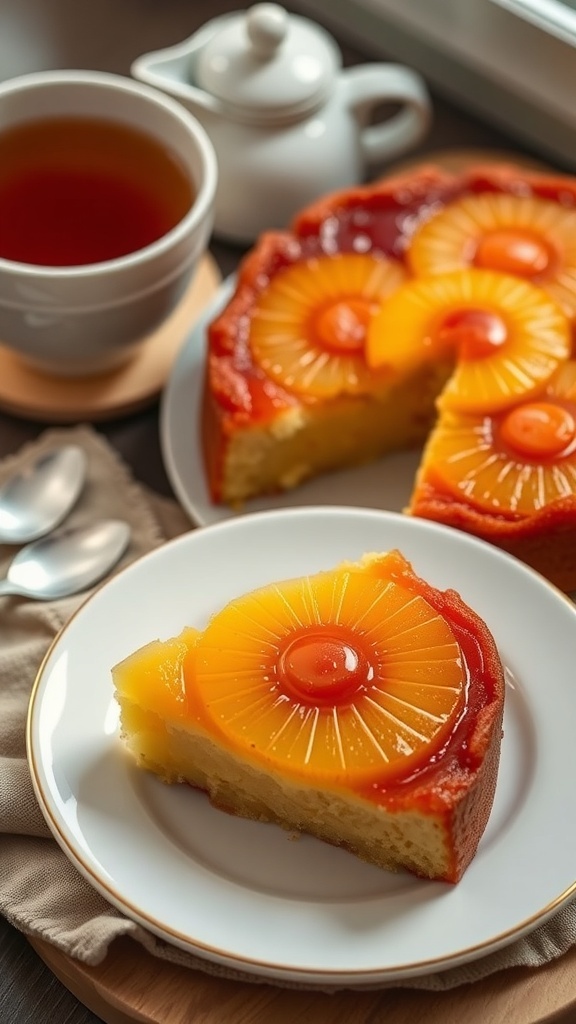
Pineapple upside-down cake is a classic dessert that brings a smile to any gathering. This version gives it a healthier twist while keeping all the flavors you love. The bright, sunny pineapple rings on top create a stunning presentation, making it perfect for parties.
In this recipe, we swap out some traditional ingredients for healthier options. Using whole wheat flour adds fiber, while reducing sugar keeps it light. The pineapple not only adds sweetness but also brings a tropical vibe to your dessert table.
Pair this cake with a cup of tea for a delightful treat. The combination of flavors and textures will surely impress your guests. Plus, it's easy to make, so you can enjoy the party without spending all your time in the kitchen.
Ingredients
- 1 cup whole wheat flour
- 1/2 cup coconut sugar
- 1/2 teaspoon baking powder
- 1/4 teaspoon baking soda
- 1/4 teaspoon salt
- 1/2 cup unsweetened applesauce
- 2 large eggs
- 1 teaspoon vanilla extract
- 1 can (20 oz) sliced pineapple in juice, drained
- 1/4 cup unsweetened pineapple juice
- Maraschino cherries for garnish
Instructions
- Preheat your oven to 350°F (175°C). Grease a round cake pan.
- In a bowl, mix whole wheat flour, coconut sugar, baking powder, baking soda, and salt.
- In another bowl, whisk together applesauce, eggs, vanilla extract, and pineapple juice.
- Combine the wet and dry ingredients until just mixed. Do not overmix.
- Arrange pineapple slices in the bottom of the greased pan. Place cherries in the center of each pineapple slice.
- Pour the batter over the pineapple and cherries, spreading it evenly.
- Bake for 30-35 minutes or until a toothpick comes out clean.
- Let it cool for a few minutes, then invert onto a serving plate. Serve warm or at room temperature.
Frozen Berry Yogurt Pops For A Fun Summer Treat
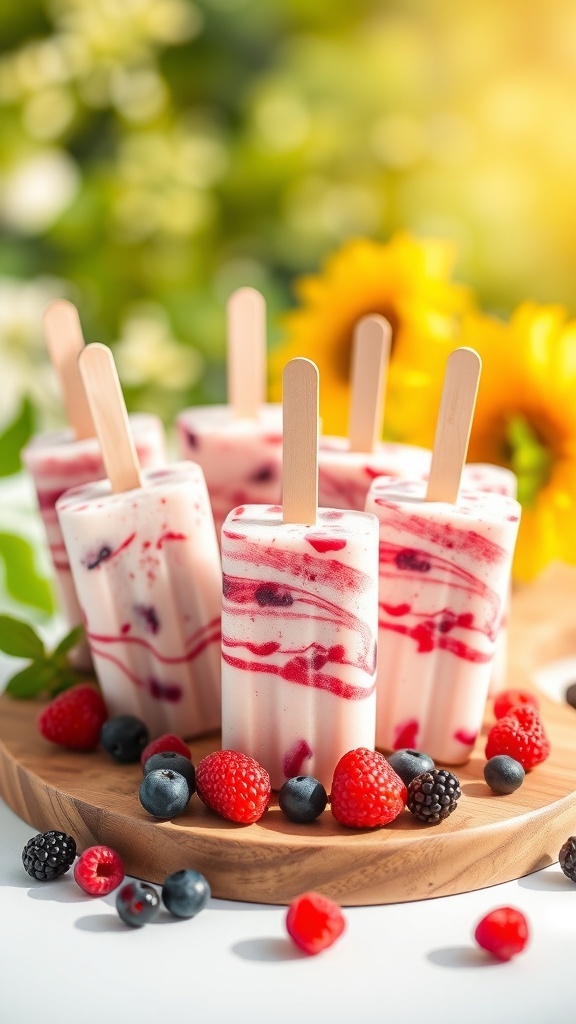
Frozen berry yogurt pops are a delightful way to cool down during hot summer days. These treats are not only refreshing but also packed with nutrients. The vibrant colors of the berries create a fun and inviting look, making them perfect for parties.
To make these pops, you’ll need a mix of your favorite berries, yogurt, and a bit of honey for sweetness. The combination of creamy yogurt and fruity flavors is sure to please everyone. Plus, they are easy to prepare and can be made ahead of time, giving you more time to enjoy your gathering.
Gather your ingredients and get ready to whip up a batch of these tasty pops. They are a hit with both kids and adults, making them a must-have for any summer celebration!
Ingredients
- 2 cups mixed berries (strawberries, blueberries, raspberries, blackberries)
- 2 cups plain yogurt (Greek or regular)
- 2 tablespoons honey or maple syrup (adjust to taste)
- 1 teaspoon vanilla extract (optional)
Instructions
- Prepare the Berries: Wash and chop the larger berries into smaller pieces. You can leave the smaller berries whole.
- Mix Yogurt: In a bowl, combine the yogurt, honey, and vanilla extract. Stir until smooth.
- Layer the Mixture: In popsicle molds, alternate layers of yogurt mixture and berries. Use a skewer to swirl the mixture slightly for a marbled effect.
- Insert Sticks: Place the popsicle sticks in the center of each mold.
- Freeze: Cover the molds and freeze for at least 4-6 hours or until solid.
- Serve: To remove the pops, run warm water over the outside of the molds for a few seconds. Enjoy your refreshing treats!
Guilt-Free Chocolate Fruit Dip For Easy Entertaining
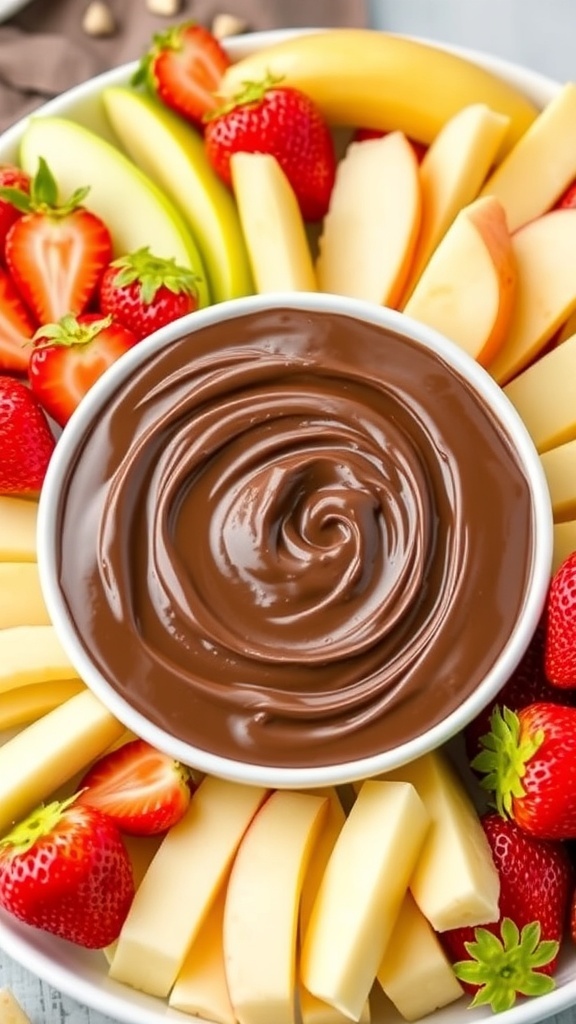
Looking for a fun and healthy dessert option for your next gathering? This guilt-free chocolate fruit dip is a perfect choice! It pairs wonderfully with fresh fruits like strawberries, bananas, and blueberries. The creamy chocolate dip adds a delightful touch to the vibrant fruits, making it a hit at any party.
Setting up a fruit platter is super easy. Just arrange your favorite fruits around a bowl of the chocolate dip. The colors of the fruits will make your table look inviting and appetizing. Plus, it’s a great way to encourage guests to enjoy some healthy snacks while indulging in a little sweetness.
This dip is not only delicious but also simple to make. It’s a great way to impress your friends without spending hours in the kitchen. Let’s get to the recipe!
Ingredients
- 1 cup Greek yogurt
- 1/4 cup unsweetened cocoa powder
- 2 tablespoons honey or maple syrup
- 1 teaspoon vanilla extract
- Fresh fruits (strawberries, bananas, blueberries, etc.)
Instructions
- In a mixing bowl, combine Greek yogurt, cocoa powder, honey (or maple syrup), and vanilla extract.
- Whisk until smooth and creamy. Adjust sweetness to your taste.
- Transfer the dip to a serving bowl.
- Arrange fresh fruits around the dip on a platter.
- Serve immediately and enjoy!
Healthy Almond Butter And Banana Sushi Rolls For A Fun Snack
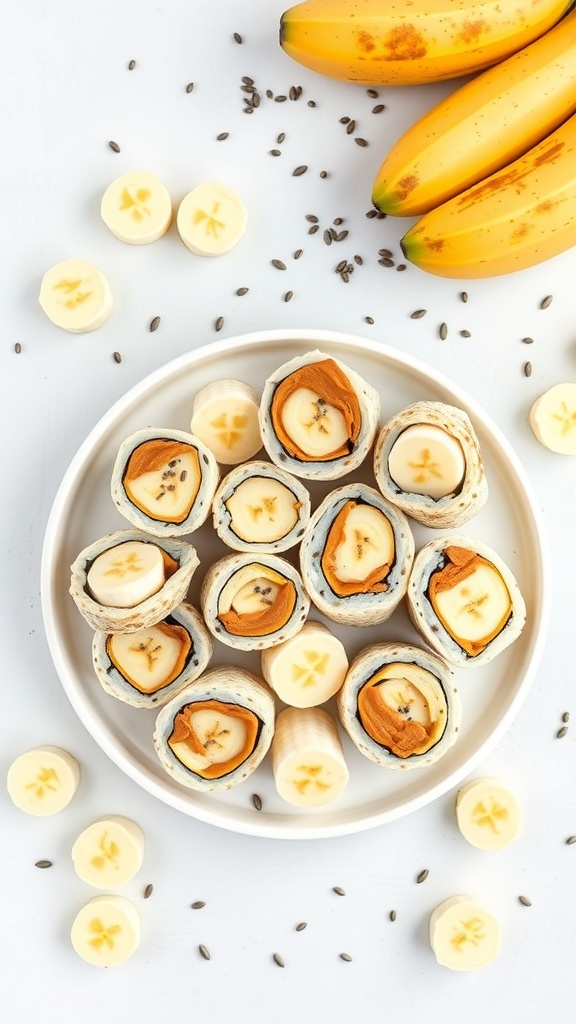
These Healthy Almond Butter and Banana Sushi Rolls are a fun and tasty treat for any party. They look like sushi but are made with simple ingredients that everyone will love. The combination of creamy almond butter and sweet bananas wrapped in a soft tortilla is sure to be a hit.
The rolls are not only visually appealing but also packed with nutrients. Bananas provide potassium and energy, while almond butter adds healthy fats and protein. This makes them a perfect snack for kids and adults alike.
Making these rolls is easy and quick. You can prepare them ahead of time and slice them just before serving. They can be enjoyed as a dessert or a healthy snack option. Plus, they’re fun to eat!
Ingredients
- 2 large bananas
- 2 whole wheat tortillas
- 1/2 cup almond butter
- 1 tablespoon honey (optional)
- 1 tablespoon chia seeds (optional)
Instructions
- Spread almond butter evenly over each tortilla.
- If using, drizzle honey on top of the almond butter.
- Place a banana on one edge of the tortilla and roll it up tightly.
- Repeat with the second tortilla and banana.
- Slice each roll into bite-sized pieces.
- Sprinkle chia seeds on top if desired.
- Serve immediately or store in the fridge until ready to enjoy.
Strawberry Shortcake With Greek Yogurt For A Lighter Option

Strawberry shortcake is a classic dessert that everyone loves. This version is lighter and healthier, thanks to the use of Greek yogurt. The fluffy layers of cake are topped with fresh strawberries and a creamy yogurt mixture, making it perfect for any gathering.
The image showcases a beautiful strawberry shortcake, layered with vibrant red strawberries and a dollop of creamy yogurt. The cake is light and airy, making it a delightful treat that won't weigh you down. Surrounding the cake are fresh strawberries and cheerful daisies, adding a pop of color and freshness.
This dessert is not only visually appealing but also packed with flavor. The Greek yogurt adds a tangy twist, balancing the sweetness of the strawberries. It's a great option for those looking to enjoy a sweet treat without the guilt.
Ingredients
- 1 cup all-purpose flour
- 1/4 cup granulated sugar
- 1 teaspoon baking powder
- 1/4 teaspoon salt
- 1/2 cup unsalted butter, softened
- 2 large eggs
- 1 teaspoon vanilla extract
- 1 cup Greek yogurt
- 2 cups fresh strawberries, sliced
- 2 tablespoons honey (optional)
Instructions
- Preheat the oven to 350°F (175°C). Grease and flour a round cake pan.
- In a bowl, mix flour, sugar, baking powder, and salt. In another bowl, beat the butter, eggs, and vanilla until smooth.
- Combine the wet and dry ingredients, then fold in the Greek yogurt until just mixed.
- Pour the batter into the prepared pan and bake for 25-30 minutes, or until a toothpick comes out clean.
- Let the cake cool completely. Once cooled, slice it in half horizontally.
- Layer the bottom half with sliced strawberries and a generous spread of Greek yogurt. Place the top half back on and repeat the layering.
- Top with more strawberries and drizzle with honey if desired. Serve chilled and enjoy!
Peach And Raspberry Galette For A Rustic Dessert
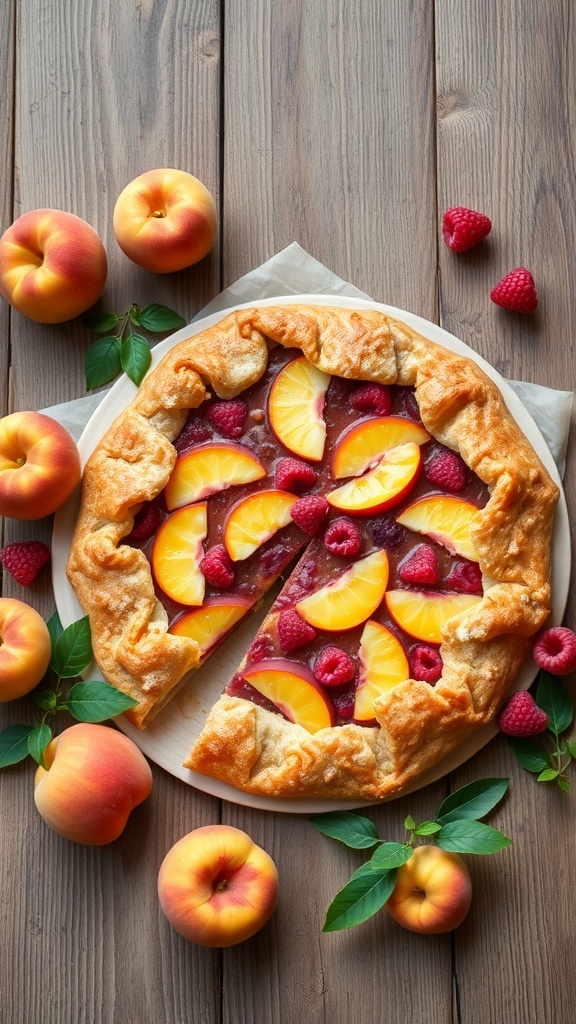
This Peach and Raspberry Galette is a delightful treat that combines the sweetness of peaches with the tartness of raspberries. The rustic look of the galette makes it perfect for any gathering. The golden, flaky crust wraps around juicy fruit, creating a dessert that is both simple and impressive.
To make this dessert, you’ll need fresh peaches and raspberries. The galette can be served warm or at room temperature, making it a versatile choice for parties. Pair it with a scoop of vanilla ice cream for an extra special touch!
Ingredients
- 1 1/2 cups all-purpose flour
- 1/4 teaspoon salt
- 1/4 cup granulated sugar
- 1/2 cup unsalted butter, chilled and diced
- 3-4 tablespoons ice water
- 2 cups fresh peaches, sliced
- 1 cup fresh raspberries
- 1 tablespoon cornstarch
- 1 tablespoon lemon juice
- 1 egg, beaten (for egg wash)
Instructions
- Make the Dough: In a bowl, mix flour, salt, and sugar. Cut in the butter until the mixture resembles coarse crumbs. Stir in ice water, a tablespoon at a time, until the dough forms a ball. Wrap in plastic and refrigerate for at least 30 minutes.
- Prepare the Filling: In a bowl, combine sliced peaches, raspberries, cornstarch, and lemon juice. Toss gently to coat the fruit.
- Preheat the Oven: Preheat your oven to 375°F (190°C).
- Roll Out the Dough: On a floured surface, roll out the dough into a 12-inch circle. Transfer to a baking sheet lined with parchment paper.
- Assemble the Galette: Place the fruit mixture in the center of the dough, leaving a 2-inch border. Fold the edges of the dough over the fruit, pleating as necessary. Brush the crust with the beaten egg.
- Bake: Bake for 35-40 minutes, or until the crust is golden brown and the fruit is bubbly. Let it cool slightly before serving.
Yummy Fruit And Nut Energy Bites For On-The-Go Snacks
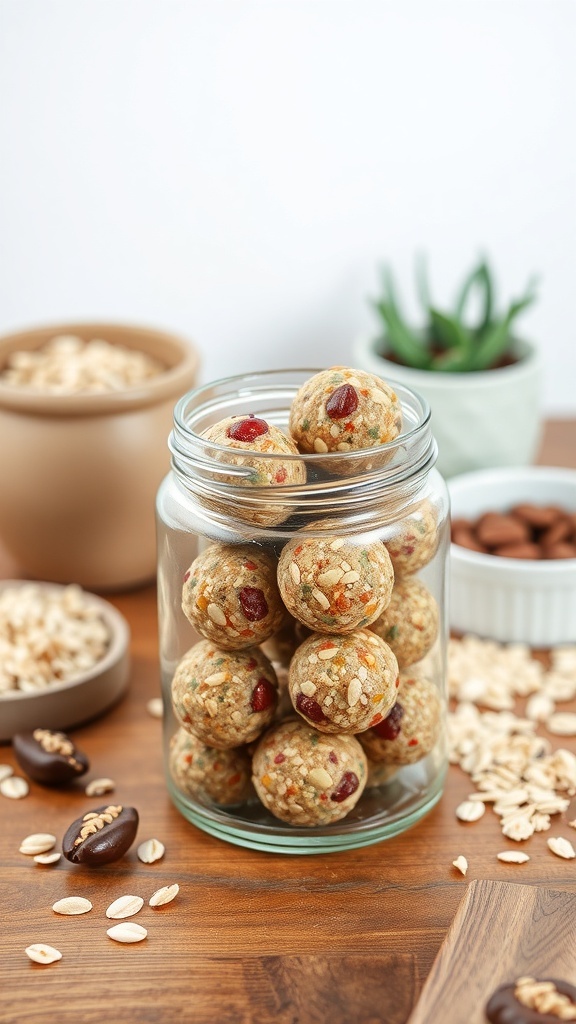
Fruit and nut energy bites are the perfect snack for busy days. They’re easy to make, packed with nutrients, and super tasty. Just look at these little gems! They’re rolled into bite-sized balls, making them a great grab-and-go option. You can see the colorful bits of dried fruit and nuts peeking through, promising a delightful crunch with every bite.
These energy bites are not just delicious; they’re also versatile. You can mix and match your favorite nuts and dried fruits to create your own unique flavor. Plus, they’re a healthier alternative to traditional sweets, making them a hit at parties or for a quick snack during the day.
Let’s get to the fun part—making these tasty treats at home! Here’s a simple recipe to whip up your own batch of fruit and nut energy bites.
Ingredients
- 1 cup pitted dates
- 1/2 cup almonds or walnuts
- 1/4 cup sunflower seeds
- 1/4 cup rolled oats
- 1/4 cup shredded coconut (optional)
- 1 tablespoon chia seeds or flaxseeds
- 1 teaspoon vanilla extract
- A pinch of salt
Instructions
- Blend the Ingredients: In a food processor, combine the pitted dates, nuts, sunflower seeds, rolled oats, coconut, chia seeds, vanilla extract, and salt. Pulse until the mixture is well combined and sticky.
- Form the Bites: Use your hands to scoop out small portions of the mixture and roll them into bite-sized balls.
- Chill: Place the energy bites on a baking sheet lined with parchment paper and refrigerate for at least 30 minutes to firm up.
- Store: Keep the energy bites in an airtight container in the refrigerator for up to one week.
Comments
Post a Comment