- Get link
- X
- Other Apps
17 Delightful Peanut Butter Desserts You Can Make on a Dollar Store Budget
If you love peanut butter and desserts but think you need to break the bank to enjoy them, think again! This collection of 5-star peanut butter treats brings you scrumptious recipes that won't make your wallet scream. Utilizing affordable ingredients, many of which can be found at your local dollar store, these desserts prove that delicious doesn't always mean expensive. Get ready for some mouthwatering ideas that are easy on the budget and big on flavor!
Indulge In Creamy Peanut Butter Fudge On A Budget
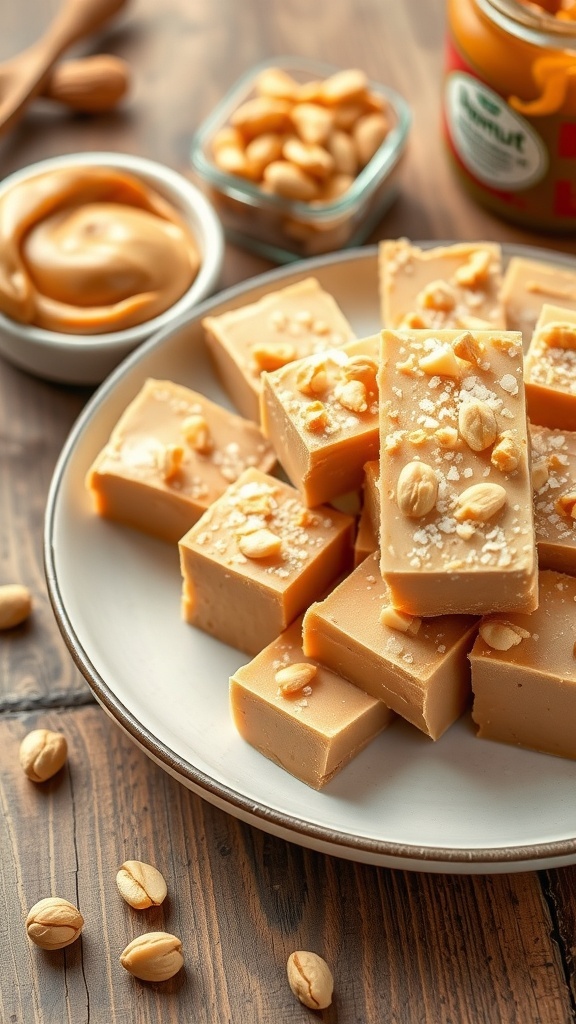
Peanut butter fudge is a delightful treat that brings together the rich, creamy flavor of peanut butter with a smooth, melt-in-your-mouth texture. This dessert is perfect for those who want to satisfy their sweet tooth without breaking the bank. With just a few simple ingredients, you can whip up a batch that rivals any gourmet fudge.
The image shows a tempting plate of peanut butter fudge, cut into neat squares and topped with crunchy peanuts. The warm, inviting tones of the fudge contrast beautifully with the rustic wooden background, making it look even more appealing. A jar of peanut butter and a bowl of whole peanuts sit nearby, hinting at the deliciousness that awaits.
Making this fudge is not only easy but also budget-friendly. You can find all the ingredients at your local dollar store, making it accessible for everyone. Whether you’re planning a family gathering or just want a sweet snack at home, this creamy peanut butter fudge will surely impress.
Ingredients
- 1 cup creamy peanut butter
- 1 cup powdered sugar
- 1/2 cup unsalted butter, softened
- 1 teaspoon vanilla extract
- 1/4 cup chopped peanuts (optional)
Instructions
- Prepare the Mixture: In a mixing bowl, combine softened butter and peanut butter. Mix until smooth and creamy.
- Add Sugar: Gradually add powdered sugar and vanilla extract, stirring until well combined.
- Spread in Pan: Line an 8x8 inch baking dish with parchment paper. Pour the mixture into the dish and spread it evenly.
- Add Toppings: If desired, sprinkle chopped peanuts on top for added crunch.
- Chill: Refrigerate for at least 2 hours until firm. Once set, cut into squares and serve.
Decadent Peanut Butter Chocolate Chip Cookies For Less
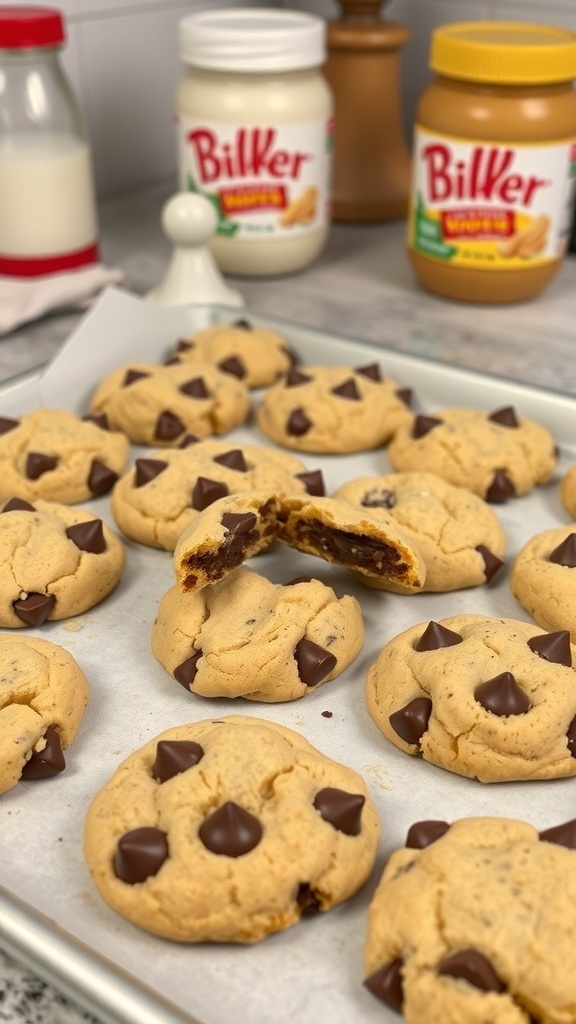
Peanut butter chocolate chip cookies are a classic treat that everyone loves. They’re soft, chewy, and packed with flavor. The best part? You can whip them up without breaking the bank. With just a few simple ingredients, you can create a batch that rivals those from fancy bakeries.
In the image, you see a delightful tray of freshly baked cookies, golden and dotted with rich chocolate chips. The jars of peanut butter in the background hint at the star ingredient that makes these cookies so irresistible. The cookies look perfectly soft, with a few even showing a gooey center, making them extra tempting.
Making these cookies is super easy. You don’t need fancy equipment or hard-to-find ingredients. Just grab some peanut butter, sugar, flour, and chocolate chips, and you’re ready to go. Plus, you can find most of these ingredients at your local dollar store, making this a budget-friendly baking project.
Let’s get right into the recipe so you can enjoy these delicious cookies at home!
Ingredients
- 1 cup creamy peanut butter
- 1 cup brown sugar, packed
- 1/2 cup granulated sugar
- 1 large egg
- 1 teaspoon vanilla extract
- 1 teaspoon baking soda
- 1/2 teaspoon salt
- 1 cup semi-sweet chocolate chips
Instructions
- Preheat the Oven: Preheat your oven to 350°F (175°C) and line a baking sheet with parchment paper.
- Mix Ingredients: In a large bowl, combine the peanut butter, brown sugar, granulated sugar, egg, and vanilla extract. Mix until smooth and well combined.
- Add Dry Ingredients: Stir in the baking soda and salt. Gradually fold in the chocolate chips until evenly distributed.
- Scoop Cookies: Using a tablespoon or cookie scoop, drop rounded balls of dough onto the prepared baking sheet, spacing them about 2 inches apart.
- Bake: Bake in the preheated oven for 10-12 minutes, or until the edges are lightly golden. The centers may look slightly underbaked but will firm up as they cool.
- Cool: Allow the cookies to cool on the baking sheet for 5 minutes before transferring them to a wire rack to cool completely.
No-Bake Peanut Butter Pie With A Dollar Store Twist
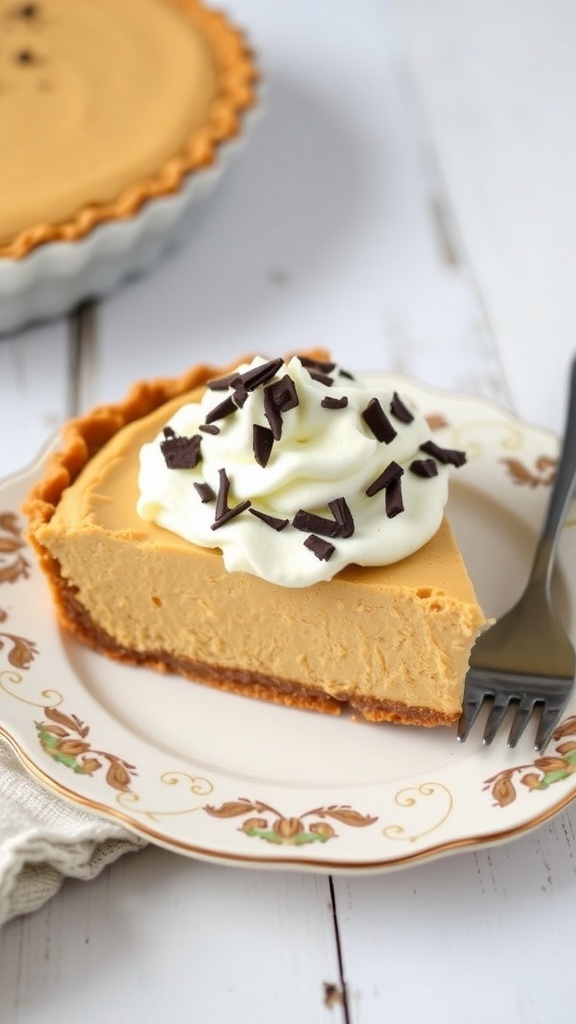
This no-bake peanut butter pie is a delightful treat that won’t break the bank. It’s creamy, rich, and perfect for any occasion. The best part? You can find most of the ingredients at your local dollar store!
The pie features a smooth peanut butter filling, set in a crunchy graham cracker crust. Topped with whipped cream and chocolate shavings, it’s sure to impress. Plus, it’s super easy to make, making it a great choice for both novice and experienced bakers.
Gather your supplies and let’s get started on this delicious dessert!
Ingredients
- 1 pre-made graham cracker crust
- 1 cup creamy peanut butter
- 1 cup powdered sugar
- 1 cup whipped topping (like Cool Whip)
- 1 teaspoon vanilla extract
- Chocolate shavings or chips for topping
Instructions
- In a mixing bowl, combine the peanut butter, powdered sugar, and vanilla extract. Mix until smooth.
- Gently fold in the whipped topping until well combined.
- Spread the peanut butter mixture into the graham cracker crust, smoothing the top with a spatula.
- Chill in the refrigerator for at least 2 hours to set.
- Before serving, top with chocolate shavings or chips for an extra touch.
Easy Peanut Butter Banana Smoothie For A Quick Treat
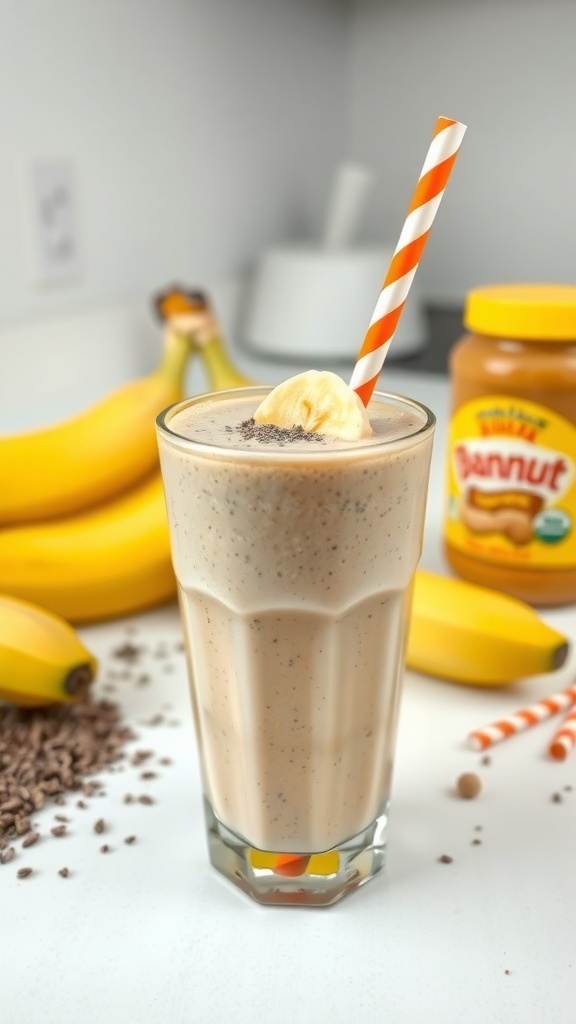
This peanut butter banana smoothie is a delightful treat that’s both quick and easy to whip up. With just a few simple ingredients, you can enjoy a creamy and satisfying drink that’s perfect for any time of day. The combination of peanut butter and banana creates a rich flavor that’s hard to resist.
The image shows a tall glass filled with a smooth, light brown smoothie topped with a slice of banana and a sprinkle of chocolate. The vibrant yellow bananas in the background add a cheerful touch, while a jar of peanut butter sits nearby, hinting at the deliciousness to come. This smoothie is not just tasty; it’s also packed with nutrients, making it a great choice for a quick breakfast or snack.
Making this smoothie is a breeze. Just toss everything into a blender and blend until smooth. It’s a fantastic way to use up ripe bananas and enjoy the creamy goodness of peanut butter without breaking the bank. Perfect for those busy days when you need a quick pick-me-up!
Ingredients
- 2 ripe bananas
- 1/2 cup peanut butter
- 1 cup milk or almond milk
- 1/2 cup yogurt (optional)
- 1 tablespoon honey or maple syrup (optional)
- Ice cubes (optional)
Instructions
- Prepare Ingredients: Peel the bananas and gather all the ingredients.
- Blend: In a blender, combine the bananas, peanut butter, milk, and yogurt if using. Add honey or maple syrup for sweetness if desired.
- Add Ice: If you prefer a chilled smoothie, add a few ice cubes.
- Blend Until Smooth: Blend on high speed until the mixture is smooth and creamy.
- Serve: Pour the smoothie into glasses and enjoy immediately.
Delicious Peanut Butter Rice Krispie Treats On A Budget

Who doesn’t love a sweet treat that’s easy to make and budget-friendly? These Peanut Butter Rice Krispie Treats are a perfect example. They combine the classic crispy texture of Rice Krispies with the creamy goodness of peanut butter. The result is a delightful dessert that everyone will enjoy.
The image shows a stack of these treats, showcasing their chewy, gooey center. You can see the peanut butter jar in the background, hinting at the star ingredient. It’s a simple yet satisfying dessert that can be made with just a few ingredients, all of which you can find at your local dollar store.
Making these treats is a breeze. You’ll only need a few minutes and minimal effort to whip them up. They’re perfect for parties, snacks, or just a sweet craving. Plus, they’re a hit with kids and adults alike!
Ingredients
- 3 cups Rice Krispies cereal
- 1 cup peanut butter
- 1/2 cup honey or corn syrup
- 1 teaspoon vanilla extract
- 1/4 cup butter
Instructions
- Prepare the Pan: Grease a 9x9 inch baking dish with butter or cooking spray.
- Melt the Mixture: In a saucepan over low heat, combine the peanut butter, honey (or corn syrup), and butter. Stir until melted and smooth.
- Add Vanilla: Remove from heat and stir in the vanilla extract.
- Mix with Cereal: Pour the melted mixture over the Rice Krispies in a large bowl. Stir until the cereal is well coated.
- Press into Pan: Transfer the mixture to the prepared baking dish. Press down firmly to create an even layer.
- Cool and Cut: Allow to cool for about 30 minutes. Once set, cut into squares and enjoy!
Wholesome Peanut Butter Oatmeal Cookies For Every Budget
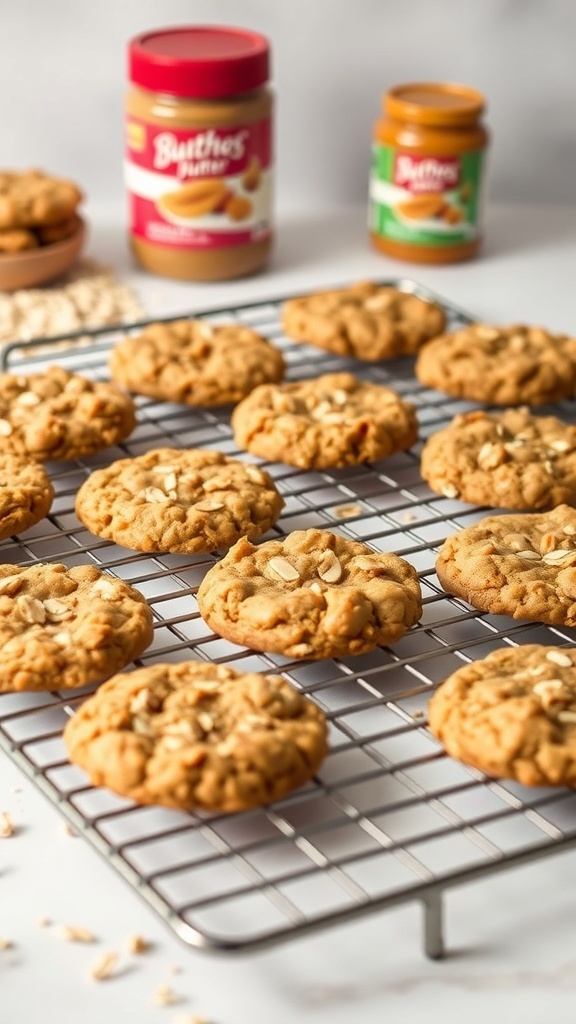
Peanut butter oatmeal cookies are a delightful treat that everyone can enjoy. They are not only easy to make but also budget-friendly. With just a few ingredients, you can whip up a batch that tastes amazing without breaking the bank.
The image shows freshly baked peanut butter oatmeal cookies cooling on a wire rack. They have a golden-brown color, with some oats sprinkled on top for that extra texture. The jars of peanut butter in the background hint at the star ingredient, making it clear that these cookies are packed with flavor.
These cookies are perfect for sharing with friends or enjoying as a snack. They combine the nutty richness of peanut butter with the wholesome goodness of oats. Plus, they are simple enough for anyone to make, regardless of their baking skills.
Ingredients
- 1 cup peanut butter
- 1/2 cup granulated sugar
- 1/2 cup brown sugar
- 1 large egg
- 1 teaspoon vanilla extract
- 1 cup rolled oats
- 1/2 teaspoon baking soda
- 1/4 teaspoon salt
Instructions
- Preheat your oven to 350°F (175°C) and line a baking sheet with parchment paper.
- In a large bowl, mix the peanut butter, granulated sugar, and brown sugar until smooth.
- Add the egg and vanilla extract, mixing until well combined.
- Stir in the rolled oats, baking soda, and salt until everything is mixed together.
- Drop spoonfuls of the dough onto the prepared baking sheet, spacing them about 2 inches apart.
- Bake for 10-12 minutes or until the edges are lightly golden.
- Let the cookies cool on the baking sheet for a few minutes before transferring them to a wire rack to cool completely.
Peanut Butter Chocolate Swirl Brownies Without Breaking The Bank
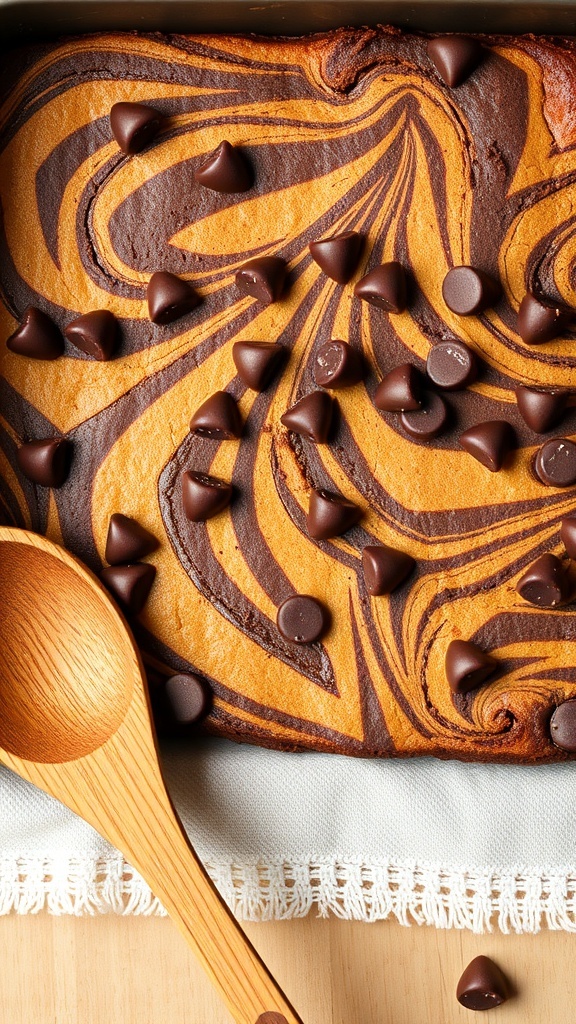
These Peanut Butter Chocolate Swirl Brownies are a delightful treat that won't empty your wallet. The image shows a beautifully swirled brownie topped with chocolate chips, inviting you to take a bite. The rich, creamy peanut butter blends perfectly with the chocolate, creating a dessert that’s both satisfying and easy to make.
Making these brownies is a breeze, and you can find all the ingredients at your local dollar store. This means you can enjoy a gourmet dessert without spending a fortune. The combination of flavors is sure to impress family and friends, making it a perfect choice for gatherings or just a cozy night in.
Let’s get to the fun part! Here’s how to whip up these tasty brownies:
Ingredients
- 1 cup peanut butter
- 1/2 cup sugar
- 1/2 cup brown sugar
- 2 large eggs
- 1 teaspoon vanilla extract
- 1/2 cup all-purpose flour
- 1/4 cup cocoa powder
- 1/2 teaspoon baking powder
- 1/4 teaspoon salt
- 1/2 cup chocolate chips
Instructions
- Preheat your oven to 350°F (175°C) and grease a baking pan.
- In a large bowl, mix together the peanut butter, sugar, and brown sugar until smooth.
- Add in the eggs and vanilla extract, mixing well.
- In another bowl, combine the flour, cocoa powder, baking powder, and salt. Gradually add this dry mixture to the peanut butter mixture until just combined.
- Pour half of the batter into the prepared pan. Swirl in some chocolate chips. Then, add the remaining batter on top and swirl again for a marbled effect.
- Sprinkle extra chocolate chips on top if desired.
- Bake for 25-30 minutes, or until a toothpick comes out clean. Let cool before cutting into squares.
Budget-Friendly Peanut Butter Cupcakes With Fluffy Frosting
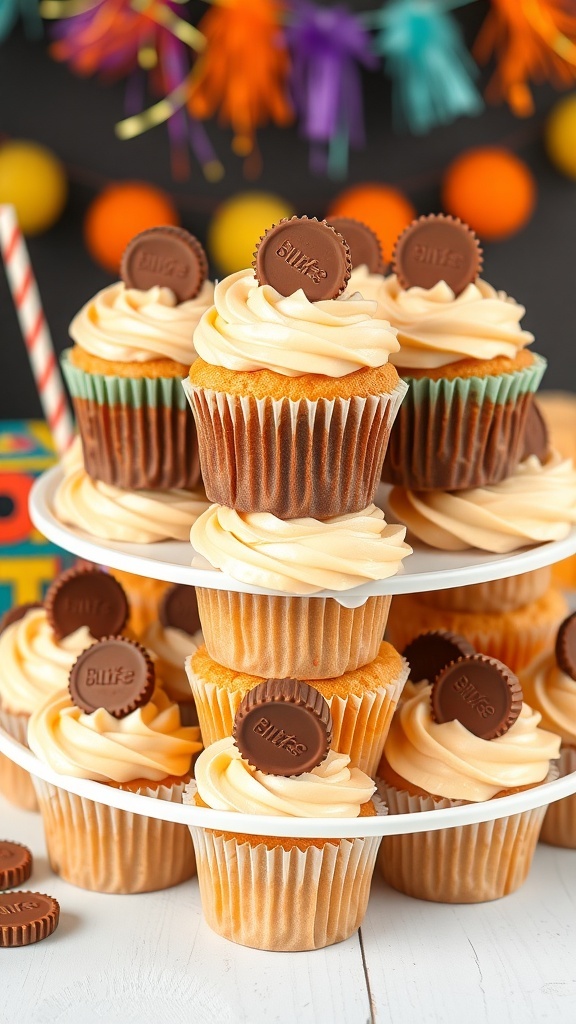
These peanut butter cupcakes are a delightful treat that won't break the bank. They are soft, fluffy, and topped with a creamy frosting that makes them irresistible. The cupcakes are adorned with mini peanut butter cups, adding a fun touch and an extra burst of flavor.
Making these cupcakes is simple and requires just a few ingredients. You can easily find everything you need at your local dollar store, making this a budget-friendly option for any occasion. Whether it's a birthday party or just a sweet craving, these cupcakes are sure to impress.
Here’s how to whip up these delicious cupcakes:
Ingredients
- 1 cup all-purpose flour
- 1/2 cup granulated sugar
- 1/2 cup creamy peanut butter
- 1/2 cup milk
- 1/4 cup vegetable oil
- 1 large egg
- 1 teaspoon baking powder
- 1/2 teaspoon vanilla extract
- 1 cup powdered sugar
- 1/4 cup unsalted butter, softened
- 2 tablespoons milk (for frosting)
- Mini peanut butter cups (for decoration)
Instructions
- Preheat your oven to 350°F (175°C) and line a cupcake pan with liners.
- In a large bowl, mix together flour, sugar, baking powder, and peanut butter until crumbly.
- Add in milk, vegetable oil, egg, and vanilla extract. Mix until smooth.
- Pour the batter into the cupcake liners, filling them about 2/3 full.
- Bake for 18-20 minutes, or until a toothpick comes out clean. Let them cool completely.
- For the frosting, beat together softened butter and powdered sugar until fluffy. Add milk and mix until smooth.
- Frost the cooled cupcakes and top each with a mini peanut butter cup.
Enjoy your delicious, budget-friendly peanut butter cupcakes!
Simple Peanut Butter Energy Bites For A Quick Snack
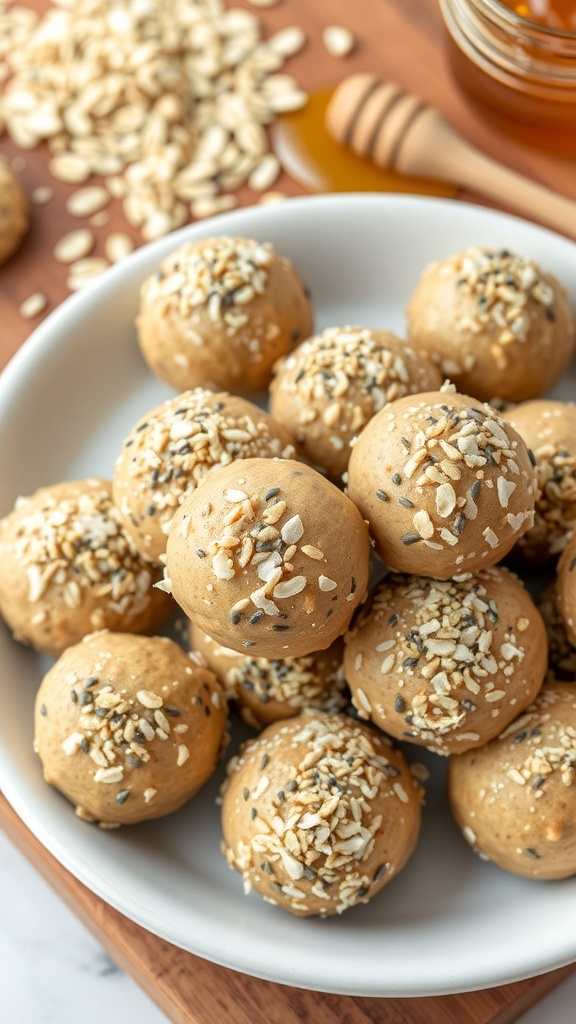
Peanut butter energy bites are the perfect snack for anyone on the go. They are easy to make and packed with flavor. Just look at those little balls of goodness! Rolled in oats and ready to fuel your day, these bites are a delightful treat.
These energy bites are not only tasty but also budget-friendly. You can whip them up using ingredients you probably already have at home. Plus, they’re great for satisfying those mid-afternoon cravings without breaking the bank.
Making these bites is a breeze. You’ll mix peanut butter, oats, and a few other simple ingredients. Then, roll them into balls and you’re done! They’re perfect for kids and adults alike.
Ingredients
- 1 cup peanut butter
- 1/2 cup honey
- 1 cup rolled oats
- 1/4 cup chocolate chips (optional)
- 1/4 cup chia seeds (optional)
- 1/2 teaspoon vanilla extract
Instructions
- In a large bowl, combine peanut butter and honey. Mix until smooth.
- Add rolled oats, chocolate chips, chia seeds, and vanilla extract. Stir until well combined.
- Using your hands, roll the mixture into small balls, about 1 inch in diameter.
- Place the energy bites on a baking sheet lined with parchment paper.
- Refrigerate for at least 30 minutes to firm up before enjoying.
Satisfying Peanut Butter Mug Cake For Instant Gratification
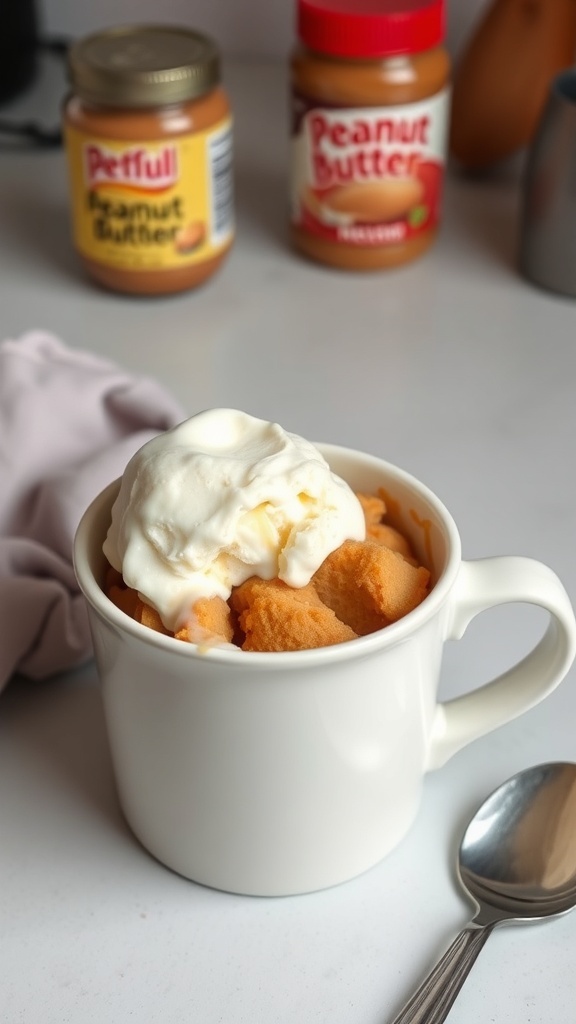
When you crave something sweet and comforting, a peanut butter mug cake is the perfect solution. This delightful treat is quick to make and satisfies your sweet tooth in no time. With just a few ingredients, you can whip up a warm, fluffy cake right in your microwave.
The image shows a delicious mug cake topped with a dollop of whipped cream, making it look even more inviting. The jars of peanut butter in the background remind us that this dessert is all about that rich, nutty flavor. It’s a simple yet satisfying way to enjoy peanut butter without breaking the bank.
Let’s get into the details of how to make this easy mug cake. You’ll find that it requires minimal effort and ingredients, making it a great choice for a quick dessert.
Ingredients
- 4 tablespoons all-purpose flour
- 1 tablespoon granulated sugar
- 1/8 teaspoon baking powder
- 1/4 cup milk
- 2 tablespoons peanut butter
- 1 tablespoon vegetable oil
- 1/4 teaspoon vanilla extract
Instructions
- In a microwave-safe mug, mix together the flour, sugar, and baking powder until well combined.
- Add the milk, peanut butter, vegetable oil, and vanilla extract. Stir until smooth and there are no lumps.
- Microwave the mug on high for about 1 minute and 30 seconds, or until the cake has risen and is set in the middle.
- Let it cool for a minute, then top with whipped cream or your favorite toppings.
Peanut Butter Chocolate Chip Pancakes For A Sweet Breakfast
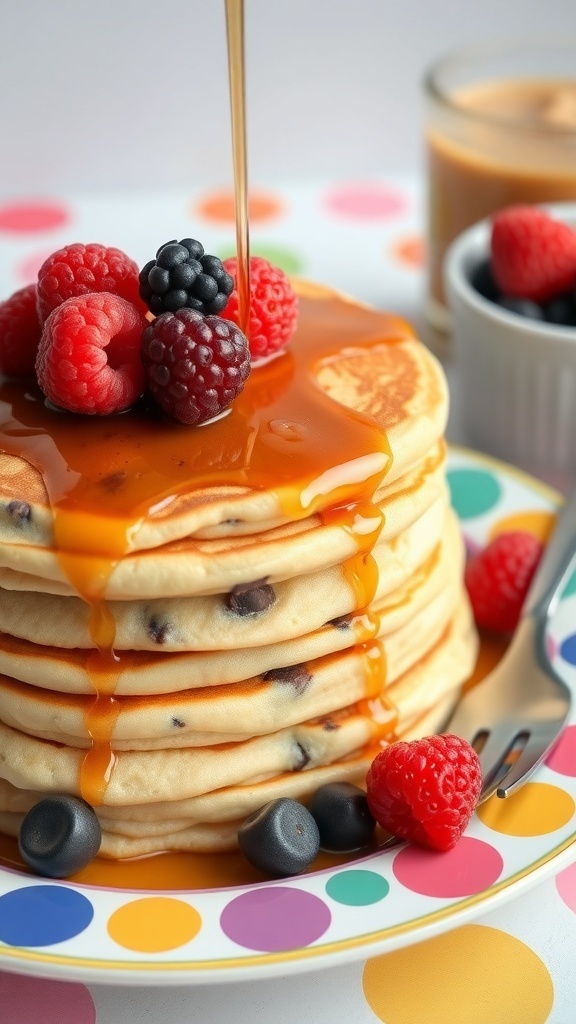
Start your day with a stack of peanut butter chocolate chip pancakes that are both delicious and budget-friendly. These pancakes are fluffy, sweet, and packed with flavor. The combination of peanut butter and chocolate chips makes them a treat everyone will love.
Imagine waking up to the smell of pancakes cooking on the griddle. The golden-brown pancakes are topped with fresh berries and drizzled with syrup, making for a perfect breakfast. You don’t need to break the bank to enjoy this delightful meal. With just a few ingredients, you can whip up a breakfast that feels special.
These pancakes are not only easy to make but also customizable. You can add more chocolate chips, swap in different fruits, or even add a sprinkle of nuts for extra crunch. They are perfect for a weekend brunch or a quick weekday breakfast.
Ingredients
- 1 cup all-purpose flour
- 2 tablespoons sugar
- 1 tablespoon baking powder
- 1/2 teaspoon salt
- 1 cup milk
- 1/4 cup peanut butter
- 1 large egg
- 1/2 cup chocolate chips
- Butter or oil for cooking
- Fresh berries and syrup for topping
Instructions
- Mix Dry Ingredients: In a bowl, combine flour, sugar, baking powder, and salt.
- Combine Wet Ingredients: In another bowl, whisk together milk, peanut butter, and egg until smooth.
- Combine Mixtures: Pour the wet mixture into the dry ingredients. Stir until just combined. Fold in chocolate chips.
- Cook Pancakes: Heat a skillet over medium heat and add a little butter or oil. Pour 1/4 cup of batter for each pancake. Cook until bubbles form on the surface, then flip and cook until golden brown.
- Serve: Stack the pancakes on a plate, top with fresh berries, and drizzle with syrup. Enjoy!
Creative Peanut Butter And Chocolate Banana Pops
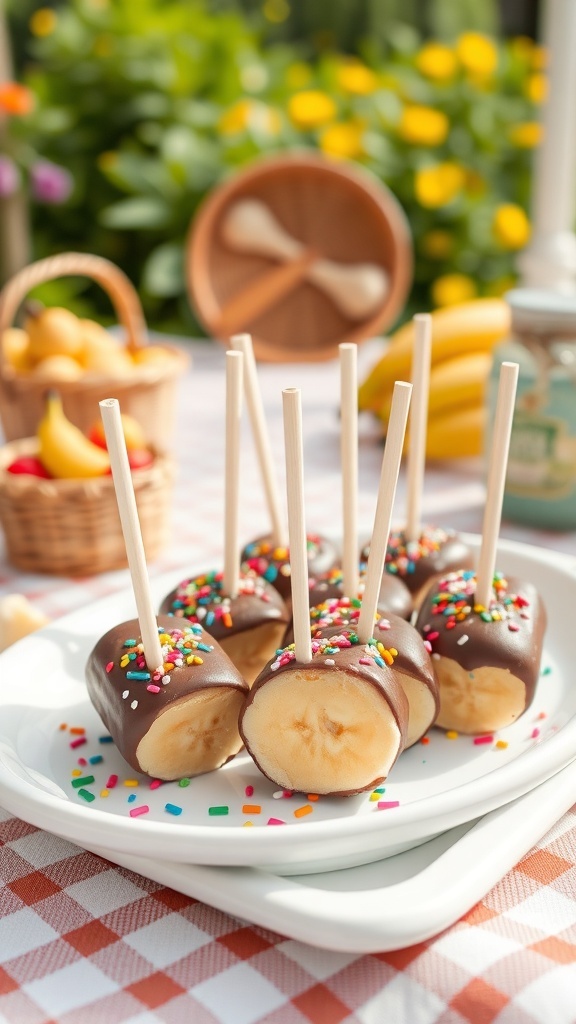
These Creative Peanut Butter and Chocolate Banana Pops are a delightful treat that combines the rich flavors of peanut butter and chocolate with the sweetness of bananas. Perfect for a hot day, these pops are not only fun to make but also budget-friendly!
In the image, you can see several banana pops coated in chocolate and sprinkled with colorful toppings. The pops are presented on a white plate, making them look even more inviting. The bright flowers in the background add a cheerful touch, perfect for a sunny day.
Making these pops is simple. You just need a few ingredients and some fun toppings. Kids love to help out in the kitchen, and this recipe is a great way to get them involved. Plus, it’s a healthy snack option that feels like a dessert!
Ingredients
- 2 ripe bananas
- 1/2 cup peanut butter
- 1 cup chocolate chips
- 1 tablespoon coconut oil
- Sprinkles or chopped nuts for topping
- Wooden sticks
Instructions
- Prep the Bananas: Peel the bananas and cut them in half. Insert a wooden stick into each half.
- Spread Peanut Butter: Generously coat each banana half with peanut butter.
- Melt Chocolate: In a microwave-safe bowl, combine chocolate chips and coconut oil. Microwave in 30-second intervals, stirring until smooth.
- Dip in Chocolate: Dip each peanut butter-coated banana into the melted chocolate, ensuring it’s fully covered.
- Add Toppings: While the chocolate is still wet, sprinkle your choice of toppings over the pops.
- Freeze: Place the pops on a baking sheet lined with parchment paper and freeze for at least 2 hours until solid.
Enjoy your Creative Peanut Butter and Chocolate Banana Pops as a sweet snack or dessert!
Peanut Butter And Chocolate Chip Granola Bars For On-The-Go
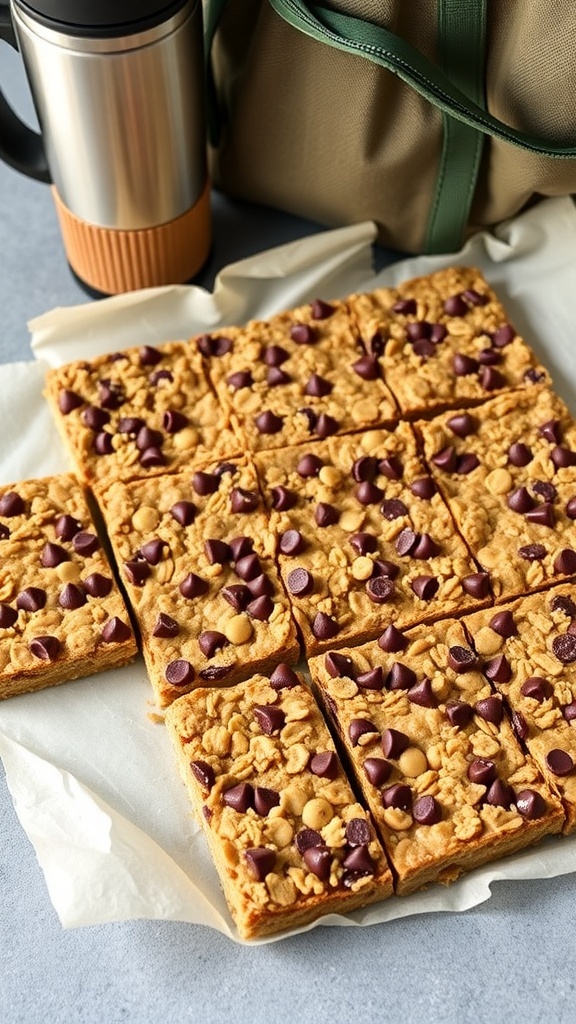
These peanut butter and chocolate chip granola bars are perfect for busy days. They’re easy to make, delicious, and packed with energy. Whether you’re heading to work, school, or just out for a walk, these bars will keep you fueled.
The image shows a batch of golden-brown granola bars, studded with chocolate chips. They’re cut into neat squares, making them easy to grab and go. A thermos and a bag sit nearby, hinting at a day full of activities. This snack is not just tasty; it’s also budget-friendly, using ingredients you can find at your local dollar store.
Let’s get into how you can whip these up in no time!
Ingredients
- 2 cups rolled oats
- 1 cup peanut butter
- 1/2 cup honey or maple syrup
- 1/2 cup chocolate chips
- 1/4 cup chopped nuts (optional)
- 1/2 teaspoon vanilla extract
- 1/4 teaspoon salt
Instructions
- Preheat your oven to 350°F (175°C). Line a baking dish with parchment paper.
- In a large bowl, mix the rolled oats, peanut butter, honey, vanilla extract, and salt until well combined.
- Fold in the chocolate chips and nuts if using.
- Spread the mixture evenly in the prepared baking dish, pressing it down firmly.
- Bake for about 20-25 minutes or until the edges are golden brown.
- Let it cool completely before cutting into squares. Store in an airtight container for up to a week.
Dreamy Peanut Butter Milkshake For A Cool Treat

This dreamy peanut butter milkshake is the perfect way to cool off on a warm day. Picture a tall glass filled with creamy, rich goodness topped with whipped cream and crunchy peanut pieces. The classic diner vibe in the background adds to the charm, making it feel like a special treat.
Making this milkshake is easy and budget-friendly, especially if you shop at your local dollar store. You can find all the ingredients you need without breaking the bank. Just grab some peanut butter, ice cream, and milk, and you’re ready to blend up a delicious drink that everyone will love.
Let’s get to the recipe so you can whip this up in no time!
Ingredients
- 2 cups vanilla ice cream
- 1/2 cup milk
- 1/4 cup peanut butter
- Whipped cream for topping
- Chopped peanuts for garnish
Instructions
- Blend the Ice Cream: In a blender, combine the vanilla ice cream, milk, and peanut butter. Blend until smooth and creamy.
- Adjust Consistency: If the milkshake is too thick, add a little more milk until you reach your desired consistency.
- Serve: Pour the milkshake into a tall glass. Top with whipped cream and sprinkle chopped peanuts on top.
- Enjoy: Grab a straw and enjoy your delicious peanut butter milkshake!
Peanut Butter Stuffed Dates: A Healthy Snack Option

Peanut butter stuffed dates are a delightful treat that combines sweetness and nutrition. These little bites are not just tasty; they are also packed with energy and healthy fats. The image shows a beautiful platter filled with dates, generously filled with creamy peanut butter and drizzled with chocolate. They are surrounded by a variety of nuts, adding a crunchy texture to the overall experience.
Making these treats is super easy and budget-friendly, perfect for anyone looking to enjoy a healthy snack without breaking the bank. You can find all the ingredients at your local dollar store, making it a win-win situation!
Dates are naturally sweet, and when paired with peanut butter, they create a satisfying snack that can curb your sweet tooth. The chocolate drizzle on top adds a touch of indulgence without being overwhelming. This snack is perfect for a quick energy boost or a post-workout treat.
Ingredients
- 12 Medjool dates
- 1/2 cup creamy peanut butter
- 1/4 cup dark chocolate chips
- 1 tablespoon coconut oil
- 1/4 cup mixed nuts (for garnish)
Instructions
- Prepare the Dates: Slice each date lengthwise and remove the pit. Be careful not to cut all the way through.
- Fill with Peanut Butter: Spoon about a teaspoon of peanut butter into each date, pressing it gently to fill the cavity.
- Melt the Chocolate: In a microwave-safe bowl, combine dark chocolate chips and coconut oil. Microwave in 30-second intervals, stirring until smooth.
- Drizzle Chocolate: Use a fork to drizzle the melted chocolate over the stuffed dates.
- Add Nuts: Sprinkle mixed nuts on top for an extra crunch.
- Chill: Place the platter in the refrigerator for about 15 minutes to set the chocolate.
Enjoy your peanut butter stuffed dates as a delicious and healthy snack!
Peanut Butter S'Mores For A Campfire Classic

Peanut Butter S'Mores take the classic campfire treat to a whole new level. Imagine the gooeyness of melted marshmallows and chocolate, paired with the creamy richness of peanut butter. This twist on the traditional s'more is perfect for those cozy nights around the fire.
To make these delightful treats, you’ll need some simple ingredients. Grab graham crackers, marshmallows, chocolate bars, and, of course, your favorite peanut butter. The combination of flavors is sure to impress everyone, whether you’re camping or just enjoying a backyard fire.
Start by roasting your marshmallows over the fire until they’re golden brown and melty. While that’s happening, spread peanut butter on one side of a graham cracker. Once your marshmallow is perfectly toasted, place it on top of the peanut butter, followed by a piece of chocolate. Top it off with another graham cracker, and you’ve got a delicious treat!
These Peanut Butter S'Mores are not just tasty; they’re also easy to make. Perfect for gatherings or a fun family night, they bring everyone together for a sweet experience. So, gather your supplies and get ready to enjoy this delightful twist on a classic!
Ingredients
- Graham crackers
- Marshmallows
- Chocolate bars
- Peanut butter
Instructions
- Prepare your campfire and let it burn down until you have hot coals.
- Take a graham cracker and spread a generous layer of peanut butter on one side.
- Skewer a marshmallow and roast it over the fire until golden brown.
- Place the roasted marshmallow on the peanut butter side of the graham cracker.
- Add a piece of chocolate on top of the marshmallow.
- Finish with another graham cracker on top, pressing down gently to create a sandwich.
- Enjoy your Peanut Butter S'Mores while they’re warm and gooey!
Peanut Butter And Jelly Cheesecake Shots: A Fun Twist
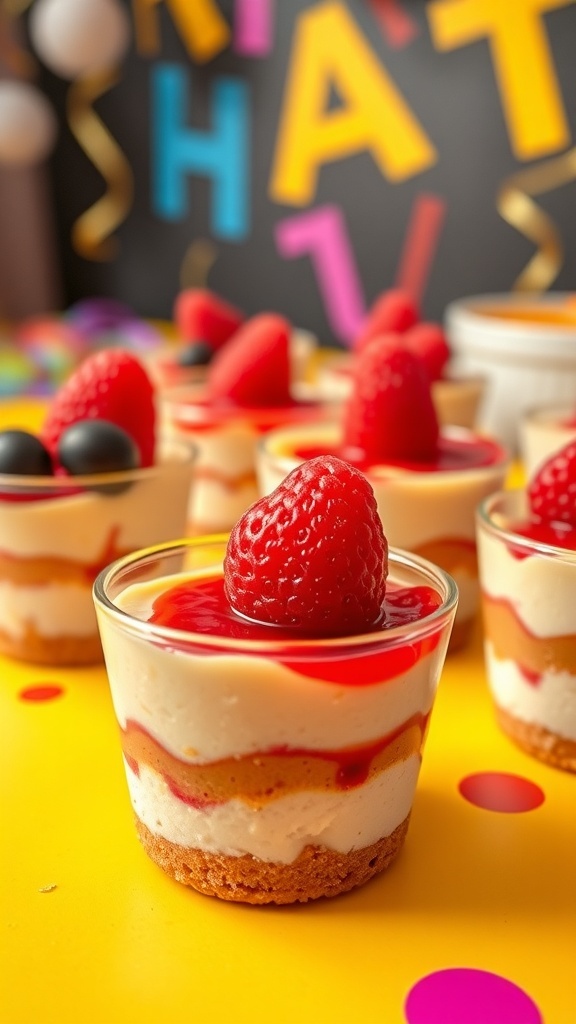
Peanut Butter and Jelly Cheesecake Shots are a delightful way to enjoy a classic flavor combo in a fun, bite-sized format. These little treats are perfect for parties or just a sweet snack at home. The layers of creamy cheesecake, peanut butter, and fruity jelly create a delicious balance that everyone will love.
In the image, you can see these colorful cheesecake shots topped with fresh raspberries and blueberries. The vibrant colors pop against the playful background, making them visually appealing. Each shot glass showcases the beautiful layers of graham cracker crust, creamy filling, and jelly, inviting you to take a bite.
Making these shots is easy and budget-friendly, especially if you pick up your ingredients from a dollar store. You can impress your friends without breaking the bank!
Ingredients
- 1 cup graham cracker crumbs
- 1/4 cup unsalted butter, melted
- 8 oz cream cheese, softened
- 1/2 cup powdered sugar
- 1/2 cup peanut butter
- 1 teaspoon vanilla extract
- 1/2 cup whipped cream
- 1/2 cup jelly (your choice of flavor)
- Fresh berries for topping
Instructions
- Prepare the Crust: In a bowl, mix graham cracker crumbs and melted butter until combined. Press the mixture into the bottom of shot glasses to form a crust.
- Make the Cheesecake Filling: In another bowl, beat together cream cheese, powdered sugar, peanut butter, and vanilla extract until smooth. Fold in whipped cream gently.
- Layer the Shots: Spoon a layer of the cheesecake mixture over the crust in each shot glass. Add a layer of jelly on top, then repeat the layers until the glasses are filled.
- Chill: Place the shots in the refrigerator for at least 2 hours to set.
- Serve: Top with fresh berries before serving for an extra pop of flavor and color.
Comments
Post a Comment