- Get link
- X
- Other Apps
17 Irresistible No-Bake Chocolate Desserts You Need to Try
If the thought of turning on the oven feels like too much effort, you're in luck! These no-bake chocolate desserts are perfect for satisfying your sweet tooth without any baking fuss. From creamy mousses to rich truffles, these treats are quick to whip up and deliciously satisfying, making them ideal for any chocolate lover looking to skip the heat.
Indulge In Rich Chocolate Coconut Truffles
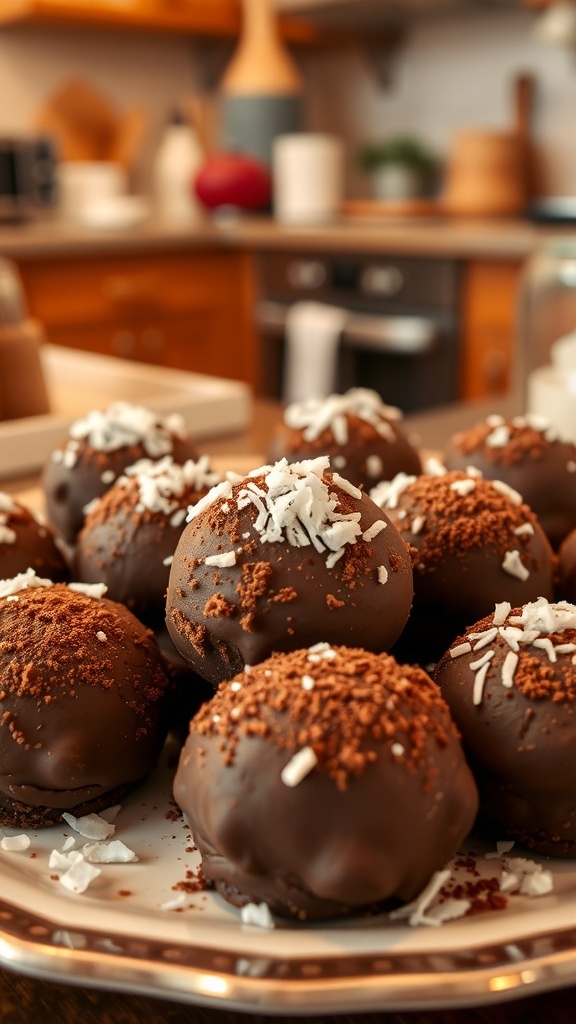
Chocolate coconut truffles are a delightful treat that brings together the rich flavors of chocolate and the tropical essence of coconut. These little bites are perfect for satisfying your sweet tooth without turning on the oven. The image shows a plate piled high with these truffles, each one coated in a glossy layer of chocolate and sprinkled with coconut flakes and cocoa powder. They look inviting and are sure to impress anyone who sees them.
Making these truffles is simple and fun. You can enjoy them as a quick snack or serve them at gatherings. They are a hit for any occasion, whether it’s a party or a cozy night in. Plus, they are no-bake, which means you can whip them up in no time!
Ingredients
- 1 cup shredded coconut
- 1 cup chocolate cookie crumbs
- 1/2 cup sweetened condensed milk
- 1 cup dark chocolate chips
- 1 tablespoon coconut oil
- Extra shredded coconut for coating
- Cocoa powder for dusting
Instructions
- Mix the Base: In a bowl, combine shredded coconut, chocolate cookie crumbs, and sweetened condensed milk. Stir until well mixed.
- Shape the Truffles: Scoop out small portions of the mixture and roll them into balls. Place them on a baking sheet lined with parchment paper.
- Chill: Refrigerate the truffles for about 30 minutes to firm them up.
- Melt the Chocolate: In a microwave-safe bowl, melt the dark chocolate chips and coconut oil together in 30-second intervals, stirring until smooth.
- Coat the Truffles: Dip each chilled truffle into the melted chocolate, allowing excess to drip off. Roll them in extra shredded coconut or dust with cocoa powder.
- Set: Place the coated truffles back on the baking sheet and let them set in the refrigerator for another 15 minutes.
These chocolate coconut truffles are a sweet escape that everyone will love. Enjoy your no-bake treat!
Sweeten Your Day With No-Bake Chocolate Cheesecake

No-bake chocolate cheesecake is a delightful treat that brings joy without the fuss of baking. This dessert features a creamy chocolate filling that sits atop a crunchy crust, making it a perfect choice for any occasion. The image shows a slice of this rich cheesecake, beautifully garnished with fresh raspberries that add a pop of color and a hint of tartness.
Imagine serving this cheesecake at your next gathering. It’s sure to impress your friends and family. The smooth chocolate layer paired with the crunchy base creates a wonderful texture contrast. Plus, it’s easy to make, so you can whip it up even on a busy day!
Let’s get to the recipe so you can enjoy this delicious dessert at home.
Ingredients
- 1 ½ cups chocolate cookie crumbs
- ½ cup unsalted butter, melted
- 2 cups cream cheese, softened
- 1 cup powdered sugar
- 1 cup heavy whipping cream
- 1 cup semi-sweet chocolate chips, melted
- 1 teaspoon vanilla extract
- Fresh raspberries for garnish
Instructions
- Prepare the Crust: In a bowl, mix the chocolate cookie crumbs with melted butter until well combined. Press the mixture into the bottom of a 9-inch springform pan to form an even layer.
- Make the Filling: In a large mixing bowl, beat the softened cream cheese until smooth. Gradually add the powdered sugar and mix until combined. Stir in the melted chocolate and vanilla extract.
- Whip the Cream: In another bowl, whip the heavy cream until stiff peaks form. Gently fold the whipped cream into the chocolate mixture until fully incorporated.
- Assemble: Pour the chocolate filling over the prepared crust, smoothing the top with a spatula. Cover and refrigerate for at least 4 hours, or until set.
- Serve: Once set, remove the cheesecake from the springform pan. Slice and serve with fresh raspberries on the side for a lovely touch.
Decadent Chocolate Peanut Butter Pie That Melts In Your Mouth
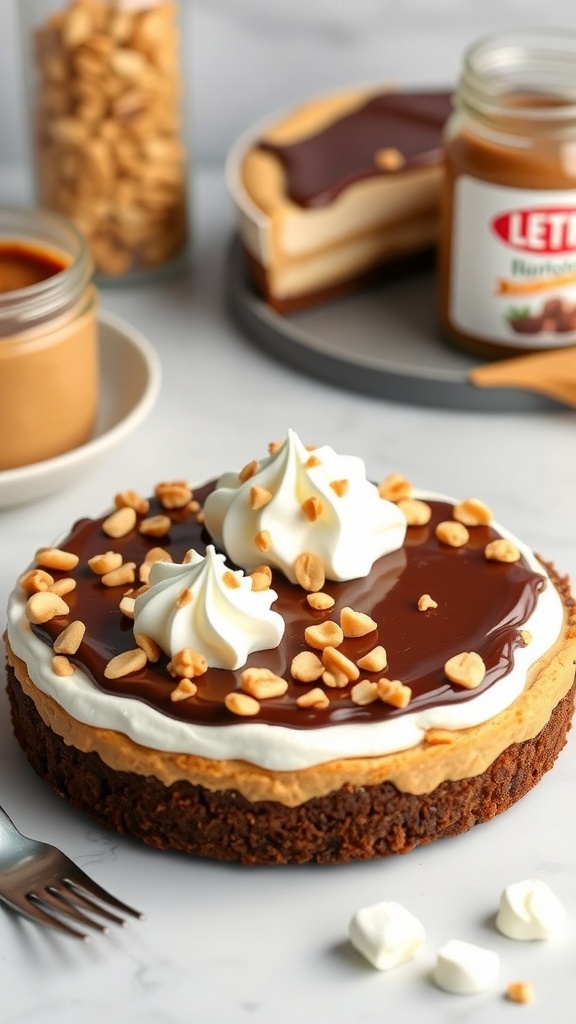
This chocolate peanut butter pie is a true treat for anyone who loves the combination of rich chocolate and creamy peanut butter. The image showcases a beautifully layered pie topped with whipped cream and crunchy peanuts, making it not just delicious but also visually appealing. The smooth chocolate ganache glistens on top, inviting you to take a bite.
This no-bake dessert is perfect for warm days when you want something sweet without turning on the oven. It’s simple to make and requires minimal effort, yet it delivers a flavor that feels indulgent. The layers of peanut butter filling and chocolate create a delightful contrast that melts in your mouth.
Let’s get into the recipe so you can whip this up in no time!
Ingredients
- 1 ½ cups chocolate cookie crumbs
- ½ cup unsalted butter, melted
- 1 cup creamy peanut butter
- 1 cup powdered sugar
- 1 cup heavy whipping cream
- 1 teaspoon vanilla extract
- 1 cup chocolate ganache (store-bought or homemade)
- Chopped peanuts for topping
Instructions
- Prepare the Crust: In a bowl, mix chocolate cookie crumbs with melted butter until combined. Press the mixture into the bottom of a 9-inch pie pan to form the crust.
- Make the Peanut Butter Filling: In another bowl, beat together peanut butter and powdered sugar until smooth. In a separate bowl, whip the heavy cream and vanilla until soft peaks form. Gently fold the whipped cream into the peanut butter mixture until well combined.
- Layer the Pie: Spread the peanut butter filling over the cookie crust evenly. Refrigerate for about 30 minutes to set.
- Add the Ganache: Once the filling is set, pour the chocolate ganache over the peanut butter layer, spreading it evenly.
- Garnish: Top with whipped cream and sprinkle chopped peanuts on top for added crunch.
- Chill and Serve: Refrigerate the pie for at least 2 hours before slicing and serving. Enjoy your delicious no-bake chocolate peanut butter pie!
Refreshing No-Bake Chocolate Mint Bars To Satisfy Your Cravings
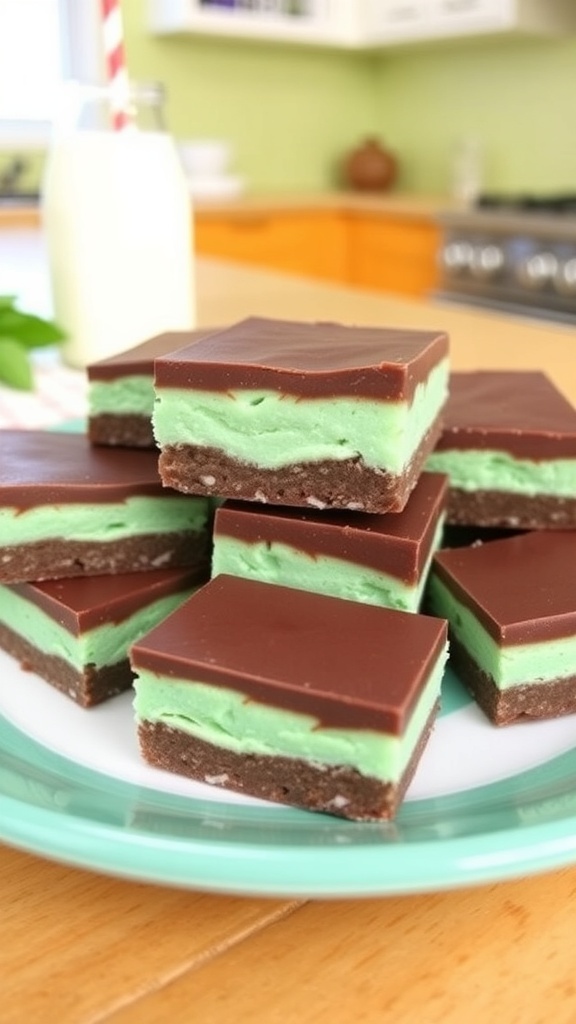
These no-bake chocolate mint bars are a delightful treat that combines rich chocolate with a refreshing mint layer. Perfect for satisfying your sweet tooth without turning on the oven, these bars are easy to make and even easier to enjoy. The vibrant green mint layer peeking through the dark chocolate creates a stunning visual that’s sure to impress.
The recipe requires simple ingredients like chocolate, cream cheese, and mint extract. You’ll love how quickly they come together. Just layer the mint filling between two chocolate layers, chill, and slice. It’s a fun and tasty way to enjoy a classic flavor combination!
Ingredients
- 1 cup chocolate chips
- 1/2 cup unsweetened cocoa powder
- 1/2 cup powdered sugar
- 1/4 cup unsalted butter, melted
- 1/2 cup cream cheese, softened
- 1/4 cup granulated sugar
- 1 teaspoon peppermint extract
- Green food coloring (optional)
- 1/2 cup chocolate chips (for topping)
Instructions
- Prepare the Base: In a bowl, mix together chocolate chips, cocoa powder, powdered sugar, and melted butter until well combined. Press this mixture into the bottom of a lined 8x8 inch baking dish.
- Make the Mint Layer: In another bowl, beat together cream cheese, granulated sugar, peppermint extract, and a few drops of green food coloring until smooth. Spread this mixture over the chocolate base.
- Add the Top Layer: Melt the remaining chocolate chips and pour over the mint layer, spreading evenly. Chill in the refrigerator for at least 2 hours until set.
- Slice and Serve: Once set, remove from the dish and cut into bars. Enjoy your refreshing no-bake chocolate mint bars!
Easy No-Bake Chocolate Oatmeal Cookies For A Quick Treat
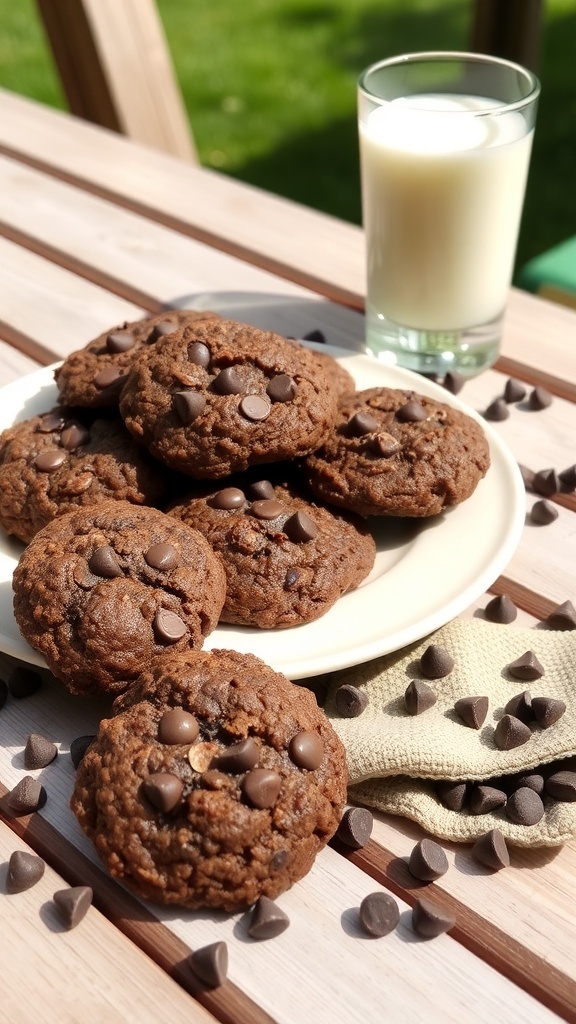
When you’re craving something sweet but don’t want to turn on the oven, no-bake chocolate oatmeal cookies are a fantastic choice. These cookies are quick to whip up and require minimal ingredients. Plus, they’re perfect for satisfying that chocolate craving without the fuss of baking.
Imagine a plate piled high with chewy cookies, dotted with chocolate chips, and ready to be enjoyed with a glass of cold milk. The combination of oats and chocolate creates a delightful texture that everyone loves. They’re perfect for an afternoon snack or a late-night treat!
Ingredients
- 1 cup granulated sugar
- 1/2 cup unsweetened cocoa powder
- 1/2 cup unsalted butter
- 1/2 cup milk
- 3 cups quick oats
- 1 teaspoon vanilla extract
- 1/2 cup chocolate chips (optional)
Instructions
- In a saucepan, combine sugar, cocoa powder, butter, and milk. Bring to a boil over medium heat, stirring constantly.
- Once it reaches a rolling boil, let it boil for 1 minute without stirring.
- Remove from heat and stir in the oats and vanilla extract until well combined.
- If using, fold in the chocolate chips until melted and mixed through.
- Drop spoonfuls of the mixture onto wax paper or a baking sheet lined with parchment paper.
- Let the cookies cool and set for about 30 minutes before enjoying.
Luscious No-Bake Chocolate Lava Cake For A Decadent Finish
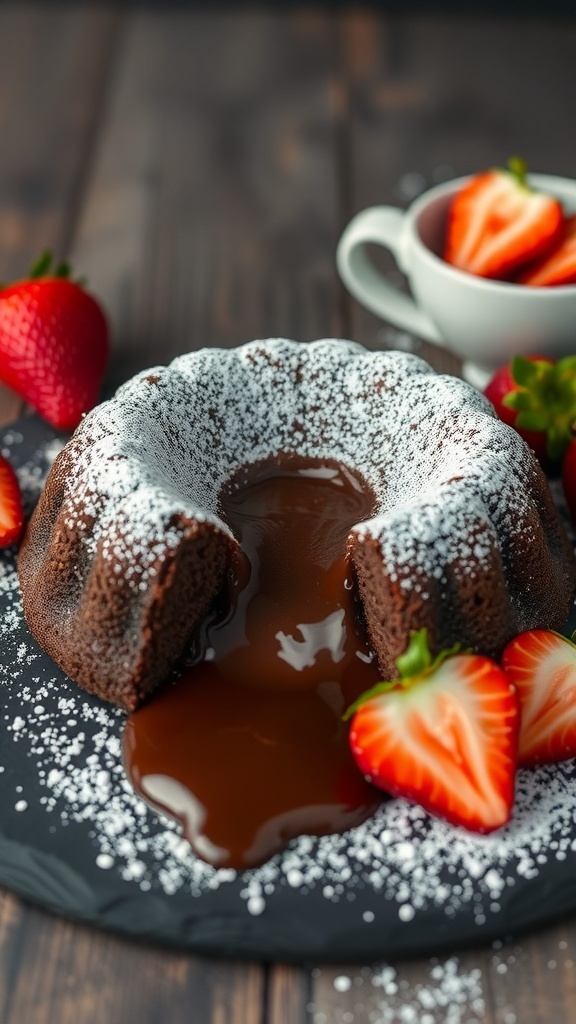
No-bake chocolate lava cake is the perfect treat for those who crave something rich and indulgent without turning on the oven. This delightful dessert features a soft, gooey center that flows out like molten chocolate when you cut into it. The cake is beautifully dusted with powdered sugar and paired with fresh strawberries, adding a pop of color and freshness to the plate.
Imagine serving this stunning dessert at your next gathering. The combination of the warm, flowing chocolate and the cool strawberries is simply irresistible. Plus, it’s easy to whip up, making it a go-to choice for any occasion.
Here’s how to make your own no-bake chocolate lava cake:
Ingredients
- 1 cup dark chocolate chips
- 1/2 cup unsalted butter
- 1 cup powdered sugar
- 2 large eggs
- 2 large egg yolks
- 1 teaspoon vanilla extract
- 1/2 cup all-purpose flour
- Fresh strawberries for garnish
Instructions
- Melt the chocolate and butter together in a microwave-safe bowl, stirring until smooth.
- Add the powdered sugar and mix until well combined.
- Whisk in the eggs and egg yolks, followed by the vanilla extract.
- Gently fold in the flour until just combined.
- Pour the mixture into greased ramekins or a bundt pan.
- Chill in the refrigerator for at least 1 hour.
- When ready to serve, remove from the fridge and let sit for a few minutes. Invert onto a plate, dust with powdered sugar, and serve with fresh strawberries.
Crispy Chocolate Rice Treats For A Fun Snack
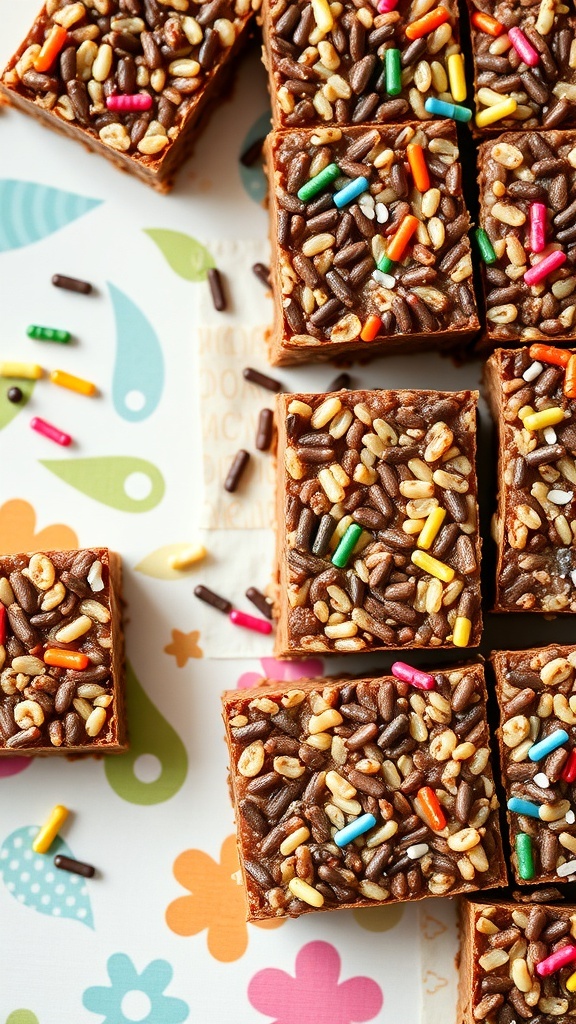
Crispy chocolate rice treats are a delightful way to satisfy your sweet tooth without turning on the oven. These treats are easy to make and perfect for kids and adults alike. The combination of chocolate and crispy rice creates a fun texture that everyone loves.
To make these treats, you’ll need just a few simple ingredients. The chocolate melts beautifully, coating the crispy rice and making each bite a little piece of heaven. Plus, the colorful sprinkles on top add a festive touch, making them great for parties or just a fun snack at home.
Here’s how to whip up these tasty treats in no time!
Ingredients
- 4 cups crispy rice cereal
- 2 cups chocolate chips
- 1/4 cup unsalted butter
- 1 cup mini marshmallows
- 1/2 cup colorful sprinkles
Instructions
- Prepare the Pan: Line a 9x13 inch baking dish with parchment paper for easy removal.
- Melt the Chocolate: In a large saucepan, melt the butter over low heat. Add the chocolate chips and stir until completely melted and smooth.
- Add Marshmallows: Stir in the mini marshmallows and mix until they are melted and well combined with the chocolate.
- Mix in Cereal: Remove the saucepan from heat and gently fold in the crispy rice cereal until evenly coated with the chocolate mixture.
- Transfer to Pan: Pour the mixture into the prepared baking dish. Press it down firmly with a spatula to create an even layer.
- Add Sprinkles: Sprinkle the colorful sprinkles on top while the mixture is still warm, pressing them in slightly.
- Cool and Cut: Allow the treats to cool completely at room temperature. Once set, cut into squares and enjoy!
Creamy No-Bake Chocolate Pudding Cups For Easy Serving
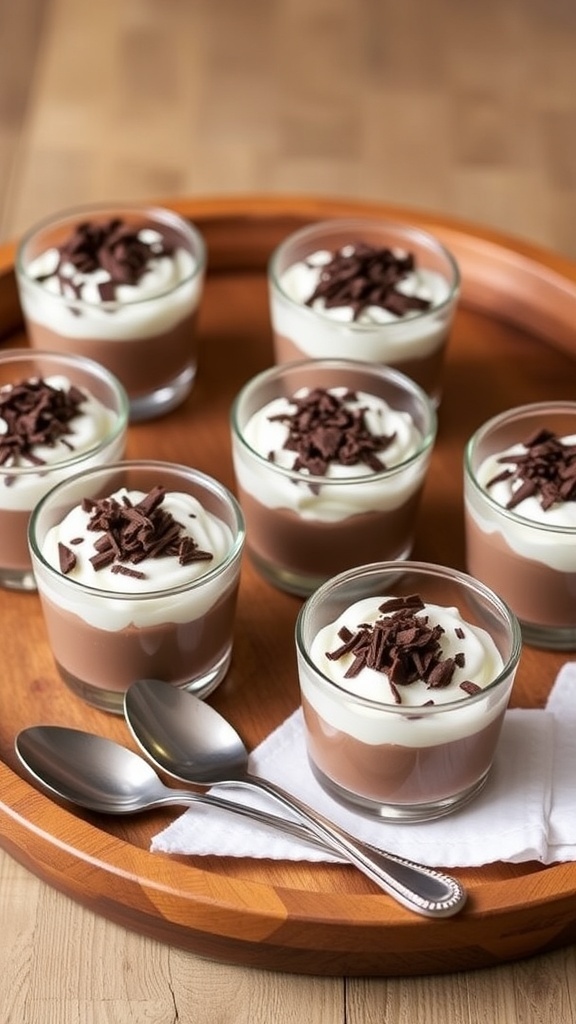
These creamy no-bake chocolate pudding cups are a delightful treat that’s perfect for any occasion. They come together quickly and require no oven time, making them a go-to dessert for warm days or busy evenings. The rich chocolate flavor pairs beautifully with a light, fluffy topping, creating a dessert that’s both satisfying and easy to serve.
Each cup is layered with smooth chocolate pudding and topped with whipped cream and chocolate shavings. They look impressive and taste even better, making them a hit at gatherings or a sweet indulgence for yourself. Plus, they’re served in individual cups, so everyone gets their own little dessert!
Ingredients
- 2 cups milk
- 1/2 cup granulated sugar
- 1/3 cup unsweetened cocoa powder
- 1/4 cup cornstarch
- 1/4 teaspoon salt
- 1 teaspoon vanilla extract
- 1 cup heavy cream
- 2 tablespoons powdered sugar
- Chocolate shavings for garnish
Instructions
- In a medium saucepan, whisk together the milk, granulated sugar, cocoa powder, cornstarch, and salt over medium heat. Stir constantly until the mixture thickens and begins to bubble.
- Remove from heat and stir in the vanilla extract. Pour the pudding into individual cups and let them cool to room temperature. Once cooled, refrigerate for at least 2 hours.
- In a separate bowl, whip the heavy cream and powdered sugar until soft peaks form. Spoon or pipe the whipped cream on top of the chilled pudding cups.
- Finish with chocolate shavings for an extra touch. Serve and enjoy your delicious no-bake chocolate pudding cups!
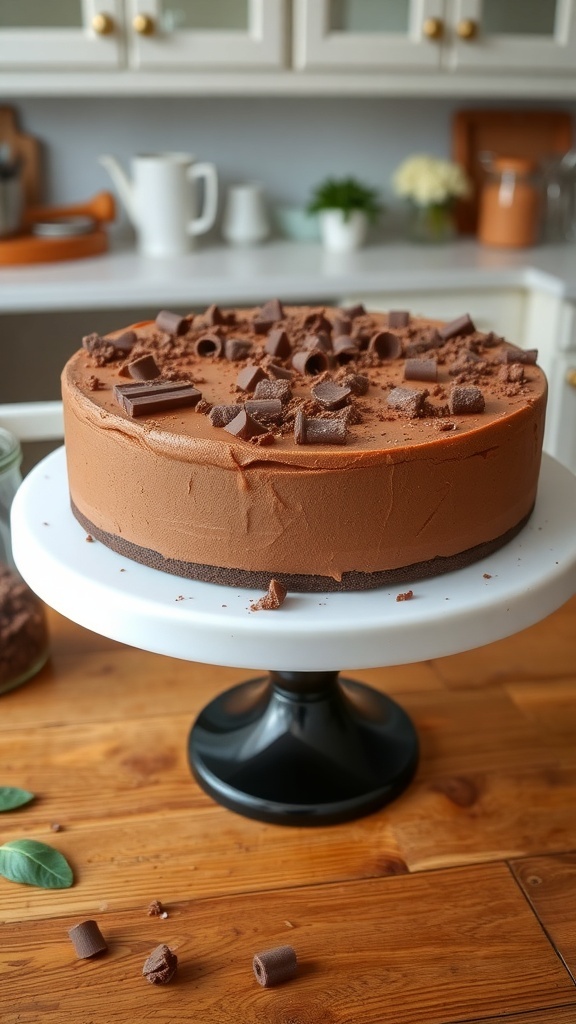
Heavenly No-Bake Chocolate Biscuit Cake For Sharing
No-bake chocolate biscuit cake is a delightful treat that’s perfect for sharing. This cake is rich, creamy, and oh-so-chocolatey, making it a favorite for gatherings or cozy nights in. The image shows a beautifully glazed chocolate cake, topped with elegant chocolate curls, sitting on a glass cake stand. It’s a visual feast that promises a delicious experience without the hassle of baking.
Making this cake is simple and requires just a few ingredients. You’ll love how easy it is to whip up, and the best part? No oven needed! Just mix, chill, and enjoy. It’s a fantastic way to satisfy your chocolate cravings without heating up the kitchen.
Gather your friends and family around this stunning cake. It’s sure to impress everyone with its glossy finish and rich flavor. Serve it at parties, or just enjoy a slice after dinner. Either way, it’s a treat that everyone will love!
Ingredients
- 200g digestive biscuits
- 100g unsalted butter
- 200g dark chocolate
- 100g sweetened condensed milk
- 50g cocoa powder
- Chocolate curls for decoration
Instructions
- Prepare the Base: Crush the digestive biscuits into small pieces and set them aside.
- Melt the Chocolate: In a saucepan, melt the dark chocolate and butter together over low heat. Stir until smooth.
- Mix Ingredients: Remove from heat and stir in the sweetened condensed milk and cocoa powder until well combined.
- Add Biscuits: Fold in the crushed biscuits until they are fully coated with the chocolate mixture.
- Set the Cake: Line a cake tin with parchment paper. Pour the mixture into the tin and press down firmly. Refrigerate for at least 4 hours or until set.
- Serve: Once set, remove from the tin, decorate with chocolate curls, and slice to serve. Enjoy your delicious no-bake chocolate biscuit cake!
Silky Smooth No-Bake Chocolate Tiramisu For Coffee Lovers
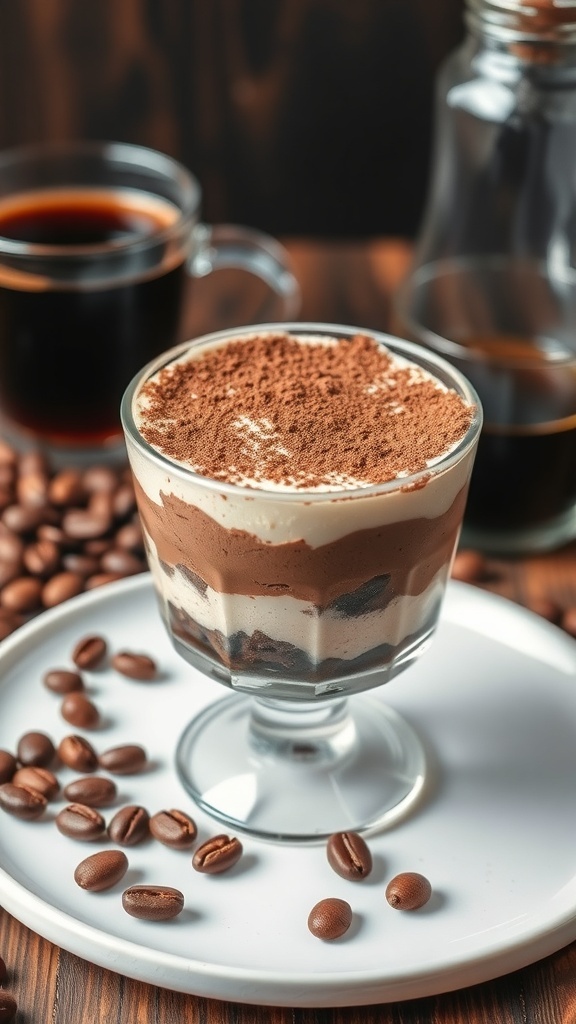
If you’re a coffee lover, this no-bake chocolate tiramisu is a dream come true. Imagine layers of creamy chocolate filling, coffee-soaked ladyfingers, and a dusting of cocoa on top. It’s rich, smooth, and perfect for satisfying your sweet tooth without turning on the oven.
The image captures this delightful dessert beautifully. You can see the luscious layers of chocolate and cream in a glass dish, topped with cocoa powder. Surrounding it are coffee beans and a cup of black coffee, setting the perfect mood for this indulgent treat.
This dessert is not just easy to make; it’s also a crowd-pleaser. Whether you’re hosting a dinner party or just treating yourself, this tiramisu will impress everyone. Plus, it’s a great way to enjoy the flavors of coffee and chocolate together.
Ingredients
- 1 cup strong brewed coffee, cooled
- 2 tablespoons coffee liqueur (optional)
- 8 ounces mascarpone cheese
- 1 cup heavy cream
- 1/2 cup powdered sugar
- 1 teaspoon vanilla extract
- 24 ladyfingers
- 2 tablespoons unsweetened cocoa powder
Instructions
- Prepare the Coffee Mixture: In a shallow dish, combine the brewed coffee and coffee liqueur. Set aside.
- Make the Cream Mixture: In a mixing bowl, beat the mascarpone cheese, heavy cream, powdered sugar, and vanilla extract until smooth and creamy.
- Layer the Dessert: Dip each ladyfinger into the coffee mixture for a few seconds, then layer them in the bottom of a glass dish. Spread half of the cream mixture over the ladyfingers.
- Add Another Layer: Repeat the process with another layer of dipped ladyfingers and the remaining cream mixture on top.
- Chill: Cover the dish and refrigerate for at least 4 hours, or overnight for best results.
- Serve: Before serving, dust the top with cocoa powder. Enjoy your silky smooth no-bake chocolate tiramisu!
Nutty No-Bake Chocolate Energy Bites For A Healthy Boost
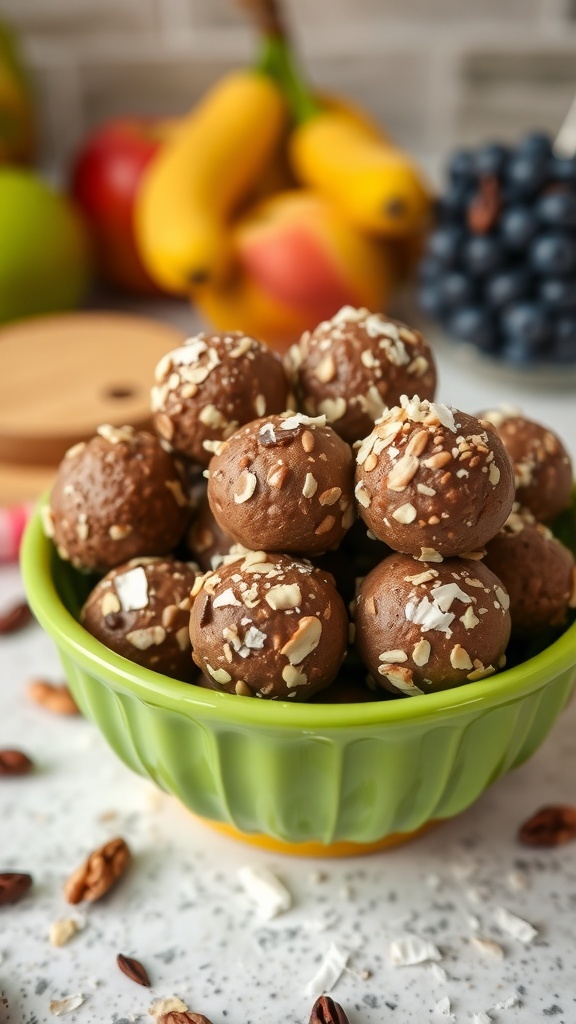
These Nutty No-Bake Chocolate Energy Bites are perfect for a quick snack or a healthy boost during the day. They are packed with wholesome ingredients and require no baking, making them super easy to whip up. Just look at those delightful little bites, rolled in oats and ready to be enjoyed!
These energy bites are not only tasty but also provide a great source of energy. With a mix of nuts, oats, and chocolate, they satisfy your sweet tooth while keeping things healthy. Plus, they’re perfect for on-the-go snacking or a post-workout treat.
To make these energy bites, you’ll need some simple ingredients that you might already have in your pantry. The combination of nut butter and chocolate creates a rich flavor that is hard to resist. Let’s get into the recipe!
Ingredients
- 1 cup rolled oats
- 1/2 cup nut butter (like almond or peanut butter)
- 1/3 cup honey or maple syrup
- 1/4 cup cocoa powder
- 1/4 cup chocolate chips
- 1/4 cup chopped nuts (like almonds or walnuts)
- 1/4 cup shredded coconut (optional)
Instructions
- Mix Ingredients: In a large bowl, combine rolled oats, nut butter, honey, cocoa powder, chocolate chips, and chopped nuts. Stir until everything is well mixed.
- Form Bites: Using your hands, roll the mixture into small balls, about 1 inch in diameter. If the mixture is too sticky, you can wet your hands slightly to make rolling easier.
- Chill: Place the energy bites on a baking sheet lined with parchment paper. Refrigerate for about 30 minutes to firm up.
- Enjoy: Once chilled, enjoy your energy bites right away or store them in an airtight container in the fridge for up to a week.
Satisfy Your Sweet Tooth With No-Bake Chocolate Fudge
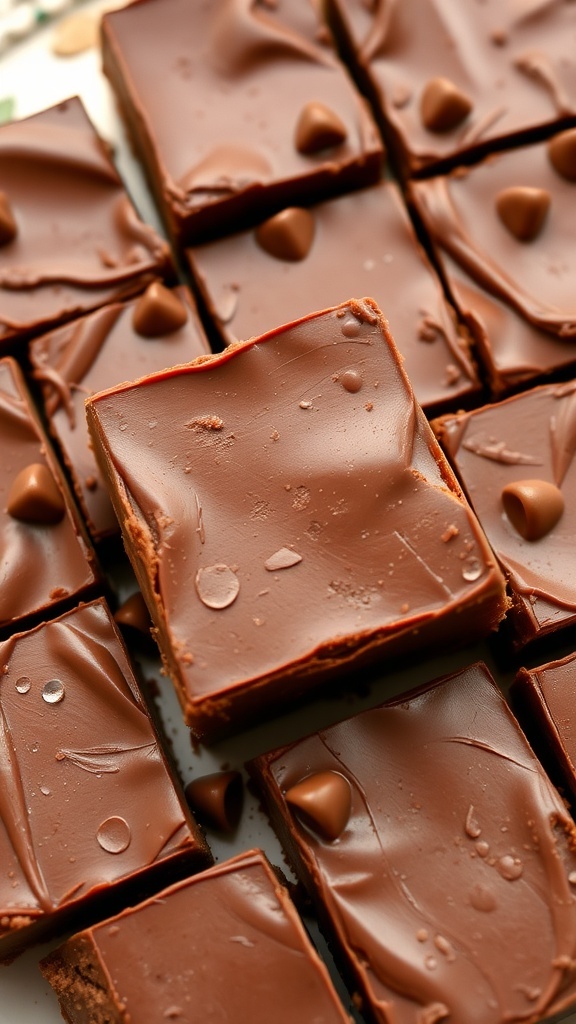
No-bake chocolate fudge is a delightful treat that brings together rich flavors and smooth textures. Picture a glossy, chocolatey surface, perfectly cut into squares, each piece glistening with a hint of sweetness. This fudge is not just easy to make; it’s also incredibly satisfying for anyone with a sweet tooth.
Imagine biting into a piece of this fudge, where the creamy chocolate melts in your mouth. It’s perfect for those days when you want something sweet without the hassle of turning on the oven. Plus, it’s a hit at parties and gatherings!
Ingredients
- 1 cup unsweetened cocoa powder
- 1 cup granulated sugar
- 1/2 cup unsalted butter
- 1/4 cup milk
- 1 teaspoon vanilla extract
- 2 cups powdered sugar
- 1/2 cup chocolate chips (optional)
Instructions
- Prepare the Pan: Line an 8x8 inch baking dish with parchment paper for easy removal.
- Mix Cocoa and Sugar: In a medium saucepan, combine cocoa powder and granulated sugar. Stir well to combine.
- Add Butter and Milk: Add butter and milk to the saucepan. Cook over medium heat, stirring constantly until the mixture is smooth and begins to boil.
- Remove from Heat: Once boiling, remove from heat and stir in vanilla extract.
- Add Powdered Sugar: Gradually mix in powdered sugar until fully incorporated. If using, fold in chocolate chips for extra richness.
- Pour and Chill: Pour the mixture into the prepared baking dish. Spread evenly and smooth the top. Refrigerate for at least 2 hours or until firm.
- Cut and Serve: Once set, lift the fudge out of the dish using the parchment paper. Cut into squares and enjoy!
Charming No-Bake Chocolate And Raspberry Tart For A Romantic Touch
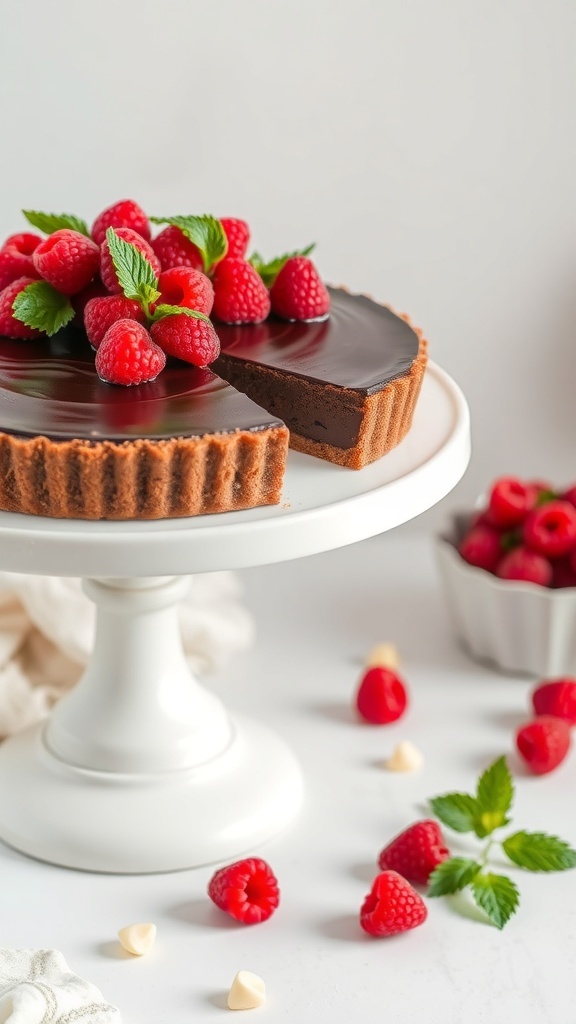
This no-bake chocolate and raspberry tart is a delightful treat that combines rich chocolate with the tartness of fresh raspberries. The glossy chocolate filling sits perfectly in a crumbly crust, making it both beautiful and delicious. Topped with vibrant raspberries and fresh mint, it’s a showstopper for any romantic occasion.
Making this tart is simple and requires no oven, which is perfect for those warm evenings when you want to keep the kitchen cool. The combination of chocolate and raspberries not only looks stunning but also tastes amazing. Each bite offers a burst of flavor that’s sure to impress.
Gather your ingredients and let’s get started on this charming dessert!
Ingredients
- 1 ½ cups chocolate cookie crumbs
- ½ cup unsalted butter, melted
- 1 cup heavy cream
- 8 ounces dark chocolate, chopped
- 2 tablespoons powdered sugar
- 1 teaspoon vanilla extract
- 1 cup fresh raspberries
- Fresh mint leaves for garnish
Instructions
- Prepare the Crust: In a bowl, mix the chocolate cookie crumbs with melted butter until well combined. Press the mixture into the bottom and sides of a tart pan. Chill in the refrigerator for 30 minutes.
- Make the Filling: In a saucepan, heat the heavy cream over medium heat until it begins to simmer. Remove from heat and add the chopped dark chocolate. Stir until smooth and glossy. Add powdered sugar and vanilla extract, mixing well.
- Assemble the Tart: Pour the chocolate filling into the chilled crust. Smooth the top with a spatula and refrigerate for at least 2 hours until set.
- Garnish: Once set, top the tart with fresh raspberries and mint leaves. Serve chilled and enjoy!
Quick And Easy No-Bake Chocolate Peanut Butter Bars For A Sweet Snack

These no-bake chocolate peanut butter bars are a delightful treat that combines the rich flavors of chocolate and peanut butter. Perfect for when you want something sweet without turning on the oven, these bars are quick to make and satisfy any chocolate craving.
The image showcases a stack of these delicious bars drizzled with chocolate, sitting next to jars of peanut butter and a glass of milk. The warm tones of the peanut butter and the glossy chocolate make it hard to resist. Each bite is creamy, crunchy, and oh-so-satisfying!
Making these bars is simple. You’ll need just a few ingredients, and the steps are straightforward. They’re great for a snack or dessert, and everyone will love them.
Ingredients
- 1 cup graham cracker crumbs
- 1 cup creamy peanut butter
- 1/2 cup powdered sugar
- 1 cup chocolate chips
- 2 tablespoons unsalted butter
Instructions
- Prepare the Base: In a mixing bowl, combine graham cracker crumbs, peanut butter, and powdered sugar. Mix until well combined and forms a dough-like consistency.
- Press into Pan: Line an 8x8 inch pan with parchment paper. Press the mixture evenly into the bottom of the pan.
- Melt the Chocolate: In a microwave-safe bowl, combine chocolate chips and butter. Microwave in 30-second intervals, stirring in between, until melted and smooth.
- Spread the Chocolate: Pour the melted chocolate over the peanut butter layer and spread it evenly.
- Chill: Refrigerate for at least 2 hours or until the chocolate is set. Cut into squares and enjoy!
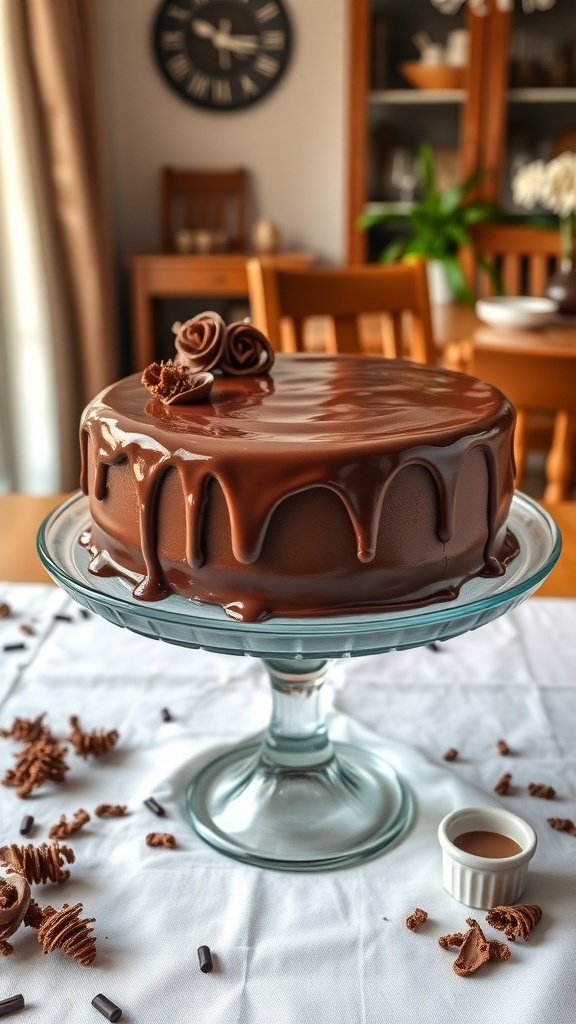
Rich No-Bake Chocolate Mousse Cake For Chocolate Lovers
This no-bake chocolate mousse cake is a dream come true for chocolate lovers. It features a smooth, creamy texture that melts in your mouth. The rich chocolate flavor is enhanced by a light, airy mousse that makes it feel indulgent without being overly heavy. Perfect for any occasion, this dessert is not only easy to make but also requires no oven time, making it a go-to recipe for warm days or when you just want to keep things simple.
The cake is beautifully presented on a glass cake stand, showcasing its luscious chocolate frosting and a sprinkle of chocolate shavings on top. The clean kitchen background adds a cozy touch, making it look inviting and delicious. This dessert is sure to impress your friends and family!
Ingredients
- 2 cups heavy cream
- 1 cup semi-sweet chocolate chips
- 1/4 cup powdered sugar
- 1 teaspoon vanilla extract
- 1 package (8 oz) cream cheese, softened
- 1/2 cup granulated sugar
- 1 pre-made chocolate cookie crust
- Chocolate shavings for garnish
Instructions
- Melt the chocolate chips in a microwave-safe bowl, stirring every 30 seconds until smooth. Let it cool slightly.
- In a large bowl, whip the heavy cream, powdered sugar, and vanilla extract until soft peaks form.
- In another bowl, beat the softened cream cheese and granulated sugar until smooth. Gradually fold in the melted chocolate until well combined.
- Gently fold the whipped cream into the chocolate mixture until no streaks remain.
- Pour the mousse into the chocolate cookie crust and smooth the top. Refrigerate for at least 4 hours or until set.
- Before serving, garnish with chocolate shavings for an extra touch of elegance.
Tempting No-Bake Chocolate Chip Cookie Dough Bites For A Fun Treat
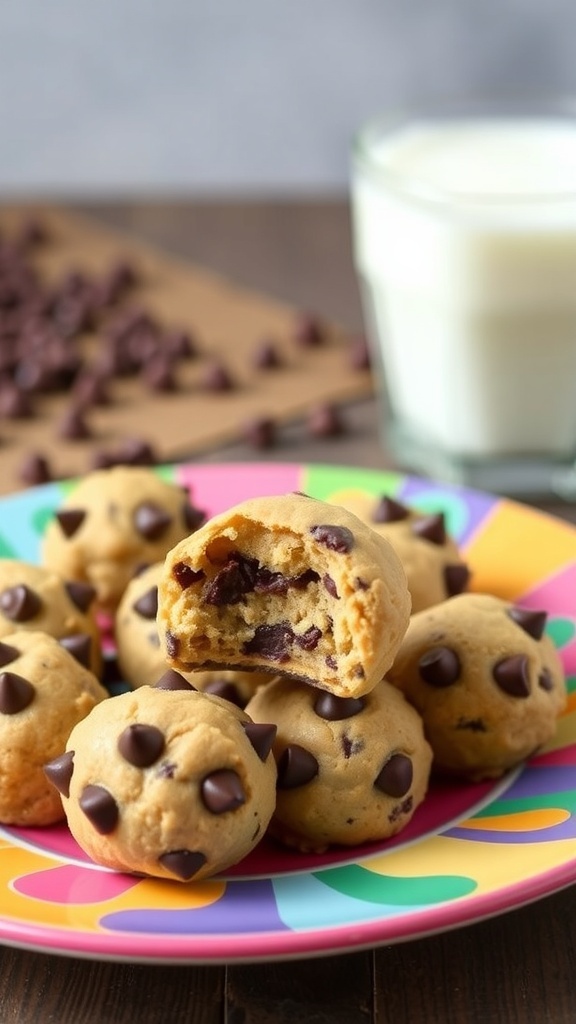
No-bake chocolate chip cookie dough bites are a delightful treat that everyone loves. They are easy to make and perfect for satisfying your sweet tooth without turning on the oven. Imagine small, round bites of cookie dough, dotted with chocolate chips, just waiting to be enjoyed. These treats are not only delicious but also fun to make, especially with kids!
The ingredients are simple and likely already in your pantry. You’ll need flour, brown sugar, butter, vanilla extract, and, of course, chocolate chips. The best part? You don’t have to bake them! Just mix everything together, roll them into balls, and chill them in the fridge. They’re ready to eat in no time!
These cookie dough bites are perfect for parties, movie nights, or just a sweet snack at home. Pair them with a glass of milk for a classic combo that never fails. Everyone will be reaching for seconds!
Ingredients
- 1 cup all-purpose flour
- 1/2 cup unsalted butter, softened
- 1/2 cup brown sugar, packed
- 1/4 cup granulated sugar
- 1 teaspoon vanilla extract
- 1/4 teaspoon salt
- 1/2 cup chocolate chips
Instructions
- Mix the Dough: In a large bowl, combine softened butter, brown sugar, and granulated sugar. Beat until creamy. Add vanilla extract and salt, mixing well.
- Add Flour: Gradually add the flour to the mixture, stirring until fully combined. The dough should be thick and slightly sticky.
- Fold in Chocolate Chips: Gently fold in the chocolate chips until evenly distributed throughout the dough.
- Shape the Bites: Using your hands, roll the dough into small balls, about one inch in diameter.
- Chill: Place the cookie dough bites on a baking sheet lined with parchment paper. Refrigerate for at least 30 minutes to firm up.
- Enjoy: Once chilled, serve and enjoy your no-bake chocolate chip cookie dough bites!
Decadent No-Bake Chocolate Caramel Bars For A Sweet Surprise
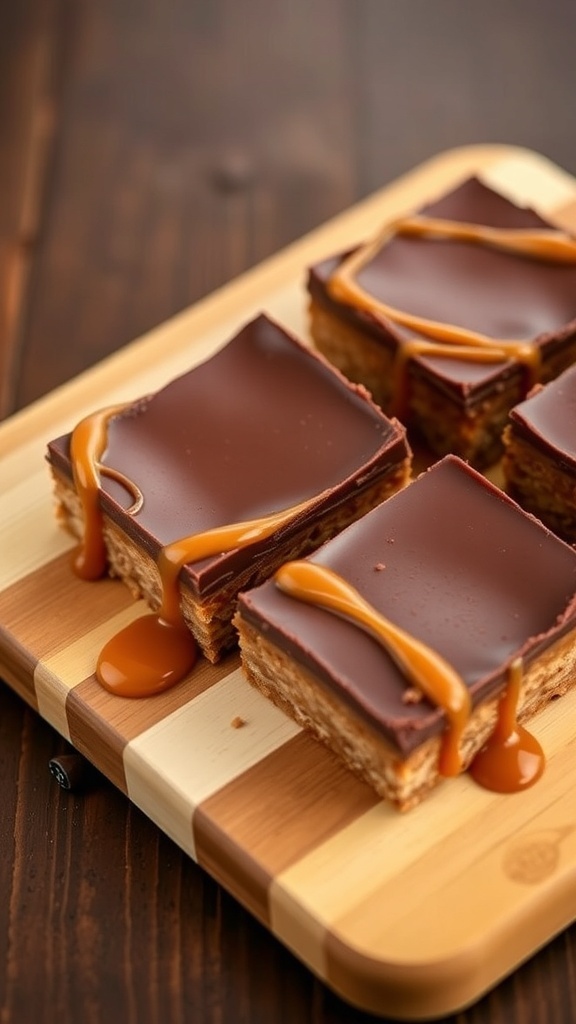
No-bake chocolate caramel bars are a delightful treat that brings together rich chocolate and gooey caramel without the need for an oven. These bars are perfect for satisfying your sweet tooth while keeping things simple. Imagine layers of chocolate goodness topped with a luscious caramel drizzle, all set to impress your friends and family.
Making these bars is a breeze. You start with a chocolate base, add a creamy caramel layer, and finish it off with a smooth chocolate topping. The combination of textures and flavors makes each bite a little piece of heaven. Plus, they’re quick to prepare, so you can whip them up in no time!
Whether you're hosting a gathering or just treating yourself, these no-bake chocolate caramel bars are sure to be a hit. They’re a sweet surprise that everyone will love!
Ingredients
- 1 1/2 cups graham cracker crumbs
- 1/2 cup unsalted butter, melted
- 1/3 cup granulated sugar
- 1 cup caramel candies, unwrapped
- 1/2 cup heavy cream
- 1 cup semi-sweet chocolate chips
- 1 teaspoon vanilla extract
- Sea salt for sprinkling (optional)
Instructions
- Prepare the Crust: In a mixing bowl, combine graham cracker crumbs, melted butter, and sugar. Press the mixture firmly into the bottom of a lined 8x8 inch baking dish to form an even layer.
- Make the Caramel Layer: In a saucepan over low heat, combine caramel candies and heavy cream. Stir until melted and smooth. Pour the caramel over the graham cracker crust and spread evenly. Allow to cool slightly.
- Prepare the Chocolate Ganache: In a separate saucepan, heat the heavy cream until just simmering. Remove from heat and add chocolate chips. Let sit for a minute, then stir until smooth and glossy. Pour the ganache over the caramel layer and spread evenly.
- Chill: Refrigerate the bars for at least 2 hours or until set. Once set, lift the bars out of the dish using the parchment paper and cut into squares.
- Serve: Sprinkle with sea salt if desired and enjoy your delicious no-bake chocolate caramel bars.
Comments
Post a Comment