- Get link
- X
- Other Apps
19 Easy No-Bake Fall Desserts to Savor This Season
Fall is the perfect time to whip up some delicious treats without turning on the oven. These easy no-bake dessert recipes are simple, quick, and packed with all the comforting flavors of the season. From pumpkin parfaits to caramel apple bites, you’ll find sweet, satisfying options that let you enjoy autumn without the fuss of baking!
Irresistible No-Bake Pumpkin Cheesecake
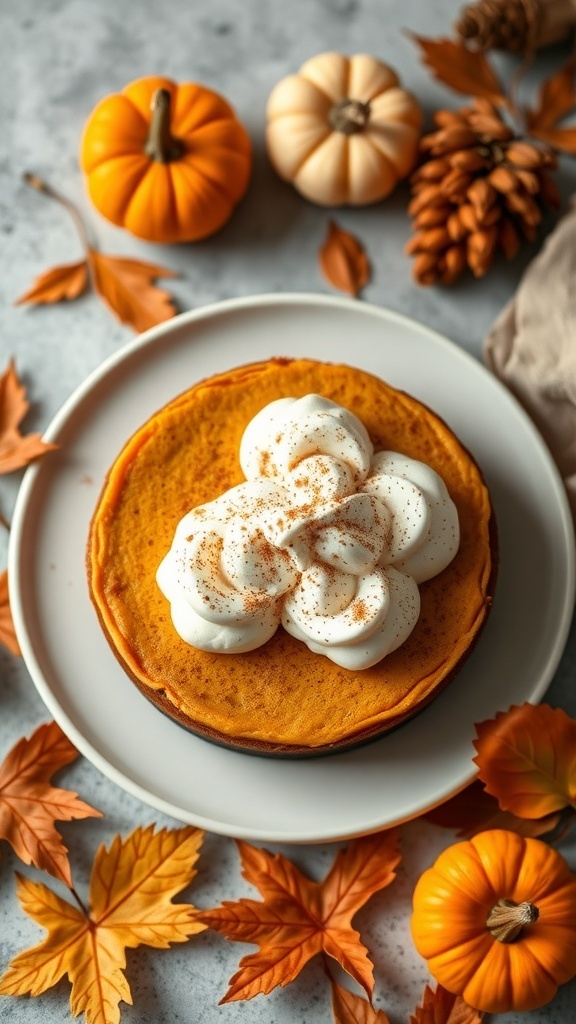
Fall is the perfect time to enjoy the flavors of pumpkin, and what better way to do that than with a no-bake pumpkin cheesecake? This dessert is creamy, rich, and oh-so-easy to make. Just picture a smooth pumpkin filling sitting on a crunchy crust, topped with fluffy whipped cream. It’s a delightful treat that captures the essence of the season.
The image of the cheesecake showcases its beautiful orange hue, surrounded by charming mini pumpkins and autumn leaves. It’s a feast for the eyes as much as it is for the taste buds. The whipped cream on top adds a touch of elegance, making it perfect for any gathering.
This no-bake pumpkin cheesecake is not only simple to prepare, but it also saves you from the hassle of baking. It’s a great option for those busy fall days when you want something special without spending hours in the kitchen.
Ingredients
- 1 ½ cups graham cracker crumbs
- ½ cup unsalted butter, melted
- 2 cups cream cheese, softened
- 1 cup pumpkin puree
- 1 cup powdered sugar
- 1 teaspoon vanilla extract
- 1 teaspoon ground cinnamon
- ½ teaspoon ground nutmeg
- 1 cup heavy whipping cream
Instructions
- Make the Crust: In a bowl, mix graham cracker crumbs and melted butter until combined. Press the mixture into the bottom of a 9-inch springform pan to form an even layer.
- Prepare the Filling: In a large bowl, beat the cream cheese until smooth. Add pumpkin puree, powdered sugar, vanilla extract, cinnamon, and nutmeg. Mix until well combined.
- Whip the Cream: In another bowl, whip the heavy cream until stiff peaks form. Gently fold the whipped cream into the pumpkin mixture until fully incorporated.
- Assemble: Pour the pumpkin filling over the crust in the springform pan. Smooth the top with a spatula.
- Chill: Cover the cheesecake and refrigerate for at least 4 hours, or overnight for best results.
- Serve: Once chilled, remove the cheesecake from the pan. Top with additional whipped cream and a sprinkle of cinnamon before slicing and serving.
Decadent Chocolate Hazelnut Parfaits
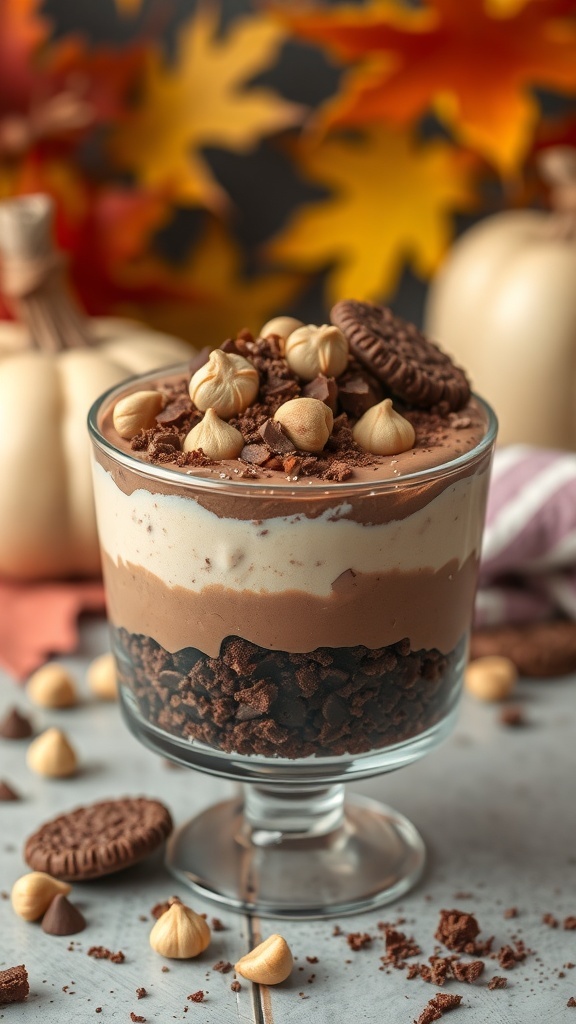
These Chocolate Hazelnut Parfaits are a delightful treat for fall. The layers of creamy chocolate and crunchy hazelnuts create a perfect balance. The warm colors of autumn in the background set a cozy vibe, making these parfaits even more inviting.
The base is made of crushed chocolate cookies, providing a rich foundation. Then, a smooth chocolate hazelnut layer follows, topped with a light whipped cream layer. Finally, sprinkle some chopped hazelnuts and chocolate shavings on top for that extra crunch.
These parfaits are not only easy to make but also a showstopper at any gathering. They are perfect for a cozy evening at home or a festive fall party. Everyone will love digging into these delicious layers!
Ingredients
- 1 cup chocolate cookie crumbs
- 1/2 cup hazelnut spread
- 1 cup heavy cream
- 1/4 cup powdered sugar
- 1 teaspoon vanilla extract
- 1/2 cup chopped hazelnuts
- Chocolate shavings for garnish
Instructions
- Prepare the Base: In a bowl, mix the chocolate cookie crumbs with a little melted butter. Press this mixture into the bottom of serving glasses.
- Make the Chocolate Layer: In another bowl, combine hazelnut spread with half of the whipped cream until smooth. Spread this layer over the cookie base.
- Whip the Cream: In a separate bowl, whip the remaining heavy cream with powdered sugar and vanilla until soft peaks form. Gently fold this into the remaining hazelnut mixture.
- Layer It Up: Add the whipped cream layer on top of the chocolate layer in the glasses.
- Garnish: Top with chopped hazelnuts and chocolate shavings. Chill in the fridge for at least 30 minutes before serving.
Delightful Apple Crisp Cups
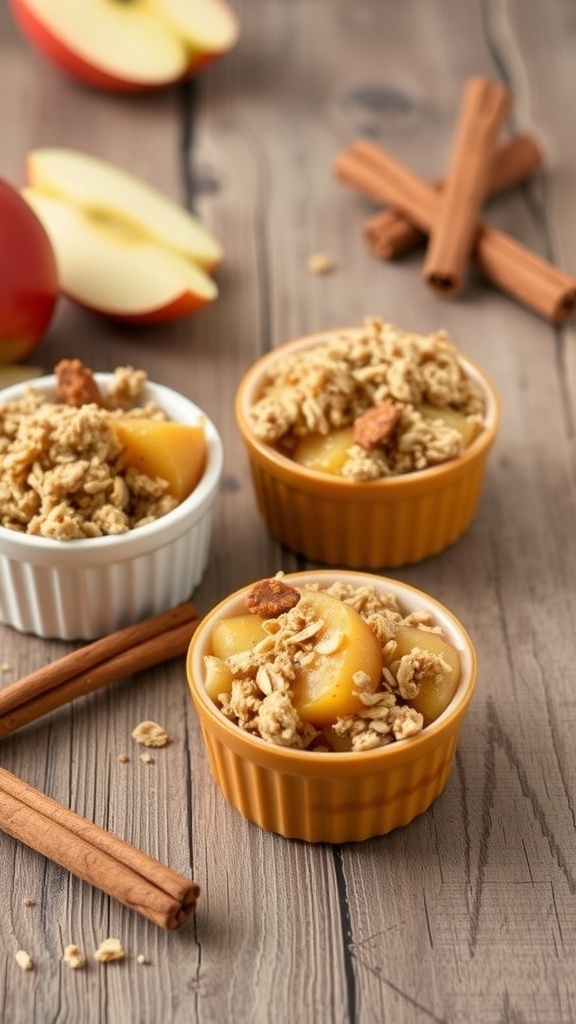
These delightful apple crisp cups are perfect for fall. They bring together the sweet and tart flavors of fresh apples, topped with a crunchy oat mixture. The warm spices of cinnamon and nutmeg make them feel cozy and inviting. Each cup is a little treat, easy to grab and enjoy.
The presentation is charming, with the crisp topping peeking over the edges of the cups. You can see the tender apples underneath, glistening and ready to be devoured. The combination of textures is simply irresistible, making these cups a hit at any gathering.
Making these apple crisp cups is a breeze. You can whip them up in no time, and they require no baking! Just layer the ingredients, and you’re set for a delicious dessert that everyone will love.
Ingredients
- 4 cups sliced apples (about 4 medium apples)
- 1/4 cup granulated sugar
- 1 teaspoon ground cinnamon
- 1/4 teaspoon ground nutmeg
- 1 tablespoon lemon juice
- 1 cup rolled oats
- 1/2 cup all-purpose flour
- 1/2 cup packed brown sugar
- 1/4 cup unsalted butter, melted
- 1/4 teaspoon salt
Instructions
- Prepare the Apples: In a large bowl, toss the sliced apples with granulated sugar, cinnamon, nutmeg, and lemon juice. Make sure the apples are well coated.
- Make the Topping: In another bowl, mix together the oats, flour, brown sugar, melted butter, and salt. Stir until crumbly.
- Assemble the Cups: Divide the apple mixture among small cups or ramekins. Top each with the oat mixture, spreading it evenly over the apples.
- Chill: Place the cups in the refrigerator for at least 30 minutes to let the flavors meld.
- Serve: Enjoy these apple crisp cups chilled or at room temperature. They make a great dessert for any fall gathering!
Creamy Maple Pudding With Whipped Topping
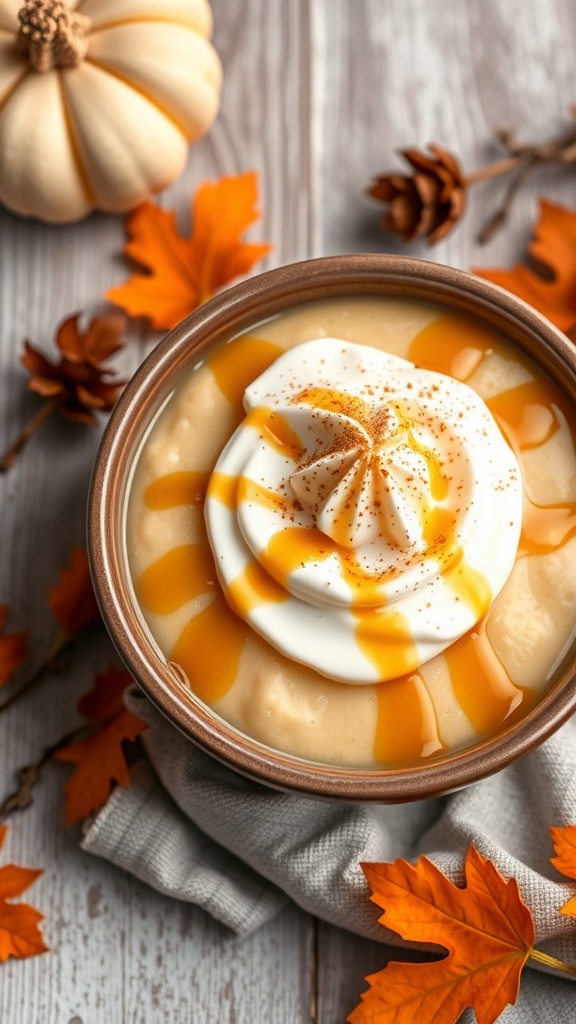
Fall is the perfect time for cozy desserts, and creamy maple pudding fits the bill. This delightful treat brings together the rich flavors of maple syrup and smooth pudding, making it a comforting choice for any gathering. The image showcases a bowl of this luscious pudding, topped with a generous swirl of whipped cream and a drizzle of caramel. The warm autumn colors of the leaves and the cute pumpkin in the background add to the seasonal charm.
Making this pudding is a breeze, and you don’t even need to turn on the oven! It’s a great way to celebrate the flavors of fall without all the fuss. Just imagine serving this creamy delight at your next family dinner or cozy get-together.
Ingredients
- 2 cups whole milk
- 1/2 cup maple syrup
- 1/4 cup cornstarch
- 1/4 teaspoon salt
- 1 teaspoon vanilla extract
- 1 cup heavy cream
- 2 tablespoons powdered sugar
- Caramel sauce for drizzling
- Ground cinnamon for garnish
Instructions
- In a medium saucepan, whisk together the milk, maple syrup, cornstarch, and salt over medium heat. Stir continuously until the mixture thickens, about 5-7 minutes.
- Remove from heat and stir in the vanilla extract. Pour the pudding into serving bowls and let it cool to room temperature.
- While the pudding cools, whip the heavy cream and powdered sugar in a mixing bowl until soft peaks form.
- Once the pudding is set, top each bowl with a generous dollop of whipped cream, a drizzle of caramel sauce, and a sprinkle of ground cinnamon.
- Serve immediately or refrigerate until ready to enjoy!
Simple No-Bake S'Mores Bars
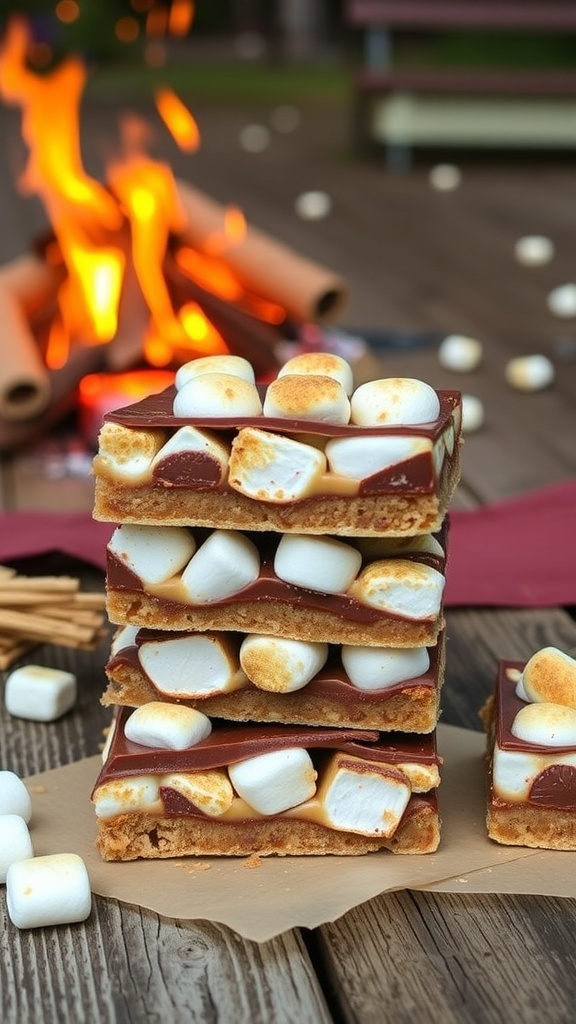
Fall is the perfect time for cozy treats, and these no-bake s'mores bars are a hit! They capture the essence of campfire s'mores without the need for a fire. Just look at those layers of graham crackers, chocolate, and toasted marshmallows. They’re easy to make and even easier to enjoy!
To whip up these delicious bars, you’ll need some simple ingredients. The combination of graham crackers, chocolate, and marshmallows creates a sweet and satisfying dessert that everyone will love. Plus, they’re perfect for sharing at gatherings or enjoying on a chilly evening.
Here’s how to make them:
Ingredients
- 2 cups graham cracker crumbs
- 1/2 cup unsalted butter, melted
- 1 cup chocolate chips
- 1 cup mini marshmallows
- 1/2 cup sweetened condensed milk
Instructions
- Prepare the Base: In a bowl, mix graham cracker crumbs with melted butter until combined. Press this mixture into the bottom of a greased 9x9 inch pan.
- Add Chocolate: Sprinkle chocolate chips evenly over the crust. Pour sweetened condensed milk over the chocolate, ensuring it’s evenly distributed.
- Top with Marshmallows: Scatter mini marshmallows on top. For a toasted effect, you can briefly broil them in the oven until golden brown.
- Chill: Place the pan in the refrigerator for at least 2 hours to set. Once firm, cut into squares and enjoy!
These s'mores bars are a delightful treat that brings the flavors of fall right to your kitchen. Perfect for gatherings or a sweet snack at home!
Easy No-Bake Cranberry Orange Tart
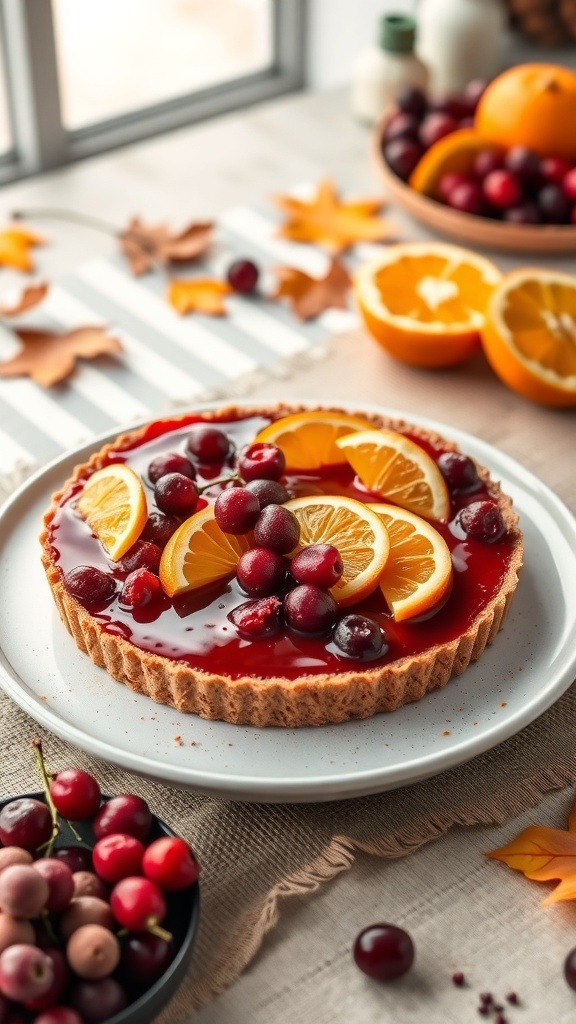
This Cranberry Orange Tart is a delightful treat for the fall season. The vibrant colors of the tart, with its glossy cranberry glaze and fresh orange slices, make it a perfect centerpiece for any gathering. The combination of tart cranberries and sweet oranges creates a refreshing flavor that everyone will love.
The crust is simple to make and doesn’t require baking, which is a huge plus. It’s made from crushed cookies mixed with butter, giving it a sweet and buttery base. The filling is a smooth blend of cream cheese and whipped cream, making it light and fluffy.
To top it off, the tart is garnished with fresh cranberries and orange slices, adding a pop of color and a burst of flavor. This dessert is not only easy to prepare but also a feast for the eyes. Perfect for those cozy fall evenings!
Ingredients
- 1 ½ cups crushed graham crackers
- ½ cup unsalted butter, melted
- 8 oz cream cheese, softened
- 1 cup powdered sugar
- 1 cup heavy whipping cream
- 1 cup cranberry juice
- 2 tablespoons cornstarch
- 1 cup fresh cranberries
- 1 orange, sliced
Instructions
- Make the Crust: In a bowl, combine crushed graham crackers and melted butter. Press the mixture into the bottom of a tart pan to form the crust. Chill in the refrigerator for 30 minutes.
- Prepare the Filling: In another bowl, beat the softened cream cheese and powdered sugar until smooth. In a separate bowl, whip the heavy cream until stiff peaks form. Gently fold the whipped cream into the cream cheese mixture until well combined.
- Assemble the Tart: Spread the cream cheese filling evenly over the chilled crust. Return to the refrigerator while you prepare the glaze.
- Make the Glaze: In a saucepan, combine cranberry juice and cornstarch. Cook over medium heat until thickened, stirring constantly. Remove from heat and let cool slightly.
- Top the Tart: Pour the glaze over the cream cheese filling. Arrange fresh cranberries and orange slices on top. Chill for at least 2 hours before serving.
No-Bake Nutty Chocolate Energy Bites
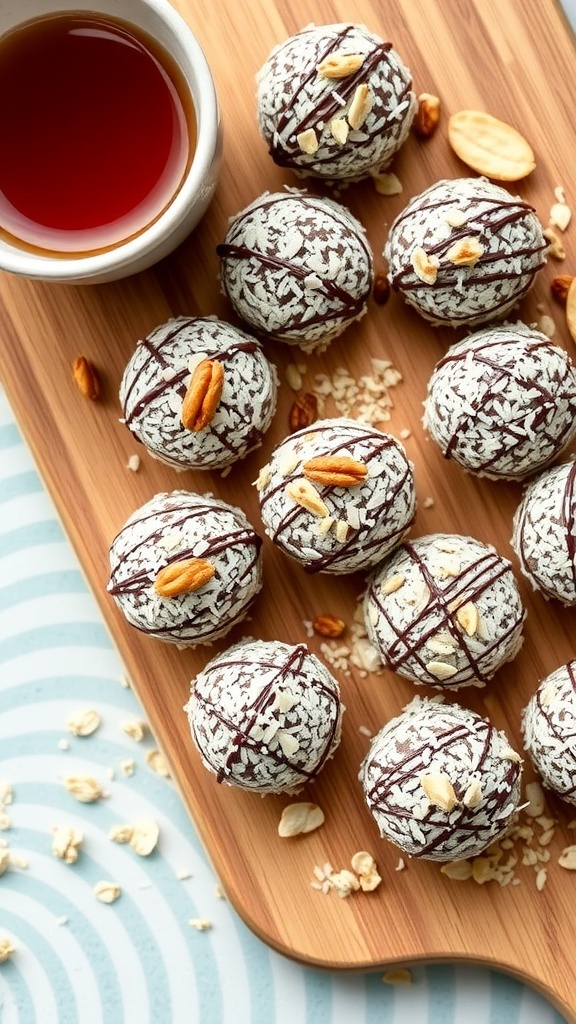
No-bake nutty chocolate energy bites are a perfect treat for fall. These little bites are packed with flavor and energy, making them great for a quick snack or a sweet pick-me-up. The image shows a delightful arrangement of these energy bites, coated in coconut and drizzled with chocolate. They look inviting and are sure to please anyone who loves a good chocolatey treat.
Making these energy bites is simple and fun. You can easily whip them up in no time, and they require no baking! Just mix your ingredients, roll them into balls, and they’re ready to enjoy. They’re perfect for busy days when you want something sweet without the fuss of baking.
These bites are not only delicious but also nutritious. They contain oats, nuts, and a hint of chocolate, giving you a boost of energy while satisfying your sweet tooth. Plus, they’re customizable! Feel free to add your favorite nuts or seeds to make them your own.
Ingredients
- 1 cup rolled oats
- 1/2 cup nut butter (like almond or peanut)
- 1/3 cup honey or maple syrup
- 1/4 cup cocoa powder
- 1/4 cup shredded coconut
- 1/4 cup chopped nuts (like almonds or walnuts)
- 1/2 teaspoon vanilla extract
- Pinch of salt
Instructions
- Mix Ingredients: In a large bowl, combine rolled oats, nut butter, honey, cocoa powder, shredded coconut, chopped nuts, vanilla extract, and salt. Stir until everything is well mixed.
- Form Balls: Use your hands to roll the mixture into small balls, about 1 inch in diameter.
- Chill: Place the energy bites on a baking sheet lined with parchment paper. Refrigerate for at least 30 minutes to firm up.
- Enjoy: Once chilled, enjoy your energy bites! Store any leftovers in an airtight container in the fridge.
Rich Pumpkin Spice Fluff Dip
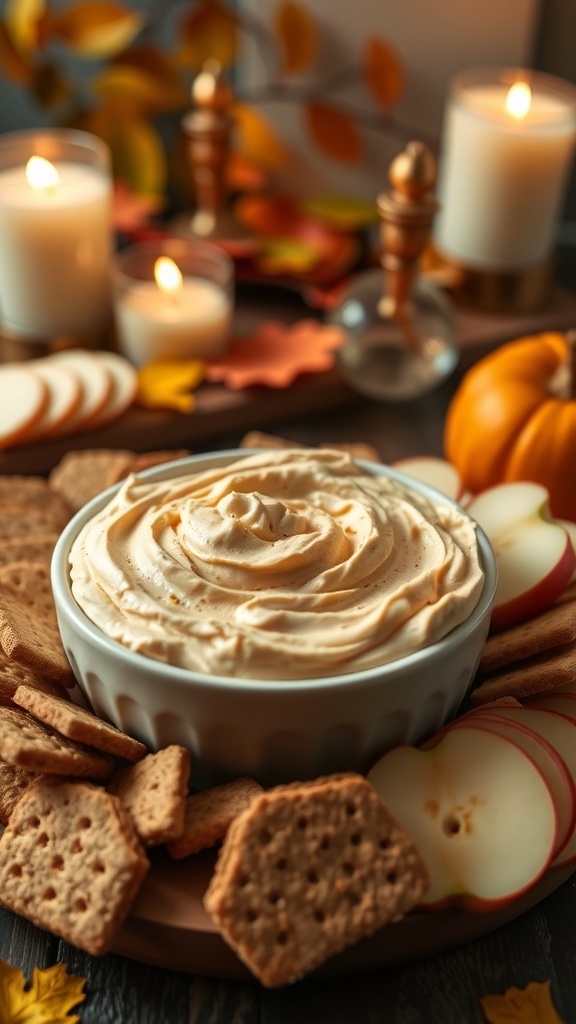
Fall is the perfect time to enjoy cozy flavors, and this rich pumpkin spice fluff dip is a delightful treat. The creamy texture and warm spices make it a hit at gatherings. Picture a smooth, fluffy dip in a bowl, surrounded by crunchy graham crackers and fresh apple slices. The warm colors of autumn leaves and flickering candles in the background create a lovely setting for sharing this tasty snack.
This dip is not only easy to make but also a crowd-pleaser. It’s perfect for parties, family gatherings, or just a cozy night in. The combination of pumpkin, cream cheese, and spices brings the essence of fall right to your table. Grab your favorite dippers and get ready to enjoy!
Ingredients
- 1 cup pumpkin puree
- 8 oz cream cheese, softened
- 1 cup powdered sugar
- 1 teaspoon vanilla extract
- 1 teaspoon pumpkin pie spice
- 1/2 teaspoon cinnamon
- 1 cup whipped topping
- Graham crackers and apple slices for serving
Instructions
- In a mixing bowl, beat together the softened cream cheese and pumpkin puree until smooth.
- Add the powdered sugar, vanilla extract, pumpkin pie spice, and cinnamon. Mix until well combined.
- Gently fold in the whipped topping until the mixture is light and fluffy.
- Transfer the dip to a serving bowl and chill in the refrigerator for at least 30 minutes.
- Serve with graham crackers and apple slices for dipping. Enjoy!
No-Bake Chocolate Pumpkin Pie
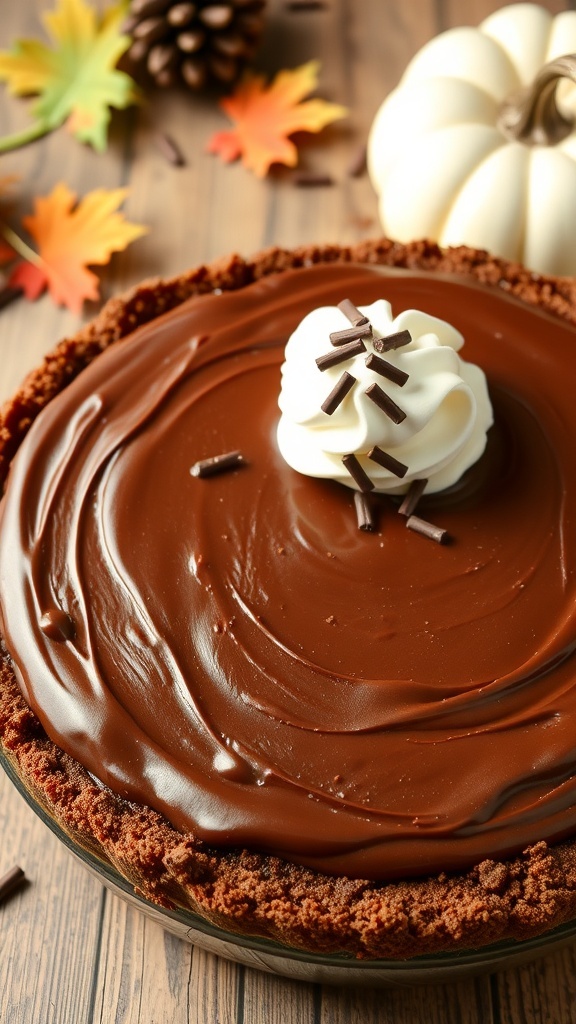
This No-Bake Chocolate Pumpkin Pie is a delightful treat for the fall season. The rich chocolate layer sits atop a creamy pumpkin filling, all nestled in a crunchy graham cracker crust. It’s perfect for gatherings or a cozy night in. The pie is topped with whipped cream and chocolate shavings, making it as pretty as it is delicious.
To make this pie, you’ll need a few simple ingredients. The combination of chocolate and pumpkin creates a unique flavor that everyone will love. Plus, there’s no baking involved, so it’s quick and easy to prepare!
Ingredients
- 1 ½ cups graham cracker crumbs
- ½ cup unsalted butter, melted
- ¼ cup granulated sugar
- 1 cup pumpkin puree
- 1 cup cream cheese, softened
- 1 cup powdered sugar
- 1 teaspoon vanilla extract
- 1 cup heavy whipping cream
- 1 cup semi-sweet chocolate chips
- Chocolate shavings for garnish
Instructions
- Prepare the Crust: In a bowl, mix graham cracker crumbs, melted butter, and granulated sugar. Press the mixture into the bottom and sides of a pie dish. Chill in the fridge for 30 minutes.
- Make the Pumpkin Filling: In a large bowl, combine pumpkin puree, cream cheese, powdered sugar, and vanilla extract. Mix until smooth and creamy.
- Whip the Cream: In another bowl, whip the heavy cream until stiff peaks form. Gently fold the whipped cream into the pumpkin mixture until well combined.
- Layer the Pie: Pour the pumpkin filling into the chilled crust. Smooth the top with a spatula.
- Melt the Chocolate: In a microwave-safe bowl, melt the chocolate chips in 30-second intervals, stirring until smooth. Pour the melted chocolate over the pumpkin layer and spread evenly.
- Chill: Refrigerate the pie for at least 4 hours or until set. Before serving, top with whipped cream and chocolate shavings.
Delicious No-Bake Oreo Pumpkin Truffles
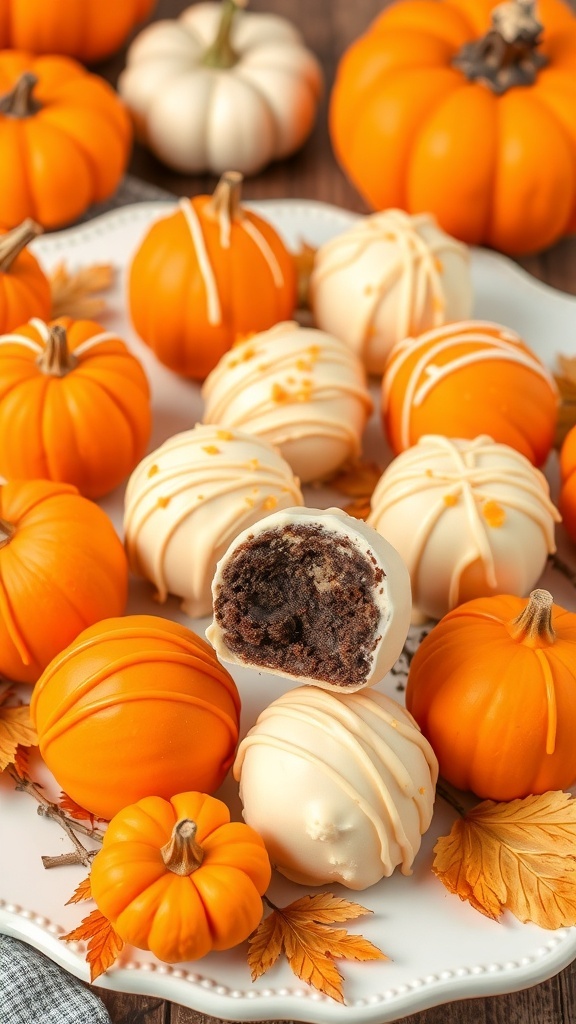
Fall is the perfect time to enjoy cozy treats, and these No-Bake Oreo Pumpkin Truffles are a delightful addition to any gathering. The image showcases these adorable truffles, resembling little pumpkins, nestled among real pumpkins and autumn leaves. Their vibrant orange color and creamy white coating make them not just tasty but also visually appealing.
Making these truffles is simple and fun. You start with crushed Oreo cookies mixed with cream cheese, then shape them into balls. After chilling, dip them in orange candy melts and drizzle with white chocolate for that pumpkin look. They are perfect for parties or just a sweet snack at home.
Ingredients
- 1 package Oreo cookies (about 15-18 cookies)
- 8 oz cream cheese, softened
- 1 cup orange candy melts
- 1/2 cup white chocolate chips
- Sprinkles for decoration (optional)
Instructions
- Crush the Oreo cookies in a food processor until fine crumbs form.
- In a bowl, mix the crushed cookies with softened cream cheese until well combined.
- Shape the mixture into small balls and place them on a baking sheet lined with parchment paper.
- Chill the balls in the refrigerator for about 30 minutes.
- Melt the orange candy melts in a microwave-safe bowl, stirring until smooth.
- Dip each chilled ball into the melted candy, coating it completely. Place back on the parchment paper.
- Melt the white chocolate chips and drizzle over the orange-coated truffles for decoration.
- Add sprinkles if desired, and let the truffles set before serving.
Charming No-Bake Pecan Pie Bars
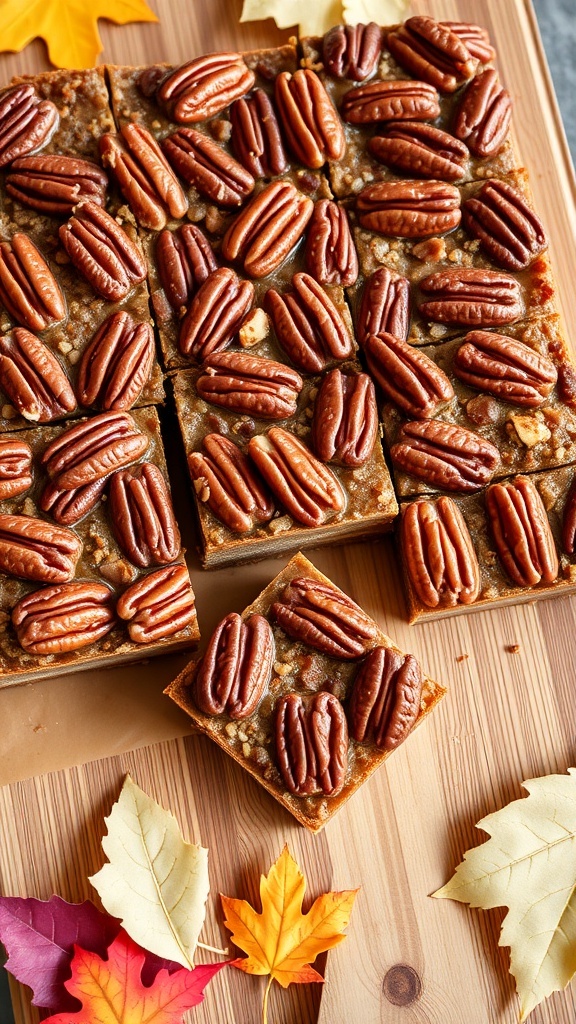
No-bake pecan pie bars are a delightful treat perfect for fall. They combine the rich, nutty flavor of pecans with a sweet, gooey filling, all on a simple crust. The image shows beautifully arranged bars topped with whole pecans, making them look as inviting as they taste.
These bars are easy to make and require no oven time, which is a bonus when the weather cools down. The golden pecans on top add a lovely crunch, while the filling is sweet and sticky, reminiscent of traditional pecan pie.
Gather your ingredients and get ready to whip up a batch of these charming bars that are sure to impress your friends and family.
Ingredients
- 1 ½ cups graham cracker crumbs
- ½ cup unsalted butter, melted
- ⅓ cup brown sugar
- 1 cup corn syrup
- 1 cup granulated sugar
- 4 large eggs
- 1 teaspoon vanilla extract
- 2 cups pecan halves
Instructions
- Prepare the Crust: In a bowl, mix graham cracker crumbs, melted butter, and brown sugar until well combined. Press the mixture into the bottom of a greased 9x13 inch pan.
- Make the Filling: In a separate bowl, whisk together corn syrup, granulated sugar, eggs, and vanilla extract until smooth. Stir in the pecan halves.
- Combine: Pour the filling over the crust, spreading it evenly.
- Chill: Refrigerate the bars for at least 4 hours or until set. This will help the filling firm up nicely.
- Serve: Once set, cut into squares and enjoy! These bars can be stored in the fridge for up to a week.
Refreshing No-Bake Apple Pie
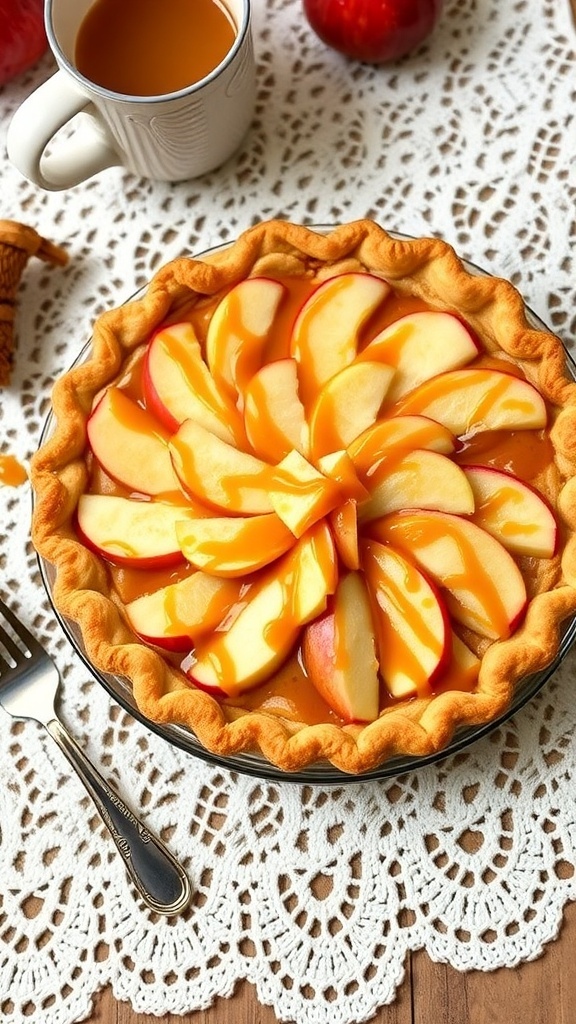
Fall is the perfect time to enjoy the flavors of apples, and this no-bake apple pie is a refreshing twist on a classic dessert. The image showcases a beautifully arranged pie filled with crisp apple slices, drizzled with caramel sauce, all resting in a flaky crust. It’s not just a treat for the taste buds but also a feast for the eyes.
This dessert is simple to make and doesn’t require any baking, making it ideal for busy days or when you want to keep your kitchen cool. The combination of sweet apples and rich caramel creates a delightful balance that everyone will love.
Gather your ingredients and get ready to whip up this easy no-bake apple pie. It’s perfect for gatherings, potlucks, or just a cozy night in with a warm cup of cider.
Ingredients
- 1 pre-made graham cracker crust
- 4 cups of thinly sliced apples (like Granny Smith or Honeycrisp)
- 1/2 cup granulated sugar
- 1/4 cup lemon juice
- 1/4 cup caramel sauce (plus extra for drizzling)
- 1 teaspoon cinnamon
- 1/4 cup whipped cream (optional, for serving)
Instructions
- Prepare the Apples: In a large bowl, combine the sliced apples, lemon juice, sugar, and cinnamon. Toss until the apples are evenly coated.
- Assemble the Pie: Spoon the apple mixture into the graham cracker crust, spreading it evenly. Drizzle caramel sauce over the top.
- Chill: Cover the pie with plastic wrap and refrigerate for at least 2 hours to allow the flavors to meld.
- Serve: Slice the pie and serve with a dollop of whipped cream and an extra drizzle of caramel if desired.
Festive Pumpkin Pie Rice Krispie Treats
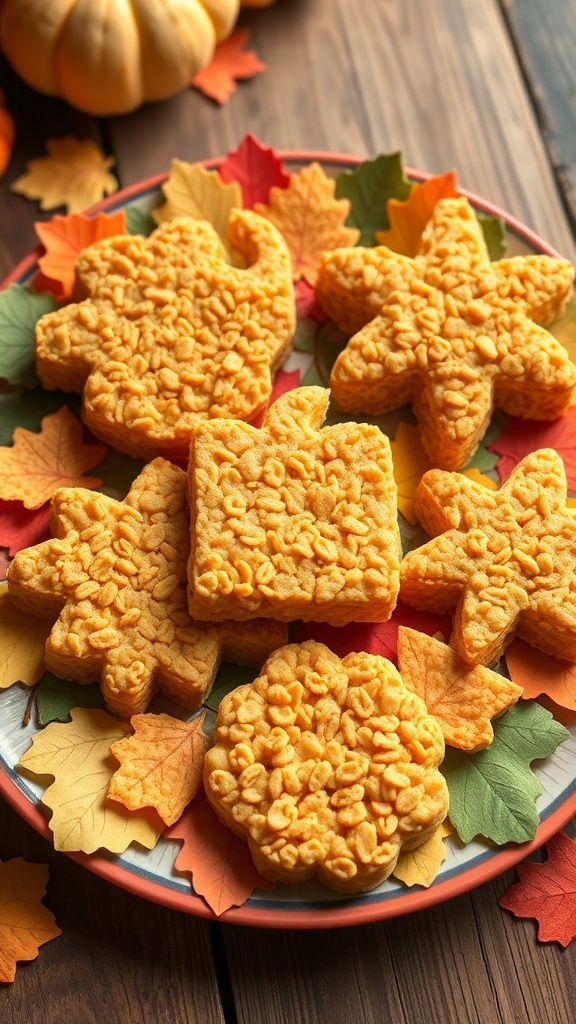
These Festive Pumpkin Pie Rice Krispie Treats are a fun twist on a classic dessert. They are shaped like autumn leaves and pumpkins, bringing a cheerful vibe to your fall gatherings. The bright orange color and playful shapes make them perfect for any celebration. Plus, they are super easy to make!
To create these treats, you’ll need just a few simple ingredients. The combination of marshmallows, butter, and Rice Krispies gives them that classic chewy texture. Adding pumpkin spice brings in that warm fall flavor, making these treats taste like a slice of pumpkin pie. They are sure to be a hit with both kids and adults!
Ingredients
- 3 tablespoons unsalted butter
- 1 package (10 oz) mini marshmallows
- 1 teaspoon pumpkin spice
- 6 cups Rice Krispies cereal
- Orange food coloring (optional)
- Cooking spray
Instructions
- Prepare the Pan: Grease a 9x13 inch baking dish with cooking spray.
- Melt the Butter: In a large saucepan, melt the butter over low heat. Add the mini marshmallows and stir until completely melted and smooth.
- Add Pumpkin Spice: Stir in the pumpkin spice and a few drops of orange food coloring if you want a vibrant color.
- Mix in Rice Krispies: Remove the saucepan from heat and add the Rice Krispies cereal. Stir until well coated.
- Shape the Treats: Pour the mixture into the prepared baking dish. Press it down evenly with a spatula. Let it cool for about 30 minutes.
- Cut into Shapes: Once cooled, use cookie cutters to cut out festive shapes. Enjoy your delicious treats!
Quick And Easy No-Bake Chocolate Mousse
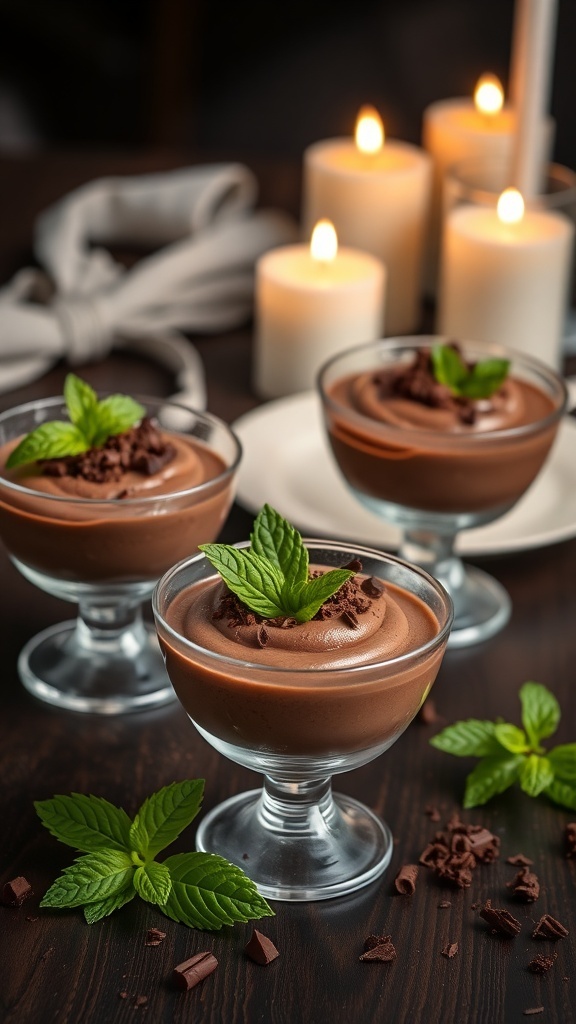
Chocolate mousse is a classic dessert that’s perfect for any occasion, especially during the cozy fall months. This no-bake version is simple to whip up and requires minimal ingredients, making it a go-to treat for gatherings or a sweet night in. The image showcases beautifully presented chocolate mousse cups, topped with fresh mint leaves and chocolate shavings, creating an inviting and elegant look.
To make this delightful dessert, you’ll need just a few ingredients. The rich chocolate flavor combined with the light, airy texture will surely impress anyone who tries it. Plus, the no-bake aspect means you can enjoy this treat without the hassle of turning on the oven!
Ingredients
- 1 cup heavy cream
- 1/2 cup semi-sweet chocolate chips
- 2 tablespoons sugar
- 1 teaspoon vanilla extract
- Fresh mint leaves for garnish
- Chocolate shavings for garnish
Instructions
- Melt the Chocolate: In a microwave-safe bowl, combine the chocolate chips and heat in 30-second intervals, stirring in between until smooth.
- Whip the Cream: In a separate bowl, whip the heavy cream, sugar, and vanilla extract until soft peaks form.
- Combine: Gently fold the melted chocolate into the whipped cream until fully incorporated. Be careful not to deflate the mixture.
- Chill: Spoon the mousse into serving cups and refrigerate for at least 1 hour to set.
- Serve: Before serving, top with fresh mint leaves and chocolate shavings for a lovely presentation.
Seasonal No-Bake Gingerbread Cookies

Fall is the perfect time to enjoy the warm, cozy flavors of gingerbread. These no-bake gingerbread cookies are a delightful treat that captures the essence of the season. The image shows beautifully decorated cookies in festive shapes like stars and snowflakes, all set against a backdrop of charming gingerbread houses. The vibrant colors and intricate designs make these cookies not just tasty but also a feast for the eyes.
Making these cookies is simple and fun. You can involve the whole family in decorating them with icing and sprinkles. They are perfect for holiday gatherings or just a cozy night in. Plus, there’s no baking involved, which means less mess and more time to enjoy!
Ingredients
- 2 cups all-purpose flour
- 1/2 cup brown sugar
- 1/2 cup unsweetened cocoa powder
- 1 teaspoon ground ginger
- 1 teaspoon ground cinnamon
- 1/2 teaspoon ground nutmeg
- 1/4 teaspoon salt
- 1/2 cup unsalted butter, melted
- 1/4 cup molasses
- 1/4 cup milk
- 1 cup powdered sugar (for icing)
- Food coloring (optional)
- Sprinkles (for decoration)
Instructions
- Mix Dry Ingredients: In a large bowl, whisk together flour, brown sugar, cocoa powder, ginger, cinnamon, nutmeg, and salt.
- Add Wet Ingredients: Pour in melted butter, molasses, and milk. Stir until a dough forms.
- Shape the Cookies: Roll the dough out on a floured surface to about 1/4 inch thick. Use cookie cutters to cut out shapes.
- Chill: Place the cut cookies on a baking sheet lined with parchment paper and chill in the refrigerator for at least 30 minutes.
- Prepare Icing: In a small bowl, mix powdered sugar with a little water to create a thick icing. Add food coloring if desired.
- Decorate: Once the cookies are chilled, use the icing to decorate them. Add sprinkles for a festive touch.
- Serve: Enjoy your no-bake gingerbread cookies with friends and family!
Savory No-Bake Cheesy Pumpkin Dip
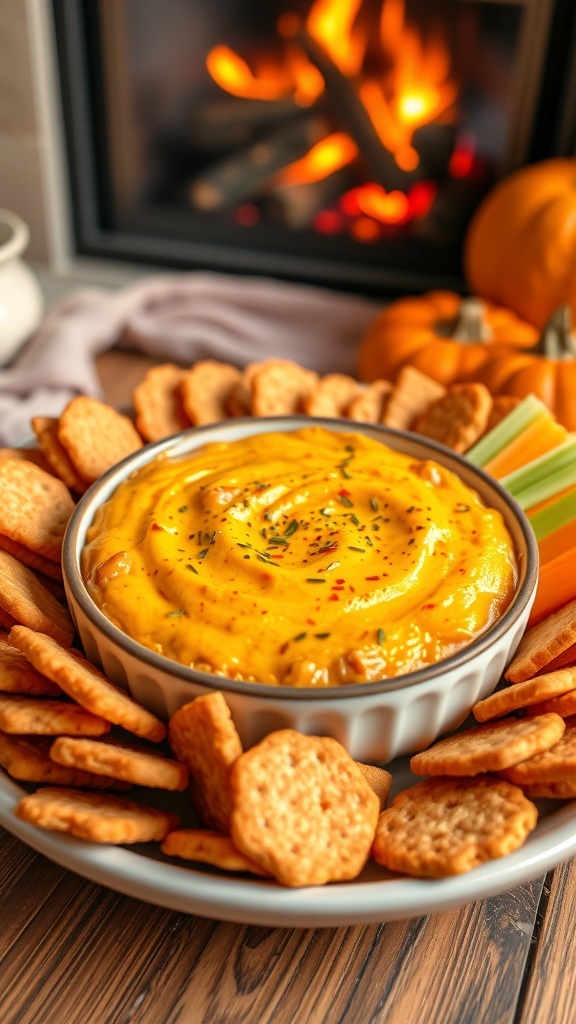
This savory no-bake cheesy pumpkin dip is perfect for fall gatherings. The warm tones of the dip, paired with the cozy ambiance of a crackling fireplace, create a welcoming vibe. The dip is creamy and rich, making it a delightful treat for any occasion.
Surrounded by crunchy crackers and fresh celery sticks, this dip invites everyone to dig in. The bright orange color of the pumpkin adds a festive touch, making it a standout dish on your table. Plus, it’s super easy to whip up, so you can spend more time enjoying the company of friends and family.
Ingredients
- 1 cup canned pumpkin puree
- 8 oz cream cheese, softened
- 1 cup shredded cheddar cheese
- 1/2 cup sour cream
- 1 teaspoon garlic powder
- 1 teaspoon onion powder
- 1 teaspoon smoked paprika
- Salt and pepper to taste
- Crackers and celery sticks for serving
Instructions
- In a mixing bowl, combine the pumpkin puree, softened cream cheese, and sour cream. Mix until smooth.
- Add in the shredded cheddar cheese, garlic powder, onion powder, smoked paprika, salt, and pepper. Stir until well combined.
- Taste and adjust seasoning if needed.
- Transfer the dip to a serving bowl and chill in the refrigerator for at least 30 minutes to let the flavors meld.
- Serve with crackers and celery sticks for dipping. Enjoy!
Delightful No-Bake Chia Seed Pudding

Chia seed pudding is a fantastic choice for a no-bake dessert, especially in the fall. This pudding is not only easy to make, but it also looks beautiful, just like the one in the image. The creamy layer of pudding topped with a rich pumpkin layer is perfect for the season.
The pudding is made by soaking chia seeds in milk, which creates a delightful texture. The pumpkin layer adds a seasonal twist, making it a great treat for autumn gatherings. You can see the vibrant orange of the pumpkin, which is a lovely nod to fall festivities.
This dessert is not just pretty; it’s packed with nutrients too! Chia seeds are full of fiber and omega-3 fatty acids, making this pudding a healthy option. Plus, it’s customizable! You can add your favorite nuts or seeds on top for extra crunch.
Let’s get to the recipe so you can whip up this delightful treat!
Ingredients
- 1/2 cup chia seeds
- 2 cups almond milk (or any milk of choice)
- 1/4 cup maple syrup (or honey)
- 1 teaspoon vanilla extract
- 1 cup pumpkin puree
- 1 teaspoon pumpkin spice
- 1/4 cup nuts (for topping)
Instructions
- Mix the chia seeds, almond milk, maple syrup, and vanilla extract in a bowl. Stir well to combine.
- Cover the bowl and refrigerate for at least 4 hours or overnight until the mixture thickens.
- In another bowl, mix the pumpkin puree with pumpkin spice until well combined.
- Once the chia pudding is ready, layer it in a jar or bowl with the pumpkin mixture.
- Top with your choice of nuts for added crunch.
- Serve chilled and enjoy!
Whimsical No-Bake Marshmallow Pumpkin Pops
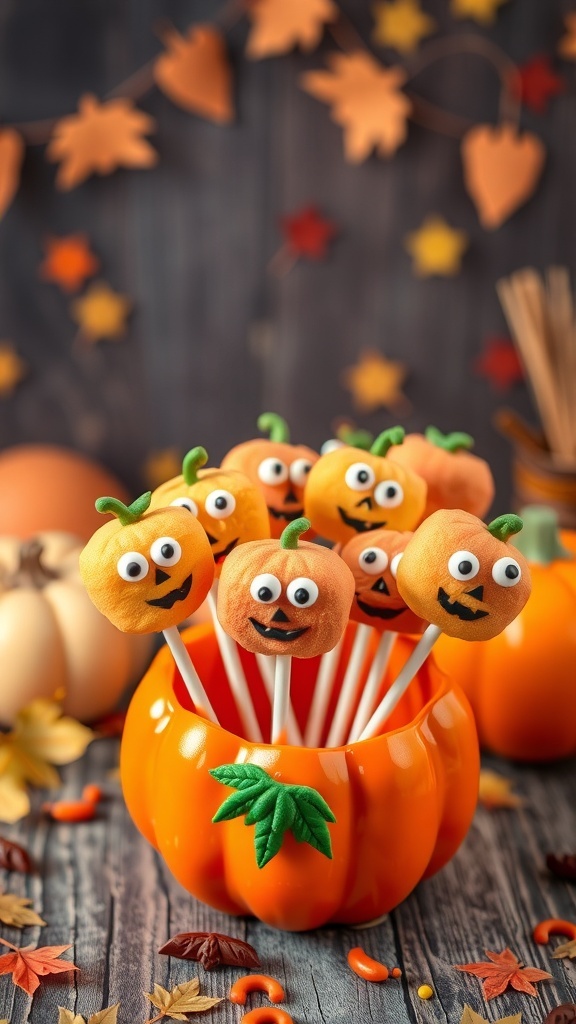
These Marshmallow Pumpkin Pops are a fun and easy treat that captures the spirit of fall. Picture a vibrant orange pumpkin pot filled with adorable marshmallow pops, each decorated with cute faces. The pops are made from fluffy marshmallows, coated in orange candy melts, and topped with green candy for the leaves. They’re perfect for parties or just a cozy night in.
Making these pops is simple and requires no baking. Kids will love helping out in the kitchen, making it a great family activity. Plus, they’re a delightful addition to any fall-themed gathering.
Ingredients
- 10 large marshmallows
- 1 cup orange candy melts
- 10 lollipop sticks
- Green candy melts or green fondant for leaves
- Edible eyes
- Black icing or edible marker for faces
Instructions
- Prepare the Marshmallows: Insert a lollipop stick into each marshmallow, making sure it goes in about halfway.
- Melt the Candy: In a microwave-safe bowl, melt the orange candy melts according to package instructions until smooth.
- Coat the Marshmallows: Dip each marshmallow into the melted candy, ensuring it’s fully coated. Allow excess to drip off.
- Add the Faces: While the coating is still wet, attach edible eyes and use black icing or an edible marker to draw on smiles and jack-o'-lantern faces.
- Make the Leaves: Melt the green candy melts and either drizzle them on top or shape them into leaves using fondant. Attach to the top of each pumpkin pop.
- Let Them Set: Place the pops upright in a foam block or a pumpkin pot to set. Allow them to cool completely before serving.
Gourmet No-Bake Chocolate Bark
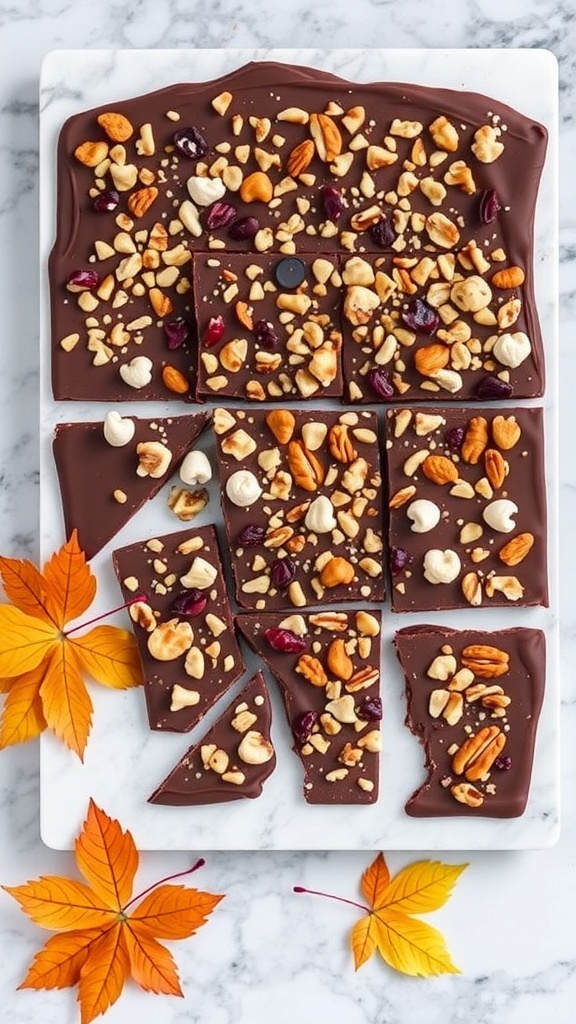
Fall is the perfect time to indulge in sweet treats that are easy to make. Gourmet no-bake chocolate bark is a delightful option that combines rich chocolate with a variety of toppings. This dessert is not only simple but also visually appealing, making it a great addition to any autumn gathering.
The image showcases a beautifully arranged chocolate bark, topped with an assortment of nuts and dried fruits. The dark chocolate base is sprinkled with crunchy nuts and vibrant cranberries, creating a festive look. The addition of colorful autumn leaves around the bark adds to the seasonal charm, making it an inviting treat for friends and family.
Making this chocolate bark is a breeze. You can customize it with your favorite toppings, whether you prefer nuts, dried fruits, or even a sprinkle of sea salt. It’s a fun way to get creative in the kitchen without the need for baking!
Ingredients
- 2 cups dark chocolate chips
- 1 cup mixed nuts (such as pecans, almonds, and cashews)
- 1/2 cup dried cranberries
- 1/4 cup white chocolate chips (optional)
- 1 teaspoon sea salt (optional)
Instructions
- Melt the Chocolate: In a microwave-safe bowl, melt the dark chocolate chips in 30-second intervals, stirring in between until smooth.
- Prepare the Baking Sheet: Line a baking sheet with parchment paper for easy removal.
- Spread the Chocolate: Pour the melted chocolate onto the prepared baking sheet and spread it evenly with a spatula.
- Add Toppings: Sprinkle the mixed nuts and dried cranberries over the melted chocolate. If using, add white chocolate chips and a sprinkle of sea salt on top.
- Chill: Place the baking sheet in the refrigerator for about 1-2 hours, or until the chocolate is fully set.
- Break into Pieces: Once set, remove the chocolate bark from the parchment paper and break it into pieces. Enjoy your gourmet no-bake chocolate bark!
Comments
Post a Comment